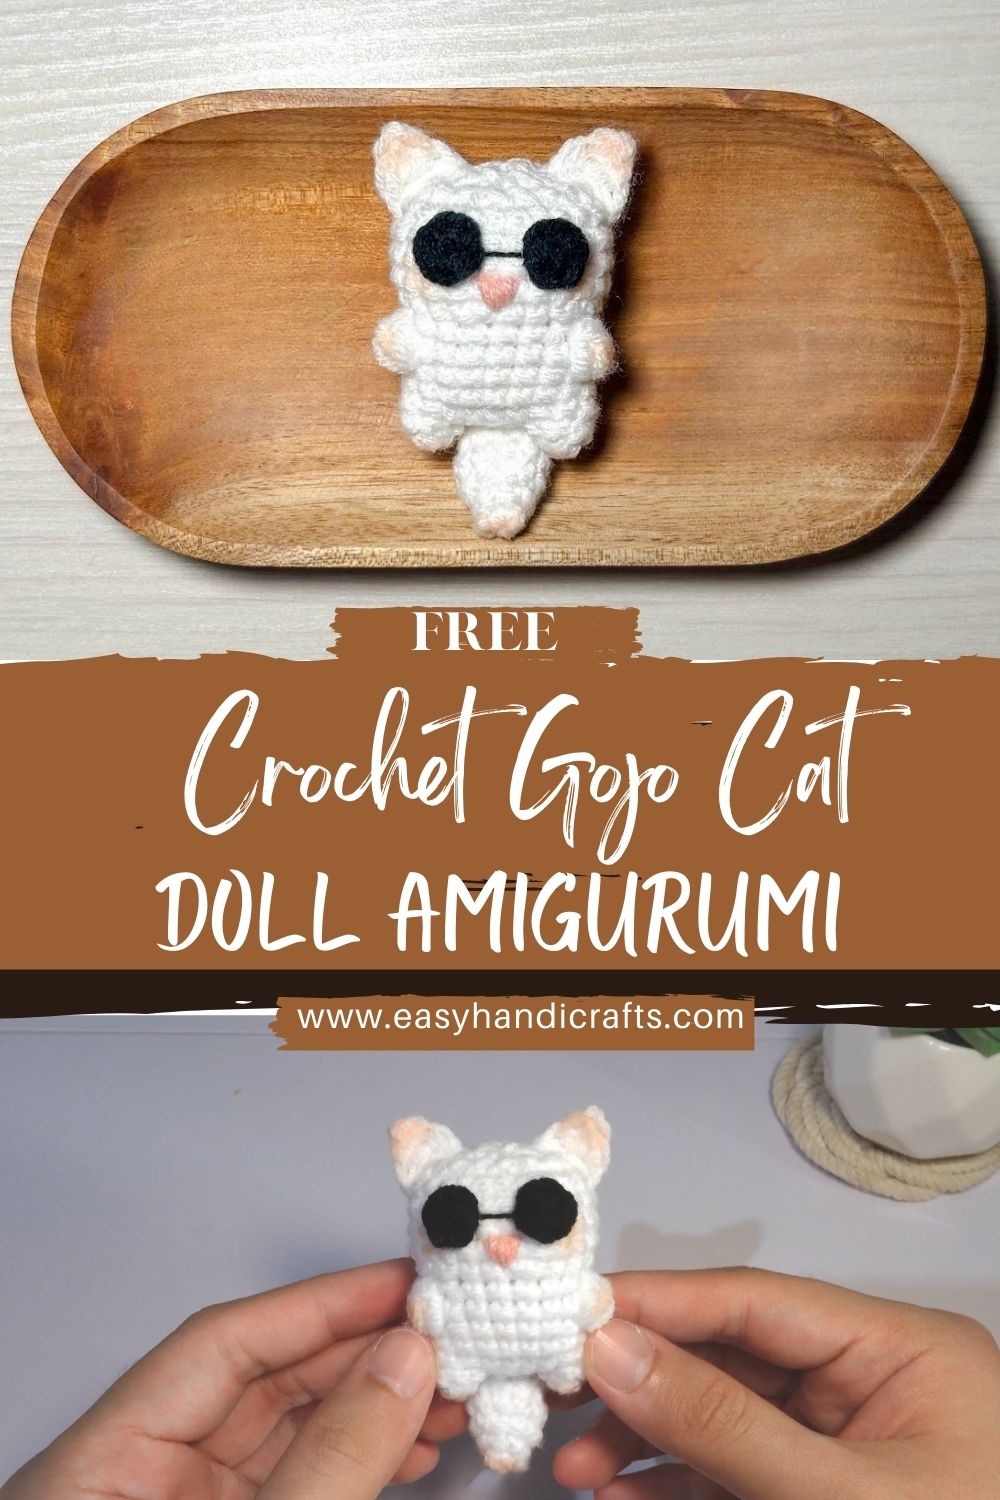
Crochet Gojo Cat Doll Amigurumi Pattern
A crochet Gojo Cat amigurumi doll is the perfect mix of cute cat energy and anime-inspired style, complete with round black glasses and a tiny pink nose. If you love anime crochet, amigurumi cat patterns, or quick handmade gifts, this project will be a favourite.
In this guide, you’ll learn how to plan and crochet a minimal, fluffy-tailed Gojo-inspired cat that looks adorable on any desk, shelf, or keychain.
A Gojo-inspired crochet cat is a small amigurumi cat doll that borrows the signature vibe of an iconic anime character, most noticeably through round black glasses and a clean, confident, minimalist look. This isn’t a character replica, it’s a cute, handmade cat design with anime influence and a cosy, craft aesthetic.
If you’re new to amigurumi, here’s a simple definition: Amigurumi is the Japanese art of crocheting small stuffed toys, usually made in tight rounds with simple shaping (increases and decreases). It’s popular worldwide because it’s relaxing, beginner-friendly once you learn the basics, and easy to customise.
This project is for:
- Beginners who want a clear, guided pattern approach (not confusing shorthand only)
- Intermediate crocheters who want a fast, social-media-friendly make
- Anime fans, cat lovers, and gift makers who want something cute but minimal
In this article, you’ll get:
- An SEO-friendly, beginner-focused walkthrough
- Materials and skill guidance
- A structured step-by-step pattern overview (head, body, ears, arms, tail, glasses, face)
- Assembly tips, common mistakes, customisation ideas, care instructions, and FAQs
Materials List (With Purpose)
- White yarn (main body): Creates the clean, minimal cat base (head, body, ears, arms, tail).
- Tip: DK or worsted weight is easiest to see stitches; plush yarn looks fluffier but is harder to count.
- Black yarn (glasses + optional eyes): For the signature round glasses and simple facial details.
- Light pink yarn (nose): For the small triangular nose (embroidered).
- Crochet hook (2.5–4.0 mm): Choose a hook slightly smaller than the yarn label for tight stitches that hold stuffing.
- Stuffing (fiberfill): Gives the doll its shape—especially the head and body.
- Yarn needle: For sewing pieces together and weaving in ends.
- Stitch marker: Keeps you from losing the start of each round (very important in amigurumi).
- Scissors: Cutting yarn cleanly.
- Optional glue (fabric glue): Helpful for securing glasses or tiny details if you don’t want visible stitches (use sparingly).
- Optional keychain ring: Turn the doll into a bag charm or keychain.
Finished Look Description (What You’re Making)
Your finished crocheted CrochetCat amigurumi doll will have a cute, compact silhouette:
- Head shape: Round and slightly oversized for an extra kawaii feel, with smooth shaping and minimal seams.
- Body proportions: Small, compact body that supports the big head; clean and simple like a tiny plush figure.
- Ears: Two small, upright cat ears—simple triangles that sit evenly on top.
- Arms: Tiny arms placed forward or slightly to the sides, giving a sweet” poseable” look (even if not wired).
- Tail: A soft, fluffy tail—slightly thicker than the arms, gently curved and attached low on the back.
- Glasses: Two round black frames connected across the nose area—instantly anime-inspired.
- Facial expression: Minimal and cute—small embroidered eyes (or tiny safety eyes) and a pink triangular nose.
- Texture and style: Handmade, clean stitches, minimal details, and an acosyy anime-inspired aesthetic that photographs beautifully.
Skill Level
Beginner-friendly (Beginner to Intermediate).
Even beginners can make this with patience. The shaping is simple and repetitive:
- Working in the round
- Single crocheC)
- Increase (INC) and Decrease (DEC)
- Basic sewing/assembly
- Simple embroidery
If you’ve made one basic amigurumi ball before, this will feel comfortable.
Crochet Abbreviations (Glossary)
- SC = Single Crochet (2 SC in the same stitch)
- DEC = Decrease (single crocheCrochettches together; invisible decrease recommended)
- MR = Magic Ring
- SL ST = Slip Stitch
- CH = Chain
- ST(s) = Stitch(es)
- Rnd / R = Round
- FO = Fasten off
- rep = repeat
Step-by-Step Pattern Overview (Clear Structure)
This is a guided overview written in a teaching style (so you understand the shaping). You can use the steps as a roadmap even if you adjust sizing.
Parts You’ll Make
- Head (white) – a round ball shape with increasing rounds, then decreasing rounds.s
- Body (white) – a smaller, rounded shape, lightly stuffed
- Ears (white, make 2) – small triangles, not stuffed
- Arms (white, make 2) – tiny tubes or ovals, lightly stuffed or left soft
- Tail (white) – a thicker tube for a fluffy look, gently curved
- Glasses (black) – two crocheted rings and a small bridge (or embroidered/couching method)
- Nose embroidery (pink) – tiny triangle
- Assembly + face – attach parts symmetrically, then finish details
Detailed Pattern Style (Explanation-Based Instructions)
Below is a beginner-friendly” how to crochet each part” method. It’s intentionally written with guidance (not only raw stitch counts), so you understand what each section is doing.
A) Head (White)
Goal: A smooth, round head.
- Start with a Magic Ring (MR)
This creates a tight centre hole. Work your first set of SC into the ring and pull tight. - Increase the number of rounds to form a flat circle.
In amigurumi, a head begins like a circle. Each round adds stitches evenly,y so the circle expands without ruffling.- If your circle begins to wave, your tension may be loose (tighten and consider a smaller hook).
- Work a few even rounds to build height.
Once the circle is wide enough, you crochet several rounds without increasing. This turns the flat circle into a bowl, then into a ball. - Safety eyes (optional) before closing
If using safety eyes, insert them after the head has enough height, before the opening becomes too small. - Decrease rounds to close
Decreases remove stitches evenly, shaping the head into a sphere. - Stuff firmly as you go
Add stuffing in small pieces. Shape the head with your hand, keeping it round. Stop stuffing when it feels plush but not stretched. - Close neatly
When only a small opening remains, finish decreasing and weave the yarn end through the remaining front loops to close.
Pro shaping tip: Invisible decreases make the head look cleaner and more” “professional”” especially in photos.
B) Body (White)
Goal: A compact body that supports the head.
- Start with MR and increase to a small circle (smaller than the head).
- Crochet a couple of even rounds for height.
- Slightly decrease to taper the bottom so it sits nicely.
- Stuff lightly to medium—too firm can make it topple; too soft can make it slouch.
- Close and leave a long yarn tail for sewing the body to the head.
C) Ears (White, Make 2)
Goal: Small ears that look neat and not bulky.
- Crochet a small base (often a tiny ring with SC).
- Shape into a mini triangle by working short rows or small increases.
- Do not stuff.
- Flatten the base and leave a long tail for sewing.
Placement note: Small ears look cutest when placed slightly toward the outer top of the head—not too close together.
D) Arms (White, Make 2)
Goal: Tiny arms that add charm without complexity.
Option (simple tube arms):
- Start with MR (small stitch count).
- Work a few even rounds to make a short tube.
- Lightly stuff only the bottom, or leave it unstuffed for a soft look.
- Flatten and close the top; leave a sewing tail.
Pose tip: Sew the arms slightly forward to make the doll look like it’s holding its belly or waving.
E) Tail (White, Fluffy Look)
Goal: A soft, fluffy tail with a gentle curve.
- Start with MR and build a small circle.
- Work several even rounds to create length.
- Stuff lightly—just enough to keep shape.
- Optional: add a tiny increase near the base so it looks fuller than the arms.
- Sew it low on the back of the body and angle it slightly to one side for a cute silhouette.
If you want extra fluff, use:
- a brushed yarn, faux-fur yarn held together with your base yarn, or
- a fluffy” “eyelas”” yarn strand held along the tail only (advanced but adorable).
F) Stuffing (When and How Much)
- Head: firm, smooth sphere (most stuffing goes here)
- Body: medium firmness (supportive but not rock-hard)
- Arms/Ears: minimal or none
- Tail: light stuffing; keep it soft and flexible
G) Glasses (Black) – 2 Easy Methods
Method 1: Crochet Rings (Recommended for a clean look)
- Crochet two small rings (like minidoughnuts).
- You can start with a chain loop (CH 6–8, join) and crochet SC around the ring.
- Make a small bridge (a short chain strip) connecting the rings.
- Sew glasses onto the face with black yarn using tiny stitches around the edges.
Method 2: Embroidered/Couched Glasses (Fastest)
- Lay black yarn in a circle shape on the face.
- Use matching black thread/yarn to stitch it down with tiny tacking stitches.
- Repeat for the second circle and add a small bridge line.
Best beginner choice: Method 1 (crochet rings) is more stable and symmetrical.
H) Nose Embroidery (Pink Triangle)
- Thread light pink yarn or embroidery floss on a needle.
- Stitch a tiny triangle centred beneath the glasses’ bridge area.
- Keep it small—minimal features match the style.
Optional: Add a short vertical stitch under the nose for a simple mouth.
Assembly Tips (Make It Look Clean)
- Symmetry first: Pin ears, arms, and glasses before sewing. Look from the front and top.
- Ears: Place them evenly, slightly angled outward. If the head is very round, sew through a few stitches at the base of the ear for stability.
- Arms: Sewn at the upper sides of the body. Align them at the same height so the doll looks balanced.
- Glasses placement: Centre the glasses horizontally. The bridge should sit above the nose area.
- Stuffing balance: Too much stuffing at the bottom can push the head forward; keep the body modestly stuffed.
- Tail positioning: Attach low back. Angle slightly left or right for extra character and a softer silhouette.
- Hide seams: Use the” “sew, pull through, and tri”” method to bury yarn tails inside the doll.
Beginner Mistakes to Avoid (At Least 8)
- Using a hook that’s too large (creates gaps and visible stuffing).
- Forgetting the stitch marker and losing the start of rounds.
- Miscounting increases the number of rounds (the head becomes lumpy or uneven).
- Overstuffing the head so stitches stretch and show fiberfill.
- Understuffing the head so it looks wrinkled or collapses.
- Sewing ears unevenly (one higher or more forward than the other).
- Placing glasses too low (covering the nose and crowding the face).
- Pulling sewing yarn too tight (causes puckering around ears/arms).
- Skipping invisible decreases (regular decreases can look bumpy on smooth yarn).
- Not test-fitting the tail position (a tail placed too high can look awkward).
Customization Ideas (Creative + Practical)
- Keychain version: Make it smaller with thin yarn and add a keychain ring at the top of the head.
- Bigger plush: Use chunky yarn and a larger hook; keep stitches tight and embroider bigger glasses.
- Colour variations: Cream, light grey, or pale blue for a different” anime vibe”
- Blush cheeks: Add pink blush with embroidery or chalk pastel (sealed lightly).
- Sleepy eyes: Embroider curved closed eyes for a calm, relaxed expression.
- Sitting version: Flatten the lower body so it sits upright on a desk.
- Gift version: Add a tiny scarf or tag” “ade for you” and wrap in a clear gift box.
- Extra-fluffy tail: Use faux-fur yarn only for the tail, or gently brush acrylic yarn.
Why This Pattern is Special
This crocheted Catt amigurumi doll stands out because it’s:
- Cute and minimal (clean shapes, simple face, no clutter)
- Anime-inspired without being complicated or overly detailed
- Handmade aesthetic that looks great in photos and on shelves
- Social media friendly—the glasses and tiny pink nose instantly read as “character-inspire” and adorable
- Beginner-accessible because the form is mostly basic amigurumi shapes (ball head, small body, simple add-ons)
Target Audience (Who Will Love It)
- Anime fans who want themed crochet complex costume details
- Beginners learning amigurumi shaping and assembly
- Crochet lovers who enjoy small, satisfying projects
- Gift makers looking for a cute handmade present
- Cat lovers wwho can’t resista tiny plush feline
Care Instructions (Cleaning + Maintenance)
- Spot clean with mild soap and cool water; dab gently, don’t rub aggressively.
- If needed, hand-wash briefly in cool water (especially for acrylic/cotton yarn).
- Air dry flat on a towel; reshape the head and body while damp.
- Avoid high heat, dryers, and strong agitation (can distort stuffing and loosen embroidery).
- If it’s a keychain, keep it away from rough surfaces to protect the glass and stitching.
FAQ Section (At Least 8 FAQs)
Is a crochet Gojo Cat amigurumi doll beginner-friendly?
Yes. The shapes are simple (round head, compact body), and the details are minimal. It’ss a great early amigurumi project.
How long does it take crocheting crafters to finish? It takes 2–4 hours, depending on the yarn type, experience, and the level of detail in the glasses.
What yarn is best for this amigurumi cat?
For beginners, DK or worsted cotton/acrylic is easiest for stitch visibility. Plush yarn looks extra soft but makes counting harder.
How do I make the round black glasses?
You can crochet two small rings, connect them with a chain bridge, and then sew them on. Or you can couch black yarn into circles and stitch it down.
Can I turn it into a keychain?
Yes. Use lighter yarn for a smaller doll and add a strong loop at the top (chain loop or sewn ribbon) plus a keychain ring.
How do I resize the doll?
Use thicker yarn and a larger hook for a bigger doll, or thinner yarn for a smaller one. Keep stitches tight and scale glasses size to match.
Should I use safety eyes or embroidery?
Embroidery is safest for small children. Safety eyes are quick and neat, but should be used only for older users or decorative dolls.
How do I keep the doll from looking lumpy?
Stuff with small pieces, shape as you go, and use invisible decreases. Gently rolling the head in your hands also helps smooth it out.
How do I attach the glasses securely?
Sew them on with small stitches around the edges. If you prefer, add a tiny dot of fabric glue at the sides (optional) for extra hold.
Conclusion
A crochet Gojo Cat amigurumi doll is a fun, beginner-friendly way to blend cute minimal design with anime-inspired details. With a clean white body, tiny arms, a fluffy tail, and those signature round black glasses, this project is simple to make but full of personality. Take your time with the shaping and placement, and you’ll have a handmade plush that looks polished, giftable, and absolutely display-worthy.