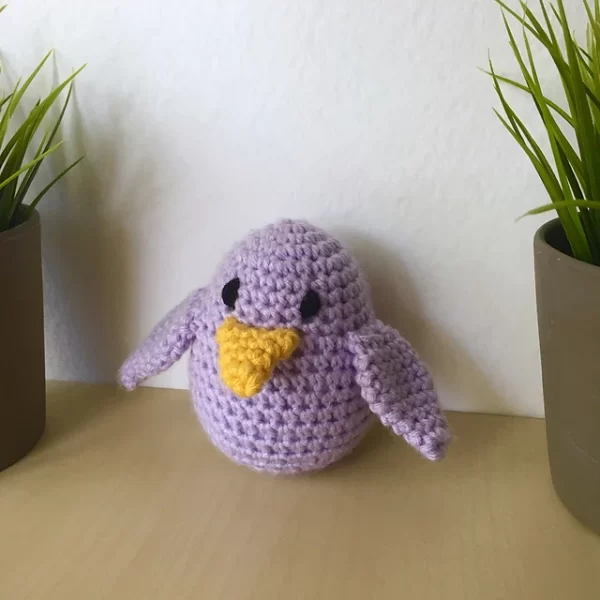
A sweet crochet little bird keychain is one of those tiny projects that feels instantly joyful. This mini crochet bird pattern is small, quick, and perfect for using up leftover yarn in bright colors.
Amigurumi is a simple crochet style that creates small stuffed shapes usually animals by working tight stitches in the round. First a flat circle is made, then it grows into a rounded form, and finally it becomes a cute character with a face and tiny features.

Crochet birds are especially popular for keychains because they’re compact and naturally “round,” which makes them easy to shape. Also, birds look adorable in almost any color combination, so each one can feel completely unique.
This crochet bird keychain pattern is beginner-friendly because it uses basic stitches and small parts. The body is a simple oval, the wings are quick little shapes, and the beak is just a tiny accent. Meanwhile, the finished bird makes a lovely handmade gift quick to crochet, easy to personalize, and fun to give.
Materials Needed
- Yarn (soft cotton or plush yarn):
- Body yarn: DK / Light Worsted (Category 3) cotton or acrylic, 15–20 g
- Wing yarn (optional contrasting shade): same weight, 3–5 g
- Beak yarn: orange or yellow, same weight, 1–2 g
- Optional: blush pink yarn/thread for cheeks, 1 g
- Crochet hook: 2.75 mm (use 3.0 mm if yarn is slightly thicker)
- Safety eyes (optional): 6 mm black safety eyes (round)
- Stuffing: polyester polyfill, 5–10 g
- Yarn needle: 1 tapestry needle
- Stitch marker: 1 removable marker
- Keychain supplies:
- Keyring: 25–30 mm round keyring
- Optional: lobster clasp, jump ring, or a short keychain chain
- Optional embellishments: tiny bow, small bead, or embroidery thread for a smile
Skill Level
Beginner
The stitches are simple, the shaping is gentle, and the pieces are small, which helps the project feel manageable.
Making Time (Overview)
Total estimated time: 1.5–2.5 hours
(The first bird may take closer to 2.5 hours, and later birds usually work up faster.)
Stitch Notes (quick and beginner-friendly)
- Work in continuous rounds (no joining), unless stated.
- Use a stitch marker to mark the first stitch of each round.
- Abbreviations: MR (magic ring), sc (single crochet), inc (2 sc in one stitch), dec (single crochet decrease).
Body (Main Shape)
Start with the bird’s body (oval base)
First, begin with a chain to form an oval, then crochet around both sides of the chain.
- Ch 6
- Next, sc in 2nd ch from hook, then sc in next 3 ch
- Meanwhile, 3 sc in last ch (this turns the oval)
- Then, on the other side of the chain, sc in next 3 ch
- Finally, 2 sc in the last ch (the first stitch area) (Total: 12 sts)
Add texture and shape (rounding up)
Next, continue in rounds to round out the body into a smooth “egg” shape.
Round 2: inc, sc 3, inc x3, sc 3, inc x2 (Total: 18 sts)
Round 3: sc 1, inc, sc 4, (sc 1, inc) x3, sc 4, (sc 1, inc) x2 (Total: 24 sts)
Rounds 4–6: sc around (Total: 24 sts)
Then, begin shaping the top slightly.
Round 7: (sc 2, dec) around (Total: 18 sts)
Round 8: sc around (Total: 18 sts)
Round 9: (sc 1, dec) around (Total: 12 sts)
Stuff the body (firm but not stretched)
Meanwhile, add stuffing in small pieces so the shape stays smooth. Next, press stuffing gently into the ends of the oval so both sides look even. Then, avoid overstuffing, because tight stuffing can stretch stitches and cause gaps.
Round 10: dec around (Total: 6 sts)
Finally, close the opening, fasten off, and weave the tail inside.
Making Time (Body): 35–55 minutes
Wings
Create small, pointed wings (make 2)
Next, crochet two simple wings that sit nicely on the sides.
Round 1: MR, 6 sc (6)
Round 2: (sc, inc) around (9)
Round 3: sc around (9)
Then, shape a little point: sl st, ch 1, sc in same st, hdc in next, dc in next, hdc in next, sc in next, sl st in next.
Finally, fasten off, leaving a long tail for sewing.
Later, flatten each wing gently so it looks neat and slightly curved.
Making Time (Wings): 15–25 minutes
Tail
Small triangular tail (make 1)
Afterwards, crochet a tiny triangle to give the bird a cute back detail.
- First, Ch 4
- Next, sc in 2nd ch from hook, then sc in next ch, then 3 sc in last ch
- Then, working back along the other side of the chain, sc in next ch, then sc in last ch area
- Finally, fasten off and leave a sewing tail.
If a sharper triangle is preferred, later add one small stitch at the tip while sewing to pinch it slightly.
Making Time (Tail): 8–15 minutes
Beak
Crochet a tiny beak (make 1)
Next, use a contrasting yarn (orange/yellow) for a tiny beak.
- First, Ch 2
- Next, 3 sc into the 2nd ch from hook
- Then, fasten off, leaving a short tail for sewing.
Alternatively, the beak can be embroidered as a small triangle if an even simpler finish is preferred.
Making Time (Beak): 5–10 minutes
Face & Assembly
Add eyes (safety eyes or embroidery)
First, decide on eye style:
- Safety eyes (6 mm): place between Rounds 6 and 7, about 5–6 stitches apart.
- Embroidered eyes: stitch two small horizontal lines or tiny knots using black thread.
Meanwhile, if a softer look is desired, embroider a tiny curved smile under the beak area.
Sew pieces neatly and securely
Next, pin the parts in place before sewing:
- Beak: center it on the front, slightly below the eyes.
- Wings: place one on each side, slightly angled upward for a lively look.
- Tail: attach at the back, centered.
Then, sew using small, tight stitches, catching both the part and a few stitches on the body each time. After that, knot the yarn tail securely and weave it inside the body before trimming.
Attach the keychain ring
Finally, attach the keyring securely:
- Option A (strong and clean): crochet a small loop on top of the head.
- Insert hook through top stitches, pull up yarn, ch 8–10, then slip stitch back into the head to form a loop.
- Option B (simple): sew a short yarn loop through the top of the head and attach the keyring to that loop.
Beginner-friendly assembly tip:
First pin everything, next step back and check symmetry, and only then begin sewing this prevents “oops” moments later.
Special Features
- Texture: Soft, smooth crochet stitches with clear features wings, beak, and tail that stand out neatly.
- Expression: Cute face options, either safety eyes for sparkle or embroidery for a gentle look.
- Size: Small enough for a keychain, yet rounded enough to feel plush and satisfying to hold.
Sizing Tips
- Thinner yarn + smaller hook (2.0–2.5 mm): a tiny bird, great for minimalist keychains.
- DK yarn + 2.75–3.0 mm hook: a palm-sized mini bird with clear stitch definition.
- Plush yarn + larger hook (3.5–4.0 mm): a softer, fluffier bird, although details like the beak may need embroidery instead.
Meanwhile, always aim for tight stitches so stuffing stays hidden and the bird looks polished.
Finishing Tips
- Neat stitching: Keep tension steady, especially around the oval ends.
- Secure knots: Knot inside the body and weave through at least 6–8 stitches.
- Balanced stuffing: Add a little at a time, then shape with fingers for a smooth curve.
- Clean finish: Trim tails only after weaving them in well so the keychain stays durable.
Common Mistakes to Avoid
- Loose stitches:
First, switch to a smaller hook or tighten tension slightly. Next, keep stitches close and even. - Overstuffing the body:
Meanwhile, stop stuffing as soon as the body feels firm. If gaps appear, remove a small amount and reshape. - Incorrect placement of wings or tail:
Later, pin and check the bird from the front and side views before sewing. - Inconsistent stitch tension:
Finally, pause every round to confirm stitch size looks uniform small adjustments early save time later.
Variations & Customization Ideas
- Color themes: sunny yellow chick, pastel blue bird, pink “lovebird,” or multicolor scrap-yarn bird.
- Wing changes: larger wings for a “flappy” look, or smaller wings for a rounder chick style.
- Accessories: tiny bow, mini scarf, little hat, or a stitched heart on the tummy.
- Extra charm: add a small jingle bell inside (only for decorative use, not for children).
Tutor Suggestions
First, treat the body as practice for smooth amigurumi shaping once that oval looks good, everything else becomes easier. Next, focus on even stitches rather than speed, because neat tension is what makes small keychains look professional.
Meanwhile, if the first wing looks slightly different from the second, simply remake one wing right away small parts are quick and the improvement is worth it. Finally, keep experimenting with colors, because a tiny bird can look completely new with just a different beak shade or a contrasting wing.
Conclusion
A crochet little bird keychain is a quick, cheerful way to enjoy amigurumi without committing to a big project. First the rounded body comes together, next the wings and tail add personality, and finally the beak and face bring the whole bird to life.Later, try making a whole “flock” in different colors for gifts, party favors, or market stock. With a little practice, each amigurumi little bird becomes faster, neater, and even more adorable and that’s the best part of tiny crochet projects.