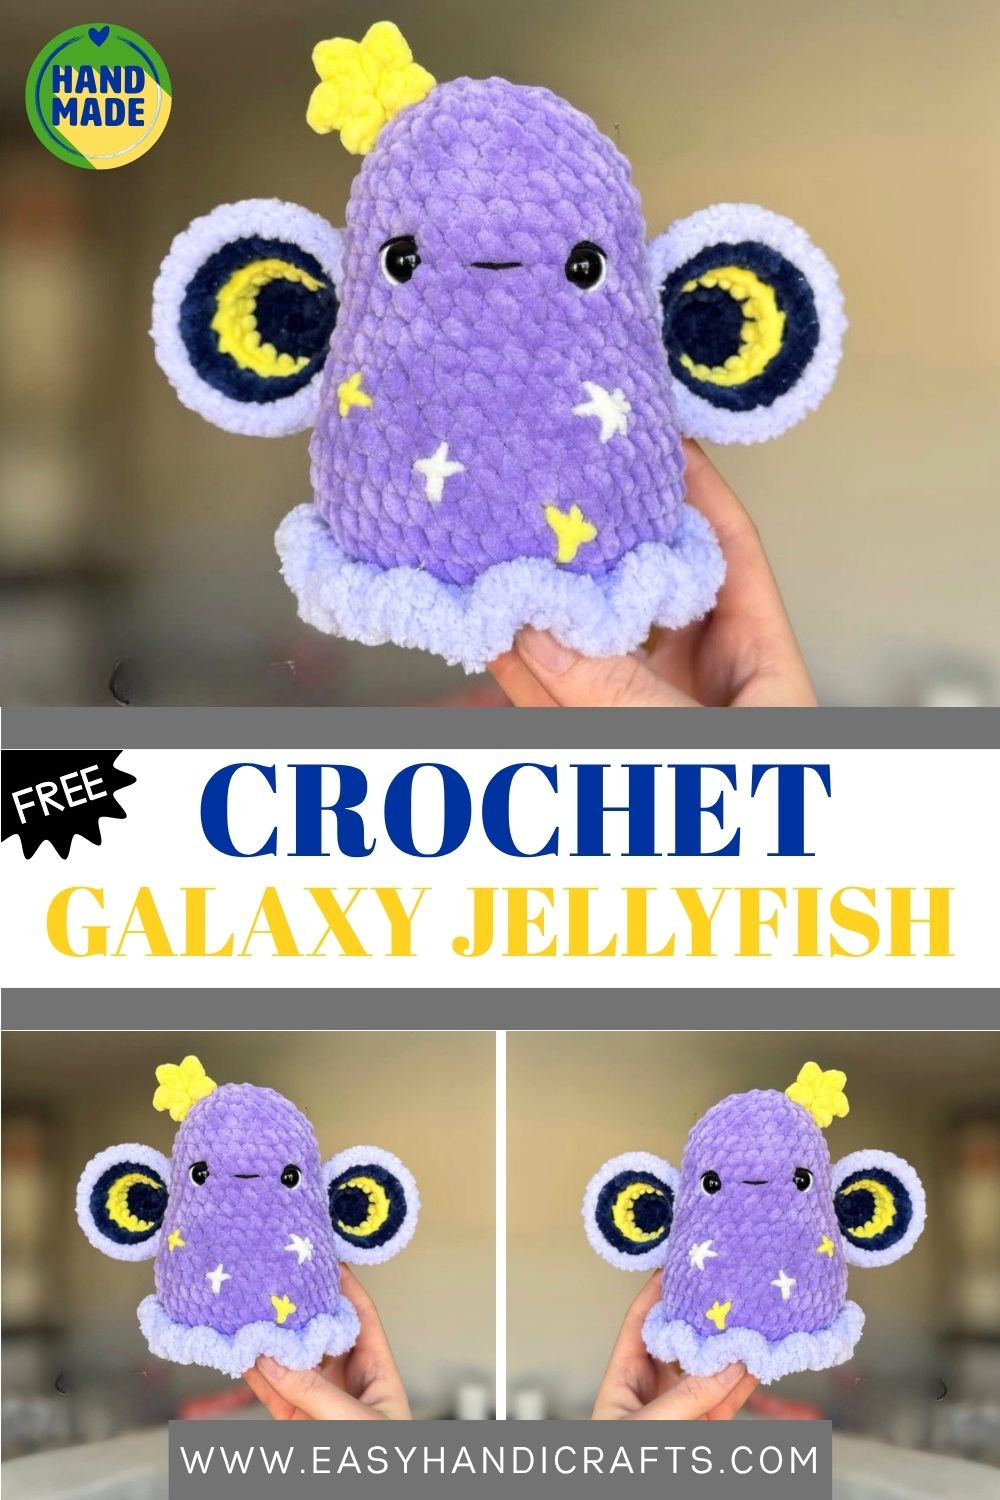
Kawaii Galaxy Jellyfish Crochet Plush | Moon Eyes & Stars | Unique Handmade Gift
She came from the galaxy, and she is NOT taking questions. This handmade crochet galaxy jellyfish has crescent moon eyes, a purple star-scattered body, a tiny yellow flower crown, and a ruffled lavender skirt, and she is everything. Who needs her in their life immediately?
Some crochet projects stop people mid-scroll. This kawaii galaxy jellyfish is exactly that kind of project. It combines a round, squishy purple body with a fluffy lavender cloud frill, delicate moon-shaped wings, a hand-embroidered starry belly, and a tiny crocheted star sitting right on top of the head. Every single detail works together to create something that feels genuinely magical rather than just cute. Furthermore, this pattern works entirely in continuous rounds with no joining required. As a result, the construction is smooth and beginner-friendly from start to finish. In addition, the fluffy yarn used for the frill and wing edging adds a soft, dreamy texture that contrasts beautifully with the structured body. Whether you are an experienced amigurumi maker looking for a show-stopping new project or a confident beginner ready for a creative challenge, this jellyfish delivers a finished result that is truly unlike anything else in your collection.
Skill Level
Intermediate. Basic amigurumi skills like magic ring, increase, and decrease are required. Additionally, color changes, front loop only rounds, and simple embroidery add creative variety throughout the pattern.
Materials You Will Need
Yarn:
- Purple yarn for the main body of the Himalaya Dolphin Baby works beautifully
- Lavender fluffy yarn for the cloud frill and wing edging, Alize Softy Plus recommended
- Dark blue yarn for the moon wings, Himalaya Dolphin Star
- Yellow yarn for the wing accent and little star
- White and black cotton thread for face embroidery
Other Supplies:
- Crochet hook — 4.0 mm (main hook)
- 4.5 mm hook for the yellow wing section
- 3.0 mm hook for the little star
- Safety eyes — 10 mm
- Sewing needle and scissors
- Polyfill stuffing
Abbreviations
- BLO — Back Loop Only
- CC — Color Change
- DEC — Decrease (invisible)
- DC — Double Crochet
- FLO — Front Loop Only
- FO — Fasten Off
- HDC — Half Double Crochet
- INC — Increase
- MR — Magic Ring
- R — Round
- SC — Single Crochet
- SLST — Slip Stitch
- TR — Treble Crochet
Pattern: Head and Body
Using purple yarn. Work in continuous rounds throughout.
R1: 8 sc in MR (8) R2: inc around (16) R3: (sc, inc) x8 (24) R4: (3sc, inc) x6 (30) R5: sc, inc, (4sc, inc) x5, 3sc (36) R6: (5sc, inc) x6 (42) R7: BLO sc around (42)
Place a stitch marker in the first front loop of R7. You will return to these loops later for the cloud frill.
R8–R10: sc around for 3 rounds (42) R11: (5sc, dec) x6 (36) R12–R13: sc around for 2 rounds (36) R14: (4sc, dec) x6 (30)
Begin stuffing at this point. Continue adding stuffing gradually as you work downward.
R15–R20: sc around for 6 rounds (30)
Add safety eyes between R17 and R18, approximately 5 stitches apart.
R21: (3sc, dec) x6 (24) R22: sc around (24) R23: (2sc, dec) x6 (18) R24: (sc, dec) x6 (12)
Finish stuffing firmly before continuing.
R25: dec around (6)
Slip stitch, fasten off, and sew the hole closed.
Embroider the mouth between the eyes over 2 stitches using black cotton thread. Furthermore, add white eye highlights and embroider a delicate eyelid above each eye for a dreamy, half-closed expression.
Pattern: Cloud Frill
Using lavender fluffy yarn. Work into the front loops of R7.
Return to the stitch marker placed in R7. Insert your hook into the front loop at that marker position.
R1: sc around into all FLO of R7 (42) R2: 3 sc in each stitch around (126)
Slip stitch to join. Fasten off and weave in ends.
Turn the jellyfish upside down to work this section comfortably. The fluffy frill will bloom outward naturally once completed, framing the body like a soft cloud skirt.
Pattern: Starry Sky Embroidery
Using white and yellow cotton thread
Embroider several small stars across the belly of the jellyfish between R15 and R20. Use simple straight stitch crosses or tiny V-shapes for each star. Furthermore, add a crescent moon shape using white thread for a complete galaxy scene across the body.
Pattern: Moon Wings Make 2
Starting with dark blue yarn. Use yellow yarn where underlined. Switch to a 4.5 mm hook for the yellow sections.
R1: 8 sc in MR (8) R2: inc around (16)
CC to yellow.
R3: 2sc, 2hdc, 1dc, 1tr, 1dc, 2hdc, 2sc, CC to blue, 5sc (16)
R4: BLO inc in next 11 stitches (yellow section), then sc in last 5 stitches through both loops (27)
R5: slst around (27)
Fasten off and hide all tails.
Important notes on wings: Use the larger 4.5 mm hook for the yellow section only. This reduces gaps in the fluffy yarn and keeps the moon shape clean. Additionally, gently push the yellow stitches outward after finishing to enhance the curved moon silhouette.
Adding the lavender edging: Insert hook into a stitch from R4 near the fasten-off point. SC around using lavender fluffy yarn. Slip stitch to join. Fasten off and leave a long tail for sewing.
Sew each wing onto the sides of the body across R12–R17, approximately 4–5 stitches behind the eyes.
Pattern: Little Star (Optional)
Using yellow yarn and a 3.0 mm hook
R1: Make a magic ring. (Ch2, sc in the second chain from hook, slst into MR) x5.
Pull the magic ring closed. Leave a long tail for sewing.
Sew the finished star on top of the jellyfish head between R22 and R23. It sits like a tiny crown and adds a finishing detail that makes the whole piece feel complete.
Customization and Variation Ideas
- First, swap the purple body for a deep midnight navy or a soft rose pink. Both create a completely different galaxy mood while using the same pattern.
- Additionally, make the cloud frill in white instead of lavender for a cumulus cloud jellyfish that looks like it floated straight out of a daydream.
- Moreover, embroider different constellations on the belly instead of scattered stars. Orion, the Big Dipper, or a simple crescent moon arrangement all work beautifully on the curved surface.
- Furthermore, add more stars of different sizes on top of the head instead of the single star for a more dramatic celestial crown effect.
- Also, try making miniature versions using fingering-weight yarn and a 2mm hook. A tiny galaxy jellyfish family displayed together on a shelf creates a stunning and cohesive handmade display.
- Finally, use glow-in-the-dark embroidery thread for the star embroidery. The effect in low light is genuinely magical and makes this jellyfish unlike anything else available, handmade or otherwise.
Common Mistakes to Avoid
- First, forgetting the stitch marker in R7: The front loops of R7 are essential for attaching the cloud frill later. Mark the first FLO immediately after completing this round, before moving on.
- Additionally, working R7 in both loops: This round must be worked in back loops only. Working both loops leaves no front loops available for the frill attachment.
- Also, rushing the wing shaping: The yellow section of the wings needs the larger hook to sit correctly. Using the same 4.0mm hook throughout causes the yellow stitches to pull tight and the moon shape to flatten.
- Furthermore, placing safety eyes after stuffing: Always add eyes before the body closes too much for your fingers to reach the backing comfortably. R17–18 is the correct placement point, and the window for access is small.
- Moreover, sewing both wings before checking symmetry: Pin both wings in place simultaneously and check from the front before sewing either one down. Asymmetric wings are the most noticeable finishing error on this piece.
- Finally, cutting embroidery tails too short: Leave generous tails on all cotton thread embroidery. Short tails on cotton thread work loose very quickly with handling and are nearly impossible to re-secure neatly.
Finishing Tips
- First, use a single strand of white cotton thread for the eye highlights. A single stitch placed at the upper corner of each eye creates the most natural and expressive kawaii look.
- Additionally, after attaching the cloud frill, fluff the lavender yarn gently with your fingers. This separates the fibers and gives the frill a fuller, more voluminous appearance.
- Moreover, when sewing the wings onto the body, anchor each wing at two points, top and bottom, rather than one central point. This keeps the wing flat against the body and prevents it from flopping forward.
- Furthermore, use the yarn tail from the little star to sew through the top of the head twice in different directions before trimming. The star is small and needs a very secure attachment to stay in place.
- Also, stuff the body slightly firmer than you think is necessary. Chunky fluffy yarn compresses with handling, and a firmly stuffed body maintains its round shape far longer over time.
- Finally, store finished jellyfish away from direct sunlight. Fluffy yarn fibers can mat and lose their soft texture with prolonged light exposure.
Gifting Ideas
- First, display the finished jellyfish inside a clear glass dome or cloche for a gift presentation that looks like a piece of art rather than a handmade toy.
- Additionally, pair the jellyfish with a small set of glow-in-the-dark star stickers for a galaxy-themed gift bundle that feels cohesive and imaginative.
- Moreover, these jellyfish make stunning birthday gifts for anyone who loves celestial aesthetics, cottagecore styling, or kawaii décor in their living space.
- Furthermore, make a matching set of two jellyfish in complementary colors, deep purple and soft teal, for example, and gift them together as a cosmic duo.
- Also, attach a small handwritten tag with the jellyfish’s name and a short poem about stars and dreams. This personal touch transforms a handmade plush into a genuine keepsake.
- Finally, these jellyfish photograph beautifully and sell consistently well on handmade marketplaces. The galaxy theme, fluffy frill, and embroidered details make each one feel unique and worth every stitch.
Conclusion
This kawaii galaxy jellyfish is one of those rare crochet projects that looks complicated but feels manageable from the very first round. The continuous round construction keeps the rhythm steady and satisfying. Furthermore, each new element, the cloud frill, the moon wings, the embroidered stars, adds a layer of beauty without demanding advanced skills. Therefore, take your time with the embroidery, mark your front loops carefully, and choose colors that speak to you. In addition, do not skip the little star on top; it is the detail that ties the entire galaxy theme together. In conclusion, this jellyfish is not just a plush. It is a handmade piece of sky, stitched together one round at a time.
Happy crocheting! Cannot wait to see your galaxy jellyfish float to life.