Meet Lili Froo Frog amigurumi crochet doll, a kawaii doll with a green frog hat, big round “frog eyes,” and a sweet red-and-green dress. This step-by-step pattern guide focuses on shaping and clean sewing, so your finished doll looks polished and gift-ready.
This small amigurumi doll with a big “cute factor,” Lili Froo, is going to steal your heart. This Lili Froo Frog amigurumi crochet doll tutorial is designed to be beginner-friendly while still teaching you the skills that make handmade dolls look professional, such as smooth shaping, balanced proportions, and tidy assembly.
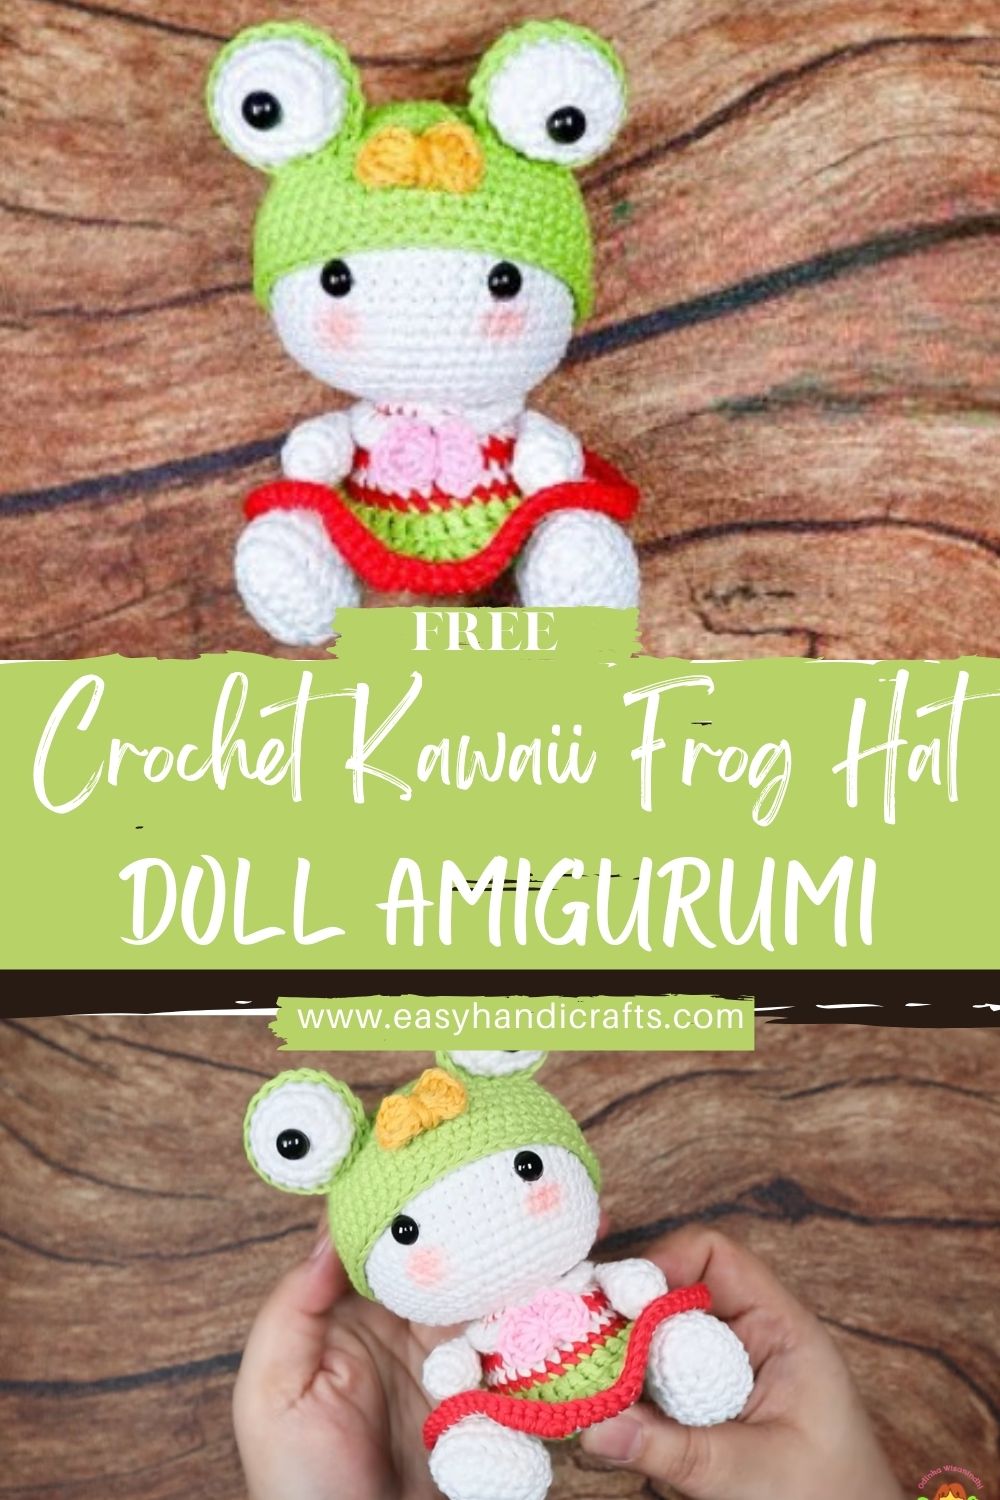
Lili Froo has a soft-toy look and a signature frog theme: a white doll body paired with a green frog hat topped with raised, round frog eyes. Her outfit is a cheerful red-and-green dress with optional trim for that extra kawaii finish. You can make her into a toy, a gift, room decor, or a handmade collectable for your shelf or craft fair table.
Short disclaimer: This is an inspired crochet guide for a frog-themed kawaii doll concept. It’s an original tutorial-style pattern explanation and not connected to any official character brand. Please feel free to personalize the colors and details to create your own version of Lili Froo.
Materials Needed
- Yarn (smooth cotton or acrylic recommended for clean stitches)
- Crochet hook sized slightly smaller than the yarn label suggests (helps prevent gaps)
- Polyester fiberfill stuffing
- Tapestry needle for sewing and weaving in ends
- Stitch markers (or a small scrap of yarn)
- Scissors
- Small black safety eyes (or black embroidery thread if you prefer embroidered eyes)
- Optional: pins for “pin-first” assembly
- Optional: blush/pink yarn for cheeks, fabric glue for tiny accents (use sparingly)
Yarn Colours and Tools
Suggested yarn colours (based on the design description):
- White: head + body base (doll skin/body)
- Green: frog hat + green outfit layer/trim
- Red: dress main layer
- Yellow: tiny nose detail (small accent)
- Black: safety eyes or embroidery thread for expression details
- Optional pink: cheeks (very light touch)
Helpful tools for a neat doll finish:
- Row counter (optional)
- Needle felting tool for blush (optional, advanced)
- Tweezers or a stuffing tool for shaping tiny areas
Colour inspiration note: The white body keeps Lili Froo looking bright and “plush,” while green instantly signals the frog theme. Red adds contrast so the outfit pops in photos (great if you’re sharing on Pinterest or gifting).
Skill Level
Beginner-friendly with some slightly tricky assembly.
You’ll mostly use basic amigurumi skills (single crochet in the round, increases, decreases). The most “advanced” part is placing and sewing pieces symmetrically—especially the frog hat eyes and the doll’s limbs.
Crochet Abbreviations / Terms
- MR: magic ring (magic circle)
- sc: single crochet
- inc: increase (2 sc in the same stitch)
- dec: decrease (invisible decrease recommended)
- sl st: slip stitch
- ch: chain
- rnd: round
- st(s): stitch(es)
- FO: fasten off
- BLO / FLO: back loop only / front loop only
Working style: Amigurumii is typically crocheted in a continuous spiral. Use a stitch marker to track your first stitch.
Finished Doll Description
Lili Froo is a small, kawaii-style amigurumi doll with:
- A big round head and small body (classic “kawaii proportions”)
- A clean white base that feels soft and plush
- Small black safety eyes for a sweet expression
- A tiny yellow nose detail that adds character without being too busy
- A green frog hat with two raised, round frog eyes on top (the signature feature)
- A red-and-green dress with optional trim for a layered look
- A cuddly, handmade aesthetic ideal for:
- Nursery decor
- Shelf collectibles
- Birthday gifts
- Crochet market makes
- Playtime dolls (choose embroidered eyes for very young children)
Step-by-Step Pattern Breakdown
A. Head
Goal: A smooth sphere with enough space for a cute face and hat.
- Start with a magic ring (MR).
Crochet your first round into the MR to create a small centre circle. - Round shaping (descriptive):
- Increase evenly around for several rounds to grow a flat circle into a rounded dome.
- Once the head is wide enough, work several rounds without increasing the height to keep the shape round.
- Begin closing by decreasing evenly around as the head curves inward.
- Eye placement:
- Decide which side is the “front” (the cleanest, most even side).
- Place the eyes symmetrically—typically at the front centre —leaving room below for the nose and a small expression.
- If using safety eyes, attach them before the opening becomes too small to reach inside comfortably.
- Stuffing tips:
- Start stuffing when the head is roughly 2/3 closed.
- Use small pieces of fiberfill to avoid lumps.
- Shape as you go: push stuffing outward toward the cheeks and forehead so the face looks smooth.
- Finish:
- Continue decreasing until closed.
- Fasten off, leaving a long tail for sewing (useful for attaching the head to the body or for extra reinforcement).
Beginner-friendly note: The head is usually the easiest and most satisfying part—once your sphere is smooth, the doll instantly looks “real.”
B. Body
Goal: A small doll body that keeps the kawaii big-head/small-body proportion.
- Small doll body shape and proportion:
- Start with an MR in white.
- Increase evenly around to create a small base—smaller than the head.
- Work several rounds without increasing, forming a compact, slightly rounded cylinder.
- Optionally, add a gentle shape change: a tiny waist or slight taper by decreasing subtly and then working a round even.
- Neck connection:
- Keep the top of the body slightly narrower than the head to create a “neck area.”
- You can either:
- Sew the head on directly to the body opening, or
- Add a short neck section by working a couple of tighter rounds (slight decreases), then fasten off.
- Stuffing:
- Stuff firmly so the dositssit nicely afeelseel plush.
- Avoid overstuffing at the top; it can make attaching the head harder.
- Finish:
- Fasten off, leaving a long tail for sewing.
Slightly tricky part: Keeping the head stable. The body needs firm stuffing and a strong seam at the neck.
C. Arms
Goal: Small, l-rounded arms that look soft and simple.
- Construction:
- Start with MR in white.
- Increase slightly to form a ti,ny rounded hand.
- Work several rounds without increasing to create a short tube.
- Light stuffing:
- For a soft-toy look, arms are usually best lightly stuffed or even left unstuffed; they sit flat against the body.
- If stuffing, focus on the “hand” end and keep the top soft.
- Finish:
- Flatten the opening and stitch it closed, or leave it open for sewing.
- Fasten off, leaving a long tail for sewing.
- Make two arms and keep them the same length (count rounds as you go).
D. Legs
Goal: Short legs that support a sitting pose.
- Short legs with a sitting shape:
- Start with an MR in white.
- Increase evenly to form a small foot base.
- Work a couple of rounds, seven, to keep the foot rounded.
- Continue into a short leg tube—keep it stubby for kawaii proportions.
- Stuffing:
- Lightly stuff, focusing more on the foot so it holds shape.
- The upper leg can be soft, er so it sits naturally.
- Finish:
- Fasten off with a long tail for sewing. Make two.
Balance tip: Before sewing, pin the legs and set the doll on a table. Adjust until it sits without tipping.
E. Frog Hat (Key Feature)
Goal: A green hat that fits snugly, plus two raised frog-eye bumps on top.
Green hat base
- Start with MR in green.
- Increase evenly around to create a flat circle that will become the hat top.
- Once the circle is wide enough to cover the doll’s head crown, work several rounds without increasing so the sides begin to curve downward like a cap.
- Try it on the head as you go. The best fit is snug but not tight.
Frog eyes (raised circles on top)
- Make two small round bumps:
- Start with MR in green.
- Increase evenly around for a couple of rounds to form small circles.
- Lightly stuff or leave flat, depending on the look you want:
- Lightly stuffed = more “3D frog eye” effect
- Unstuffed = flatter, simpler, beginner-friendly
- Optional: add a tiny black stitch or micro-circle to suggest a pupil, but keep it subtle since the doll already has facial eyes.
Attaching a hat to the head
- Position the frog eye bumps evenly spaced on top of the hat.
- Sew them firmly with small stitches around the base.
- Place the hat on the head and adjust it so the frog eyes sit centred and symmetrical when the doll faces forward.
- Once you love the placement, tack the hat onto the head with a few hidden stitches so it doesn’t slip off.
Slightly tricky part: Symmetry. Use pins to measure the distance between the frog’s eyes and the hat’s edge so they match.
F. Dress / Outfit
Goal: A red-and-green layered dress that fits the small body and looks decorative.
- Red and green layered look:
- Start the dress at the waist area, or crochet it separately as a small “skirt tube” that slides onto the body.
- Use red as the main dress colour to contrast with the white body.
- Add green as a border, waistband, or top trim to tie in the frog theme.
- Decorative border or trim:
Beginner-friendly trim ideas:- A simple single round in green at the hem
- A scalloped edge made by repeating small clusters (keep it minimal)
- A picot-like look using small chains between stitches (optional)
- Fit on body:
- Test fit as you go. The dress should be snug enough to stay in place, but not so tight that it distorts the stitches underneath.
- If making it removable, keep the top edge slightly stretchy.
- If sewing it on, pin it in place and stitch around the waist with small hidden stitches.
Beginner-friendly note: If clothing feels intimidating, keep it super simple: a basic red skirt with one green trim round still looks adorable.
G. Facial Details
Goal: A gentle kawaii face that matches the frog theme.
- Eyes:
- Small black safety eyes create a clean, toy-like finish.
- If making for a baby/toddler, consider embroidered eyes for safety.
- Nose:
- Add a tiny yellow nose detail:
- a small stitched dot,
- a tiny triangle, or
- a short horizontal stitch.
Keep it centred on the face, slightly below the eyes.
- Add a tiny yellow nose detail:
- Expression:
- A small curved smile (embroidered) looks sweet and calm.
- For extra kawaii, keep the mouth short and simple rather than wide.
H. Decorative Details
Goal: Cute finishing touches that make Lili Froo look “complete.”
- Collar, frill, or trim:
- Crochet a small collar in green (or white) and stitch it at the neckline.
- A tiny frill can be created by gently increasing the collar round to make waves.
- Tiny accents:
- Add a small bow stitch at the waist
- Add a little front panel line to the dress
- Add subtle blush cheeks with pink yarn (optional)
Keep it balanced: Lili Froo is already visually strong because of the frog hat—small details work best.
I. Final Assembly
Goal: Even attachments, balanced proportions, and a smooth, plush finish.
- Attach all parts evenly:
- Pin first, sew second. This is the biggest “secret” to a neat doll.
- Balance proportions:
- Head centred on body
- Arms at equal height
- Legs angled for sitting
- Hat aligned so frog eyes face forward
- Final shaping and finishing:
- Add a bit more stuffing if the head wobbles
- Smooth lumps by gently pressing and rolling the plush
- Weave ends inside the doll and trim neatly
Sewing & Assembly Guide
Because this doll is all about a polished, collectable finish, assembly matters just as much as crochet.
Recommended assembly order
- Finish head: insert safety eyes (if using), stuff, close
- Attach facial details: nose + smile (and blush if desired)
- Sew muzzle-free face check: make sure the expression is centred
- Sew head to body: use tight stitches all around the neck
- Attach legs: pin in a sitting pose, sew securely
- Attach arms: pin evenly, sew with small hidden stitches
- Dress/outfit: slip on and sew/tack in place (or keep removable)
- Assemble frog hat: sew frog eye bumps to hat top
- Attach hat: tack the hat to the head so it won’t shift
- Add collar/trim: final decorative touch, hide neck seam if needed
Sewing tips for a clean look
- Use long yarn tails for sewing (stronger seams, fewer knots).
- Sew with the same colour yarn as the piece you’re sewing onto.
- Work in good light and turn the doll often to check alignment.
- For a sturdy neck, sew through both the head and body stitches, then make a second pass around.
Customization Ideas
- Pastel Lili Froo: mint hat, blush dress, cream body
- Classic frog palette: bright green hat, yellow accents, red dress stays bold
- Change the outfit: swap the dress for overalls, a tiny cape, or a simple skirt
- Different hat expressions: add embroidered “frog cheeks” on the hat, or tiny nostrils
- Make it a set: create multiple dolls with different dress colours (great for gifts or markets)
Personalizing is encouraged—your Lili Froo can be sporty, fancy, sleepy, or extra colourful.
Beginner Tips
- Use a smaller hook to avoid gaps in the white yarn (white shows stuffing quickly).
- Practice invisible decreases for smoother curves.
- Stuff in tiny amounts and shape often—small dolls show lumps more easily.
- Pin everything first and take a quick photo—photos reveal uneven placement better than your eyes sometimes.
- If the hat fit feels off, adjust by adding/removing a plain round rather than forcing it.
Common Mistakes to Avoid
- Loose stitches on the head: stuffing will show through, especially with white yarn
- Eyes placed too high/low: the whole expression changes—mark first with pins
- Hat too tight: it will ride up, and the frog eyes won’t sit right
- Uneven frog eye bumps: measure spacing and pin carefully before sewing
- Overstuffed neck area: makes the head hard to seat properly
- Skipping a fit check for the dress: tiny clothes look best when tested as you go
Who This Project Is For
This Lili Froo Frog doll is perfect for:
- Beginners who want a guided, confidence-building doll project
- Intermediate crocheters who enjoy tidy assembly and clean details
- Gift makers (birthdays, holidays, “just because” handmade surprises)
- Collectable lovers who want cute shelf decor
- Crochet sellers looking for a charming themed doll idea (be sure to use your own photos and name)
Conclusion
The Lili Froo Frog amigurumi crochet doll is the kind of project that makes people stop and smile—with a big, kawaii head, a tiny body, and that unforgettable frog hat with round eyes. The crochet itself is approachable, and the real magic comes from careful sewing, balanced placement, and the playful contrast of the red-and-green outfit. Take your time, pin before you sew, and don’t hesitate to personalize the colours and details—your Lili Froo should feel like your own handmade creation.