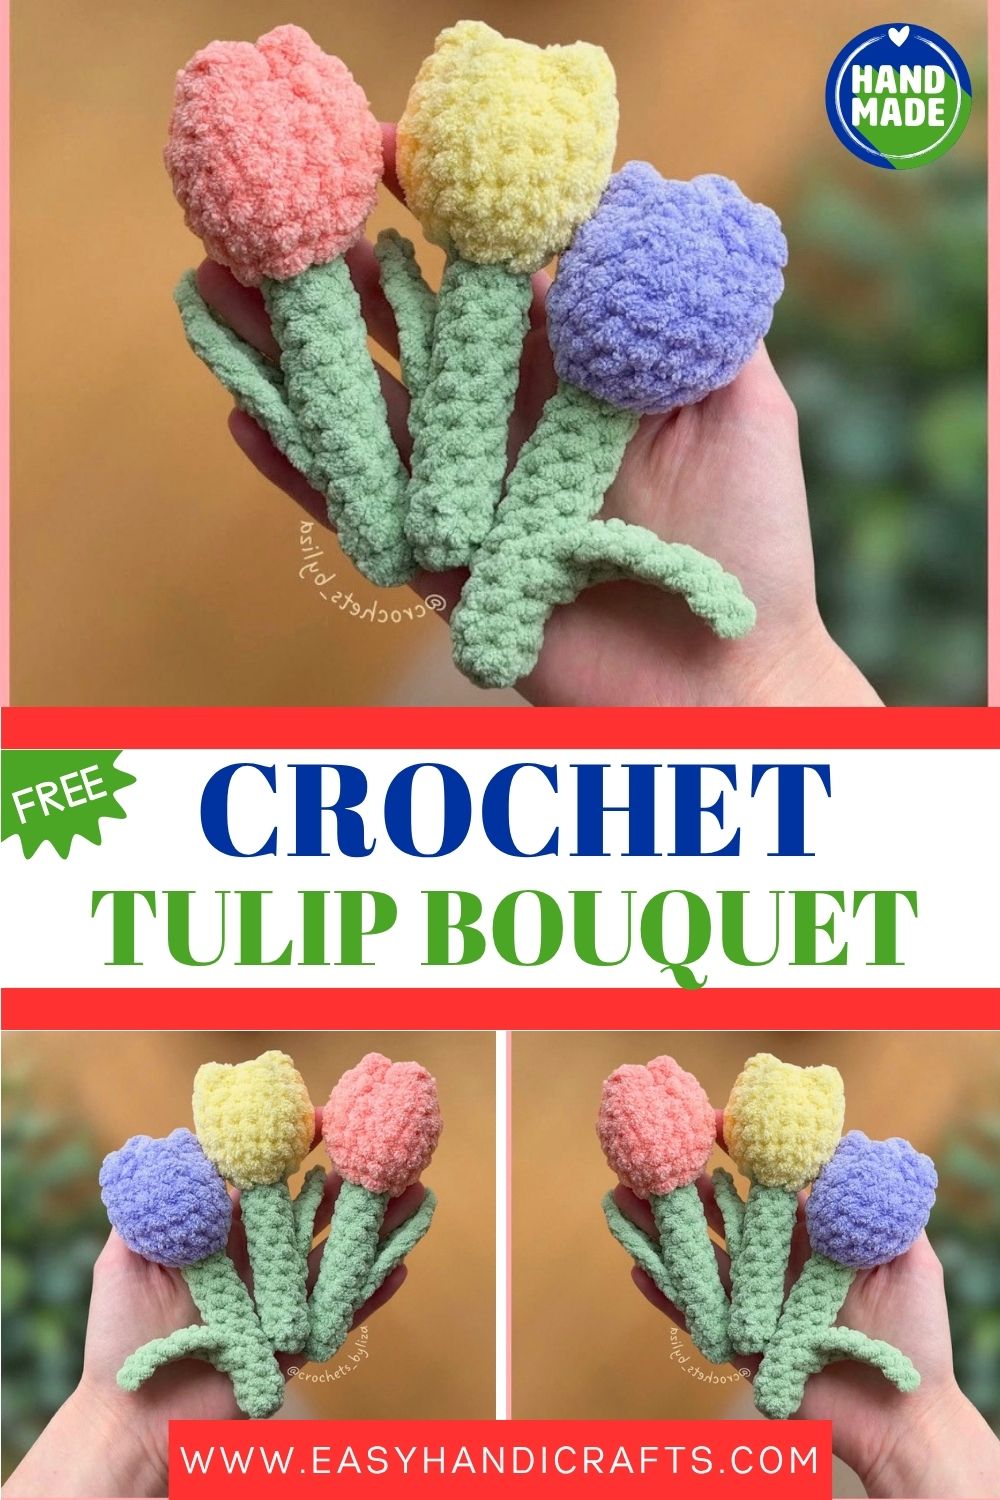
Crochet Tulip Bouquet | Pastel Handmade Flowers That Never Wilt | Gift for Her
Flowers that never die and always look this good? Yes please. These handmade crochet tulips, soft purple, pale yellow, and blush pink, are everything a bouquet should be, minus the part where they wilt in three days. Give someone something that actually lasts.
Fresh flowers are lovely. However, they fade within a week. These crochet tulips, on the other hand, last forever. Made with super bulky chenille yarn and a simple set of beginner-friendly stitches, each tulip comes together quickly and beautifully. Furthermore, the stem is worked in the round from the base up. Then the flower blooms naturally from a color change and a front loop increase round. As a result, the finished tulip has a surprisingly realistic silhouette that looks elegant on any shelf or in any vase. In addition, each leaf is worked separately on a foundation chain and sewn into place with just a few stitches. The shaping technique at the top of the flower, using a needle and yarn tail to create a gentle indentation, is one of the most satisfying finishing steps in all of crochet. Whether you make one tulip or a full bouquet of twelve in different pastel shades, this pattern rewards you with a handmade gift that is genuinely timeless.
Skill Level
Beginner to intermediate. If you know how to single crochet and work a magic ring, you can make this tulip. Additionally, the color change and front loop only round introduce useful new skills in a very manageable way.
Materials You Will Need
Yarn:
- Super bulky chenille yarn (weight 6) — Bernat Baby Blanket works beautifully
- Green for the stem and leaf
- Purple or any color you love for the flower
Other Supplies:
- Crochet hook — 5mm
- Tapestry needle
- Polyfill fiberfill stuffing
- Stitch markers
- Scissors
Skills Used in This Pattern
- Magic Ring
- Single Crochet (SC)
- Increase Stitch (INC)
- Half Double Crochet (HDC)
- Slip Stitch (SLST)
- Front Loop Only (FLO)
- Double Crochet (DC)
- Chain (CH)
- Working on the chain
- Changing yarn colors
Pattern: Stem and Flower
Starting with green yarn
Rnd 1: 6 sc in a magic ring (6)
Begin stuffing lightly at Rnd 3–4. Continue adding stuffing gradually as you work upward.
Rnd 2–11: sc in all 6 stitches for 10 rounds (6)
The stem should feel firm but not overstuffed. Therefore, add small amounts of fiberfill at a time rather than pushing in a large handful at once.
Switch to purple yarn (or your chosen flower color).
12: FLO inc in all 6 stitches (12)
13: (sc, inc) x6 (18)
14–18: sc in all 18 stitches for 5 rounds (18)
Fasten off, leaving a long tail for sewing.
Shaping the Tulip
This step transforms a simple cylinder into a beautiful tulip bloom. Furthermore, it requires no extra yarn or tools, just the tail you already have and a tapestry needle.
Step 1: Thread the tapestry needle with the yarn tail.
Step 2: Insert the needle into the stitch directly opposite your last stitch. Pull gently to create a small indentation at the top.
Step 3: Move to the next stitch beside it. Bring the needle out on the opposite side and pull gently again.
Step 4: Insert the needle on the left side of the tulip. Bring it out through the center to the opposite side.
Step 5: Repeat once more, tightening each time slightly until the tulip shape forms naturally.
Fasten off securely and weave in all ends.
Pattern: Leaf
Join green yarn to the stem at Rnd 4–5 using a slip stitch.
Chain 9, then turn.
Starting from the second chain from the hook, work: 2 slst, sc, hdc, 2 dc, sc, slst (8 stitches)
Fasten off and leave a tail for sewing.
Use the tapestry needle to sew the bottom of the leaf firmly to the stem. This secures the leaf flat against the green stem and prevents it from flopping away from the body of the flower.
Customization and Variation Ideas
- First, make a full bouquet of six or twelve tulips in different pastel colors. Soft pink, lavender, peach, and cream together create a breathtaking display.
- Additionally, try using variegated yarn for the flower section. The color shifts naturally through the rounds and creates a gradient petal effect without any extra work.
- Moreover, add a second leaf on the opposite side of the stem for a fuller, more realistic silhouette.
- Furthermore, wrap a group of finished tulips together with a satin ribbon and a sprig of dried eucalyptus for a bouquet that looks like a professional florist’s arrangement.
- Also, try making mini tulips using fingering-weight yarn and a 2mm hook. These tiny flowers are perfect for hair clips, brooch pins, or small gift toppers.
- Finally, experiment with the flower color change row. Starting the color switch one round earlier creates a longer stem and a slightly different tulip proportion that looks equally beautiful.
Common Mistakes to Avoid
- First, overstuffing the stem: The stem is only 6 stitches wide. Too much stuffing causes it to bulge unevenly between rounds. Add fiberfill gradually and stop when the stem feels smooth and firm.
- Additionally, missing the front loop on Rnd 12: The FLO increase round is what gives the flower its flared shape. Working into both loops on this round flattens the transition and loses the tulip silhouette entirely.
- Also, skipping the shaping step: The needle-and-yarn-tail shaping at the top is not optional. Without it, the flower looks like a plain cylinder rather than a tulip. It takes only two minutes and makes an enormous difference.
- Furthermore, attaching the leaf too high: Joining the leaf at Rnd 4–5 places it naturally along the lower stem. Attaching it higher makes the finished tulip look unbalanced and top-heavy.
- Moreover, cutting the yarn tail too short after the flower: Leave at least 15–20 cm of tail for the shaping step. A short tail is very difficult to thread and work with during the finishing process.
- Finally, working the leaf chain too tightly: A tight foundation chain makes the leaf curl inward rather than lying flat. Keep your tension relaxed from the very first chain stitch.
Finishing Tips
- First, block each finished tulip lightly with a damp cloth and allow it to air dry in an upright position. This smooths out any uneven tension and helps the flower hold its shape beautifully.
- Additionally, use a pencil or chopstick to push fiberfill into the very bottom of the stem before closing the magic ring. This ensures even firmness all the way through.
- Moreover, after sewing the leaf in place, run the needle through the base of the leaf one more time in the opposite direction. This double-securing stitch prevents the leaf from pulling away with handling.
- Furthermore, display finished tulips in a narrow-necked vase or bottle. The slim stem sits perfectly in a small opening and holds the flower upright without any additional support.
- Also, if the tulip top looks slightly uneven after shaping, insert the tapestry needle gently through the top and wiggle it slowly in a circular motion. This redistributes the stuffing and evens out the bloom.
- Finally, photograph finished tulips near a window in natural light. The chenille texture catches light beautifully and creates a soft, professional finish in photos.
Gifting Ideas
- First, bundle three tulips in coordinating colors and tie them with a pastel satin ribbon. This simple presentation looks like a boutique flower arrangement and requires no wrapping at all.
- Additionally, these tulips make a perfect Mother’s Day gift. They are personal, handmade, and carry the message that the flowers will never die.
- Moreover, pair a finished bouquet with a small bud vase or a ceramic pot. Together, they create a complete, ready-to-display gift that needs nothing added.
- Furthermore, make a single tulip in someone’s favorite color and attach it to the outside of a wrapped gift instead of a bow. It doubles as a gift topper and a keepsake.
- Also, these tulips sell beautifully at craft fairs and seasonal markets. Spring and Valentine’s Day are particularly strong selling seasons for handmade flower designs.
- Finally, make a tulip in each person’s birth month flower color and gift the set to a family member who loves meaningful, personalized, handmade pieces.
Conclusion
These crochet tulips are proof that the most meaningful gifts are not always the most complicated ones to make. Each flower is worked in simple rounds with basic stitches. Furthermore, the shaping step at the end is what transforms a humble crochet tube into something genuinely beautiful. Therefore, take your time with the needle shaping, keep your stem stuffing light, and choose colors that make you happy. In addition, do not stop at one; make a whole bouquet and watch the magic multiply with every tulip you finish. In conclusion, these flowers will never fade, never drop petals, and never need water. They will simply sit wherever you place them and look lovely forever.
Happy crocheting! Cannot wait to see your pastel bouquet bloom.