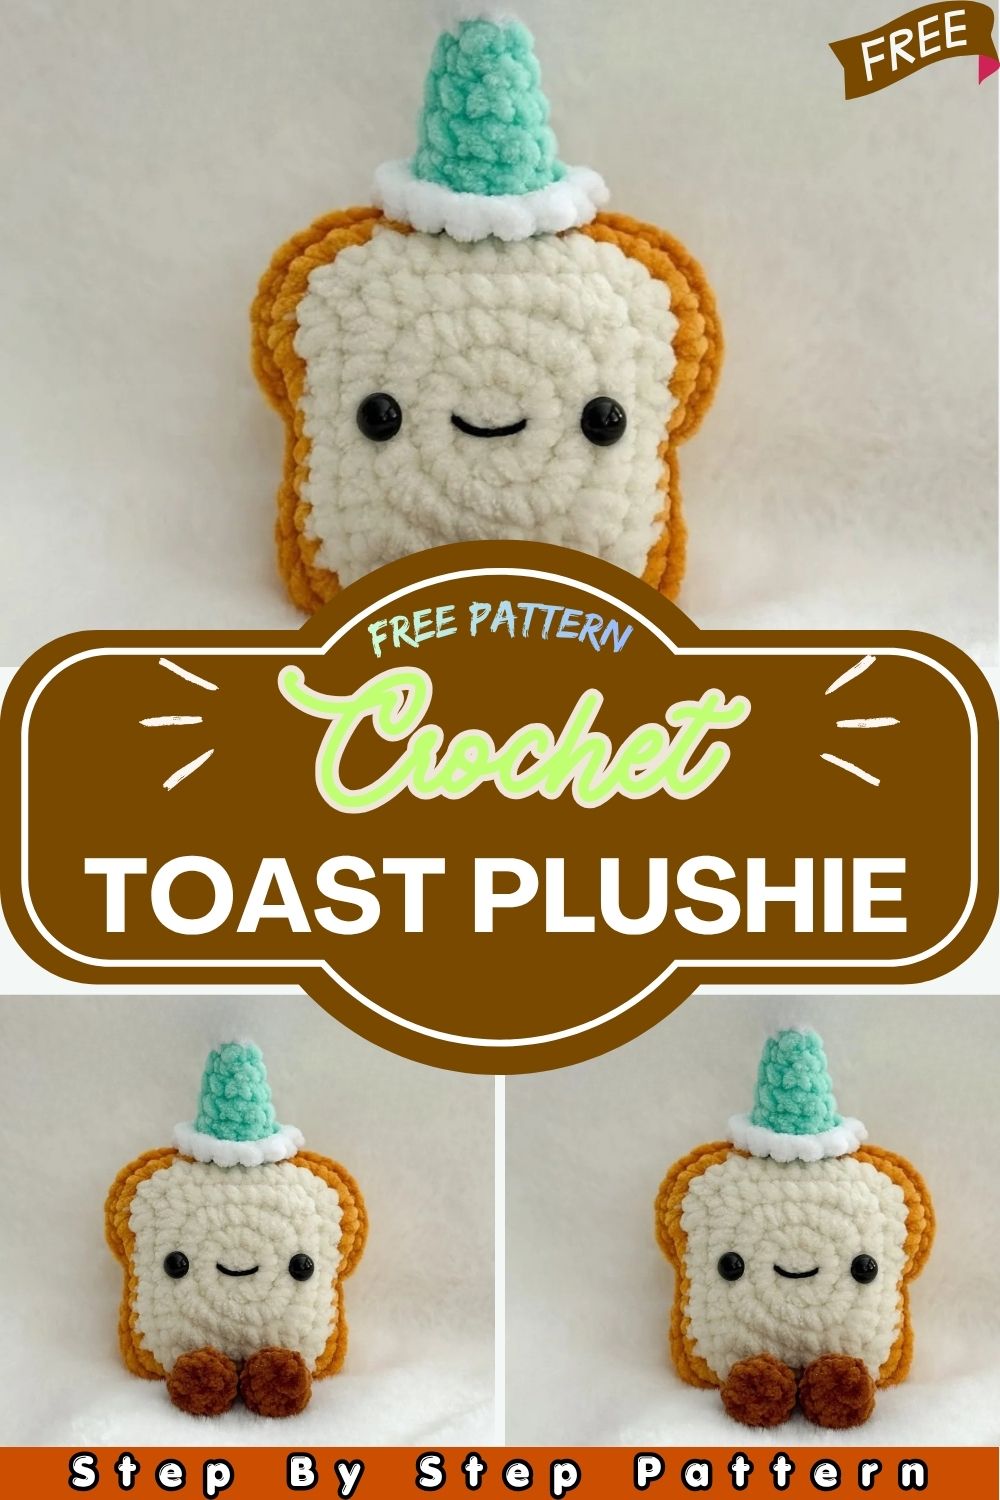
Cute Crochet Toast Plushie with Party Hat | Amigurumi Bread Stuffed Toy

Create your own Chubby Toasty Bread, an irresistibly cute amigurumi toast with tiny legs, a sweet smile, and optional accessories for extra personality. Easy to customize and fun to crochet, this pattern makes the perfect handmade gift, décor piece, or cheerful addition to your amigurumi collection.

Chubby Toasty Bread a charming, soft, and adorable crochet companion designed to bring warmth and personality to your handmade collection. Featuring a cute, chubby shape, tiny legs, an expressive face, and optional accessories like butter or a festive party hat, this pattern is perfect for crocheters who love creating playful and cozy amigurumi pieces. Whether you’re making it as a gift, décor item, key collectible, or simply for fun, this little toast is guaranteed to add a delightful touch to your crochet projects. Designed with beginner-friendly techniques and simple shaping, this pattern allows flexibility in yarn choice and customization, making every Toasty Bread uniquely yours.

Cute Crochet Toast Plushie with Party Hat Amigurumi Bread Stuffed Toy
Made By:free_world_crochet

Materials

Yarn Hook

  • You can use any size yarn and hook (size may vary)
  • Crochet hook: 5.5 mm
  • Yarn (size 6) in:
    • Cream
    • Brown
    • Dark Brown
  • Other yarn colors:
    • Yellow
    • White
    • Hat color
  • Cotton or acrylic yarn for smile

Accessories Tools

  • 10 mm eyes
  • Stitch markers
  • Yarn needle
  • Scissors
  • Stuffing
  • Glue (optional)

Abbreviations

  • R = Round or Row
  • sc = Single Crochet
  • MR = Magic Ring
  • inc = Increase
  • dec = Invisible Decrease
  • flo = Front Loop Only
  • hdc = Half Double Crochet
  • dc = Double Crochet
  • sl st = Slip Stitch
  • FO = Fasten Off
  • (#) = Stitch Count

CHUBBY TOASTY BREAD

Bread Slice (Make 2)

Start with cream yarn

Rounds

R1: 8sc in MR (8)

R2: (inc) ×8 (16)

R3: (2sc, 3sc in one st, sc) ×4 (24)

R4: (3sc, 3hdc in one st, 2sc) ×4 (32)

R5:
4sc, 3hdc in one st, 3sc, sl st, sc, hdc, 2hdc inc, 7hdc, 2hdc inc, hdc, sc, sl st, 4sc, 3hdc in one st, 2sc (40)

Color Change

Change the yarn color to brown.

Note: In the next round, mark the dec stitches with stitch markers.

R6:
5sc, 3sc in one st, 4sc, dec, 5inc, 7sc, 5inc, dec, 4sc, 3sc in one st, 4sc (52)

  • sl st
  • Invisible FO

Details

  • Add eyes between R3–R4
  • Sew a smile over R1 between the eyes
  • (Optional) Add blush
Legs (Make 2)

With dark brown yarn

Chain 3, starting from the 2nd chain from the hook

Rounds

R1:
sc, 3sc in the same st, working on the other side of the chain, inc (6)

R2:
(2sc, inc) ×2 (8)

R3:
sc, 3dec, sc (5)

Optional: Lightly stuff the foot. Do not stuff the leg.

R4:
5sc (5)

  • sl st
  • FO
  • Leave a long tail for sewing

Butter (Optional)

With yellow yarn

R1:
(sc, dc) ×4 in a MR (8)

  • Invisible FO
  • Leave a tail for sewing

Assembly

  • Sew or glue the butter to the toast
  • Position it according to your preference

BREAD

Birthday / Party Hat (Optional)

Make a birthday/party hat in any color of your choice.
Use red to turn it into a Santa hat.

Start with the hat color yarn

Rounds

R1: 4sc in MR (4)

R2: (sc, inc) ×2 (6)

R3: (2sc, inc) ×2 (8)

R4: (3sc, inc) ×2 (10)

R5: (4sc, inc) ×2 (12)

Color Change

Change the yarn color to white.

R6:
In FLO: (5sc, inc) ×2 (14)

  • sl st
  • Invisible FO
  • Leave a long tail for sewing to toast

Top Pom Pom (White Yarn)

R1:
5hdc in MR

  • sl st to join round
  • FO

Assembly

  • Sew the pom pom to the top of the hat
  • Position it over R1
  • Hide yarn ends neatly

Assembly

Step 1: Align the Bread Slices

  • Place both bread slices together with the wrong sides facing each other.
  • Use the marked stitch markers from R6 to align the slices properly.

 Join the Slices

  • On the right side (A), insert your hook through both loops of the dec stitch.
  • sl st to join the brown yarn.

 Work Around the Toast

  • In FLO: make sl st.
  • From A to B (top section):
    • Work sl st in FLO of both slices around the edges.

Starting Point: A ← START

  • From the decrease stitch, sl st through both loops from B to A.
  • Continue to sl st around the toast.

Step 4: Stuffing

  • Add stuffing before fully closing.
  • Avoid overstuffing so the toast stays flat like a slice of bread.

Step 5: Finish off

  • sl st to the first stitch.
  • FO and hide all yarn ends.

Optional Shaping

  • Lightly pinch the sides to shape the toast.

Final Assembly

  • Sew the legs to the bottom of the toast, leaving a small gap between them.

Conclusion

Your Chubby Toasty Bread is now complete, a tiny handmade companion full of charm and personality. Add optional details like butter, blush, or a festive hat to make it uniquely yours. Whether displayed as cute décor, gifted to someone special, or added to your amigurumi collection, this cozy little toast is sure to bring smiles. Happy crocheting!

Latest Posts

Leave a Reply

Your email address will not be published. Required fields are marked *