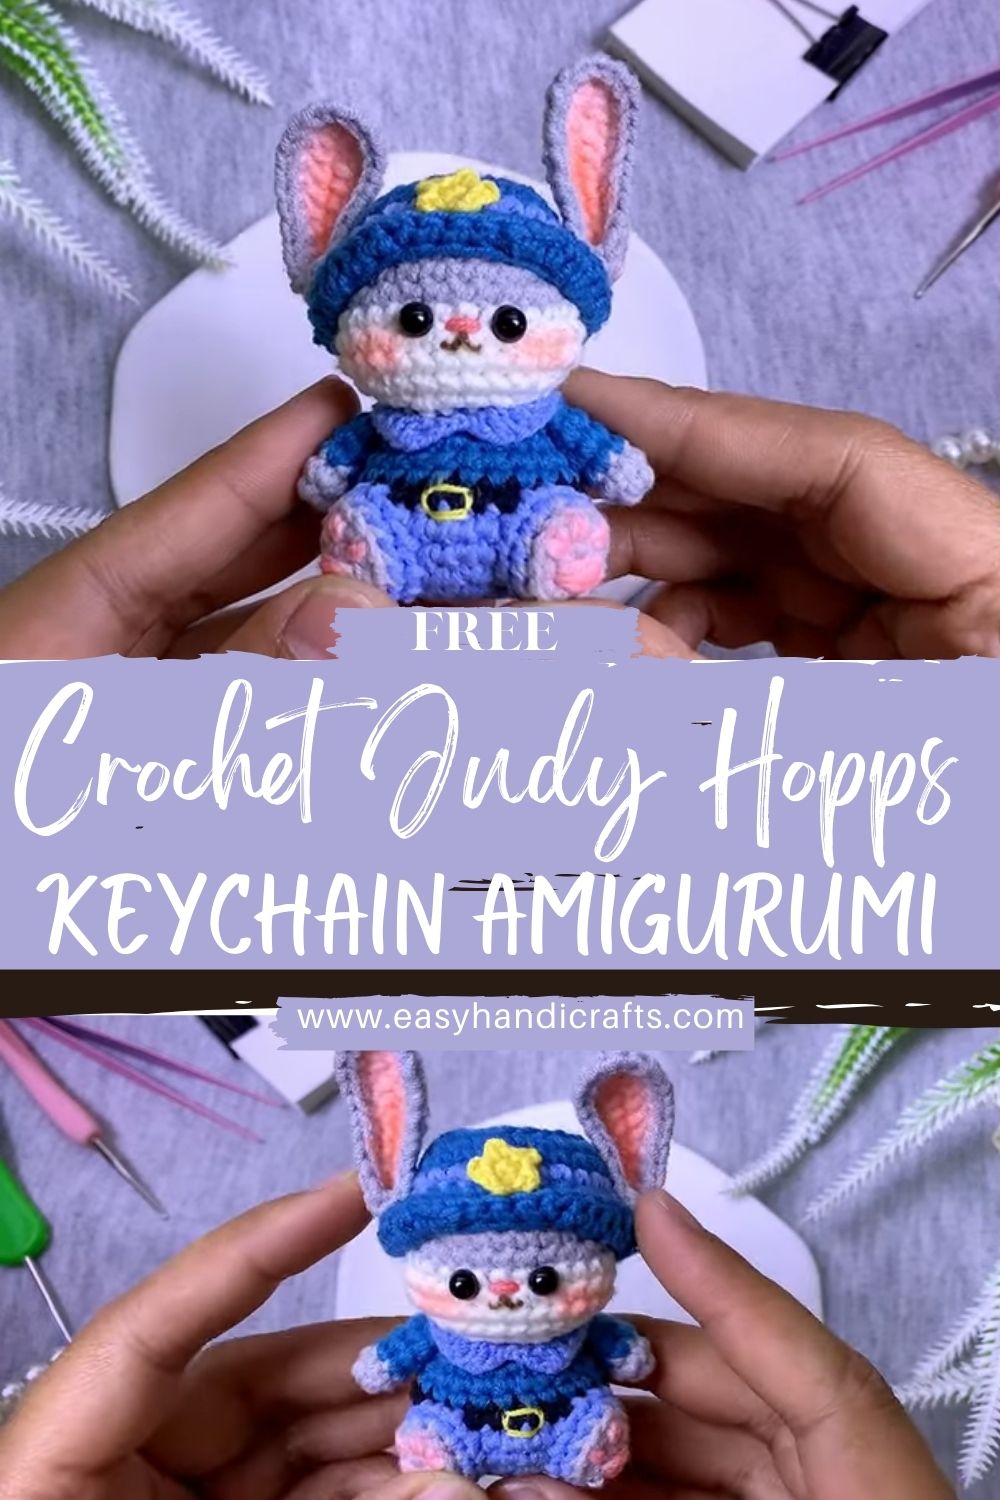
Crochet Judy Hopps Inspired Keychain Amigurumi Pattern
This crochet Judy Hopps-inspired amigurumi keychain tutorial shows you how to make a tiny, cute bunny keychain with long ears, a blue police-style hat, a blue outfit, and an embroidered face. It’s perfect if you love amigurumi keychains, crochet bunny patterns, and small bag charms that work up fast.
Welcome to the next instalment in my amigurumi series: a crochet Judy Hopps-inspired amigurumi keychain tutorial designed for beginners and confident intermediates who want a neat, giftable result. This little bunny is inspired by the upbeat police-bunny vibe (hello, Zootopia-style) with a grey body, pink inner ears, blue uniform details, and a tiny badge-and-flower embellishment for extra charm.
You’ll get a step-by-step breakdown for each piece (head, ears, arms, body, legs, hat) plus beginner-friendly assembly tips so your keychain looks balanced and professional.
Character-Inspired Disclaimer: This project is inspired by a well-known animated bunny police character. It is an original, fan-inspired crochet design guide and is not an officially licensed product. Feel free to personalise the colours and details to make it uniquely yours.
Materials Needed
- Amigurumi-safe yarn (smooth acrylic or cotton works great for stitch definition)
- Matching hook for your yarn (most keychain amigurumi use a smaller hook than the label recommends for tight stitches)
- Polyester fiberfill stuffing
- Tapestry needle (for sewing parts and weaving in ends)
- Scissors
- Stitch markers (or a small scrap of yarn)
- Keychain hardware (split ring, lobster clasp, or swivel keychain clip)
- Optional: embroidery floss or thin yarn for facial features and details
Yarn Colours and Tools
Yarn colours (suggested palette):
- Grey: main body/head (bunny fur)
- Pink: inner ear panels + optional blush
- Blue (medium): outfit/uniform + hat
- Dark blue/black: hat band, tiny accents, or shoes (optional)
- White: optional muzzle highlight or eye shine
- Yellow/gold: badge accent (optional)
Helpful tools (optional but recommended):
- Safety eyes (small size for keychain scale) or black embroidery thread for stitched eyes
- Small piece of felt (for badge/flower or hat detail)
- Fabric glue (tiny dot for felt accents—optional)
- Round-nose pliers (for attaching keychain hardware)
Skill Level
Beginner-friendly with a few slightly tricky moments (small pieces + neat assembly).
If you can crochet in the round and sew amigurumi parts, you can do this!
Trickiest parts:
- Keeping tight stitches for a clean keychain finish
- Symmetrical ear placement
- Mini hat brim shaping
Crochet Abbreviations / Terms
- MR: Magic Ring / Magic Circle
- ch: chain
- sc: single crochet
- inc: increase (2 sc in the same stitch)
- dec: decrease (invisible decrease recommended)
- sl st: slip stitch
- BLO/FLO: back loop only / front loop only
- FO: fasten off
- rnd: round
- st(s): stitch(es)
Notes:
- Work in a continuous spiral unless stated otherwise.
- Use a stitch marker to mark the first stitch of each round.
Finished Design Description
This amigurumi is a small, keychain-sized bunny with:
- A rounded grey head and compact grey body
- Long bunny ears with pink inner ear detail
- A simple blue police-style outfit that reads clearly even at a mini scale
- A rounded blue cap with a brim and small front decoration
- A sweet embroidered face: eyes, tiny nose, smile, and optional blush
- A tiny badge/flower embellishment to mimic the “uniform detail” look
Use cases:
- Keychain charm
- Backpack/bag charm
- Small desk decor
- Party favor
- Handmade gift for animation lovers
Step-by-Step Pattern Breakdown
A. Head
Goal: A smooth, round bunny head that’s proportional to a keychain body.
- Start with a magic ring (MR).
Crochet a small starting circle in the ring. - Round-by-round shaping (descriptive guidance):
- Increase evenly around for several rounds to create a flat circle that begins to cup into a bowl shape.
- Once the head has a nice width, work several rounds without increasing to build height.
- Begin shaping the top by decreasing evenly around over a few rounds until the opening is small.
- When and how to stuff:
- Start stuffing when the head is about two-thirds closed.
- Use small pinches of fiberfill and gently push them in with the back of your hook or a stuffing tool.
- Aim for firm but not stretched stitches. A keychain amigurumi looks best when it’s nicely shaped without gaps.
- Face placement (before you fully close):
- Decide where the “front” is (smoothest side).
- If using safety eyes: place them evenly, leaving enough space for a tiny nose and smile.
- If embroidering, lightly map placement with pins or a strand of contrasting yarn.
- Finish:
- Fasten off, leaving a long tail for sewing (especially if you plan to sew the head to the body securely).
Pro shaping tip: If your head looks slightly pointy, add a touch more stuffing and gently roll it between your palms.
B. Ears
Goal: Long bunny ears with pink inner detail—very Judy-inspired!
- Outer ear (grey):
- Start with a small MR or chain start (either is fine for mini pieces).
- Increase gradually to create a narrow oval.
- Work several rounds without increasing the length of the ear.
- Taper slightly near the base if you want the ears to sit closer to the head.
- Inner ear detail (pink):
- Make a smaller ear-shaped piece (either crocheted flat/oval or a thin insert).
- Keep it slightly shorter than the grey ear so the grey border frames it.
- Stitch or lightly tack it onto the outer ear.
- Shaping:
- For a natural ear curve, flatten the ear and add one or two small stitches at the base to “pinch” it.
- You can also lightly steam-block (carefully) to smooth the edges, depending on the yarn type.
- Attaching:
- Pin both ears on top of the head symmetrically.
- Angle them slightly outward for a playful, alert look.
- Sew securely with small stitches; this is especially important for keychain use.
C. Arms
Goal: Simple, small arms that won’t overwhelm the body.
- Shape:
- Start with an MR.
- Increase slightly to a tiny tube size.
- Work a few rounds evenly to create a short cylinder.
- Stuffing:
- For a keychain scale, arms often look best with no stuffing or very light stuffing (to keep them flat and neat).
- Finish:
- Flatten the open end and sew it closed, or leave it open and stitch directly to the body.
- Fasten off, leaving a tail for sewing.
- Symmetry tip:
- Make both arms at the same time (alternate rounds between them) so they match in length.
D. Body
Goal: A compact keychain body with a simple, uniform-like colour transition.
- Start:
- Begin at the bottom with grey (or start with a darker shoe/colour if you prefer).
- Work fanom a MR.
- Shaping:
- Increase evenly around to form a small base.
- Work several rounds without increasing to create a neat capsule shape.
- Color transitions (blue outfit):
- Switch to blue where you want the “uniform” to begin (often around the mid-body).
- For colour changes: do the last yarn-over of the final stitch in the colour with the colour.
- Stuffing:
- Stuff as you go, so the body stays firm and upright.
- Keep the top slightly understuffed for easier head attachment.
- Neck connection:
- Either leave a small opening and sew the head on, or crochet a short neck section by working a couple of rounds slightly tighter (gentle decreases) before fastening off.
- Fasten off, leaving a long sewing tail.
E. Legs
Goal: Tiny legs/feet that support the bunny look without adding bulk.
- Make two:
- Start with an MR.
- Increase a little to create a small foot base.
- Work a few rounds even for a stubby leg.
- Shape explanation:
- Keep legs short so the keychain stays cute and compact.
- Light stuffing is optional;l many mini legs look better lightly stuffed or left flat.
- Finish:
- Fasten off with a tail for sewing.
- Pin legs to the body before sewing to confirm the bunny can “sit” nicely.
F. Hat (Police Cap)
Goal: A mini rounded cap with a brim and a tiny front detail.
- Rounded top:
- Startwith ana MR.
- Increase evenly until the circle matches the width of the top of the head you want.
- Work a few rounds without increasing so the hat forms a shallow dome.
- Hat band (optional):
- Add a round in a darker blue or black for a band effect.
- Brim structure:
- For a brim, work a short section where you increase more toward the front (or increase along a portion of the round).
- Another option: crochet a small flat semicircle and sew it to the front edge.
- Front decoration:
- Add a tiny badge/flower shape, a small embroidered line, or a felt detail centred on the front.
- Fit check:
- Place the hat on the head before finishing. Adjust by adding/removing a round if needed.
G. Decorative Details
Goal: Bring the character-inspired vibe to life with simple, clean embroidery.
- Eyes:
- Safety eyes: insert between rounds on the face area, evenly spaced.
- Embroidered eyes: stitch small vertical/oval eyes with black thread. Add a tiny white “shine” stitch for extra cuteness.
- Nose + smile:
- Stitch a tiny triangle or small horizontal nose.
- Add a gentle curved smile underneath. Keep it minimal for mtthe initialcale.
- Cheeks (optional):
- Use pink yarn to add small blush stitches.
- Or lightly tint with blush/pastel (test first, and avoid messy application on fluffy yarn).
- Badge/flower embellishment:
- Crochet a micro flower (just a few petals) or stitch a small badge shape in yellow/gold.
- Attach it to the outfit’s chest area or to the hat’s front.
H. Final Assembly
Goal: Neat, balanced, durable assembly, especially important for a keychain.
- Plan placement first:
- Pin head to body and check proportions from all angles.
- Add ears, a hat, arms, an legs with pins before sewing anything permanently.
- Attach head to body:
- Sew with tight, even stitches all around the neck opening.
- Add a bit more stuffing into the neck area if the head feels wobbly.
- Attach ears:
- Sew firmly at the top of the head.
- Ensure both ears match in height and angle.
- Attach arms + legs:
- Arms usually sit slightly below the head line on the sides of the body.
- Legs align at the bottom front so the bunny looks seated.
- Add hat:
- Sew the hat in place with a few discreet stitch so thatso it won’t slip on a keychain.
- Final shaping tips:
- Gently roll the piece between your hands.
- Tuck in any uneven stuffing and smooth the silhouette.
- Keychain hardware:
- Sew a small hanging loop (yarn or strong thread) at the top of the head or through the hat top.
- Attach your split ring or clasp. For durability, stitch through multiple stitches and knot securely inside.
Assembly Instructions
Use this quick order if you like checklists:
- Embroidera face (or insert eyes) on the head
- Make and attach inner ear pieces to the outer ears
- Sew ears onto head (pin first)
- Sew head to body (very secure stitches)
- Attach legs, then arms
- Add outfit detail (badge/flower)
- Fit and sew the hat onto the head
- Add keychain loop + hardware
- Weave in ends, final shape check
Customization Ideas
- Swap the blue uniform for pastel overalls for a softer “kawaii bunny” version.
- Add a tiny bow tie instead of a badge
- Make the hat removable by stitching lightly (or using a tiny hidden loop)
- Use brown/golden tones for a different bunny character vibe
- Add a small tail pom-pom (mini bobble or tiny sphere)
- Turn it into a phone charm by using a thinner cord anda smaller ring
Beginner Tips
- Use a smaller hook than usual to avoid gaps (stuffing showing through is common in keychains).
- Practice invisible decreases for a smoother finish.
- Stuff with tiny amounts at a time, mini pieces fill up fast.
- Pin everything before sewing. A few minutes of pinning can save an hour of redoing.
- Keep embroidery simple. Small faces look cutest with minimal lines.
Common Mistakes to Avoid
- Loose tension: creates gaps and a messy keychain finish
- Overstuffing: makes stitches stretch and the shape lumpy
- Eyes placed too high or too far apart can change the expression dramatically
- Ears not symmetrical: the bunny will look “off” even if everything else is perfect
- Hat brim too floppy: use tighter stitches, add a firmer brim edge, or sew it down
Who This Project Is For
- Crocheters who want a quick amigurumi keychain
- Beginners ready to practice shaping, stuffing, and simple assembly
- Intermediate makers who enjoy adding tiny outfit details
- Gift-makers looking for a cute bunny charm for birthdays, stocking stuffers, or party favours
- Fans of upbeat, police-bunny-style character aesthetics (without needing an exact character replica)
Conclusion
This crochet JudyHopps-inspired amigurumi keychain tutorial is all about big personality in a tiny package: long pink-lined ears, a crisp blue cap, a sweet uniform look, and an embroidered face that you can customise to your taste. Take your time with the small parts, pin before sewing, and don’t be afraid to tweak the colour Personal touches are what make handmade keychains truly special.