Wizard Crochet Harry Potter Amigurumi Pattern Toy
What Is This Crochet Project All About?
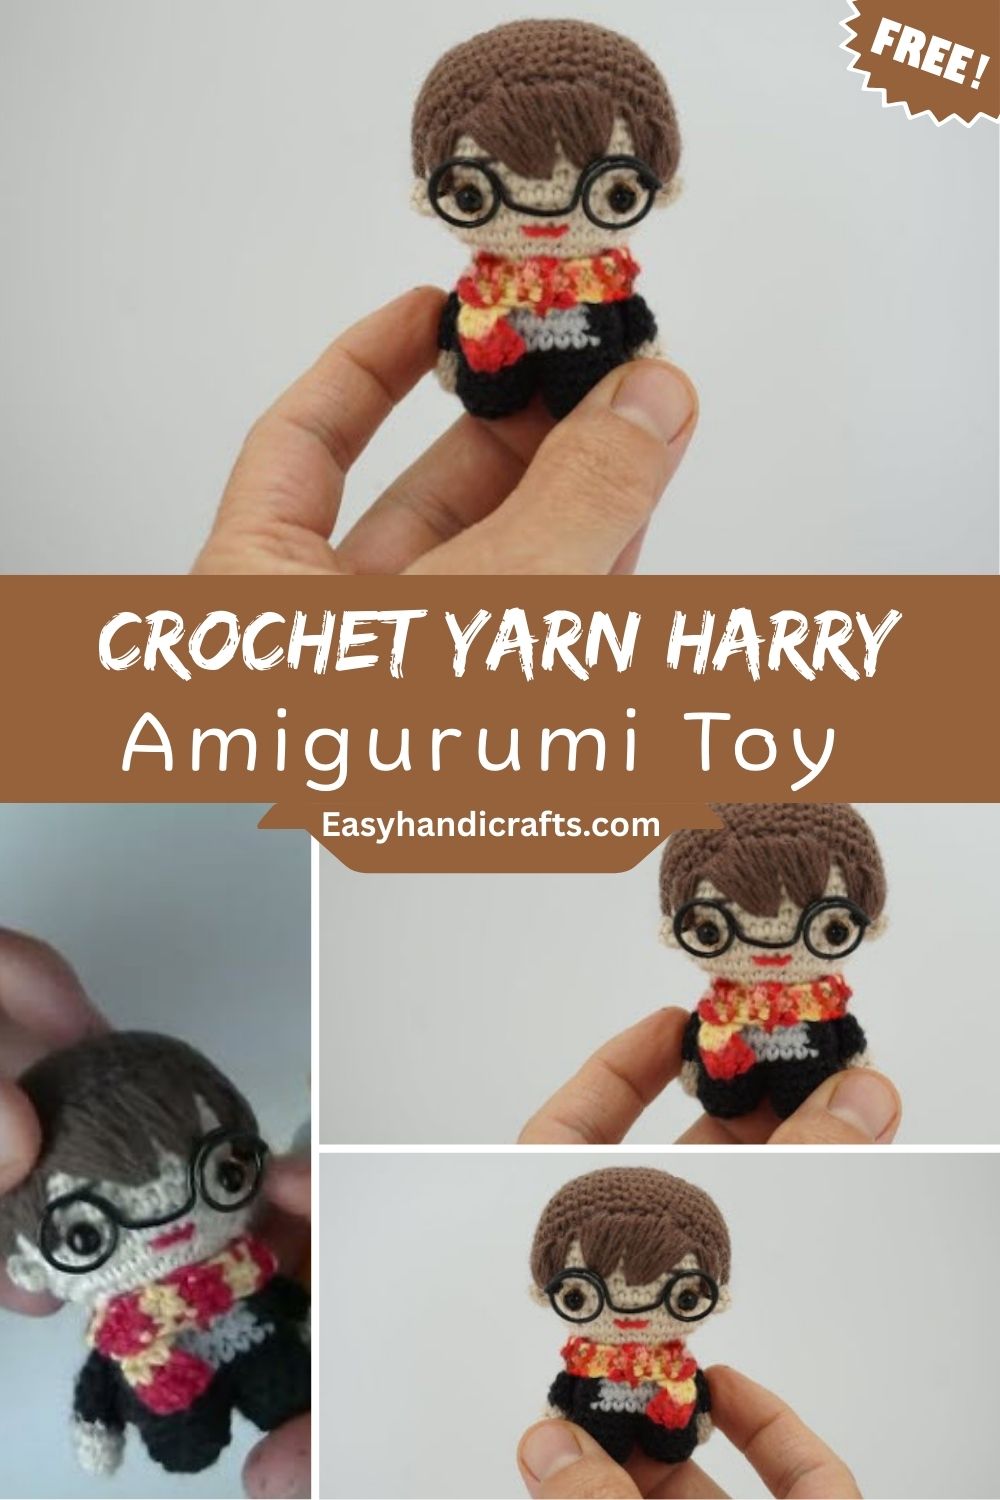
At its heart, this is an amigurumi doll shaped like a young wizard character round head, small body, a robe, glasses, and of course, that signature pointed wizard hat. The design leans into soft, huggable proportions rather than realistic ones, which is what makes amigurumi so appealing in the first place.
The project is built using basic amigurumi construction: a series of crocheted parts (head, body, arms, hat, robe details) that get stuffed and stitched together at the end. It’s a great example of how a handful of simple stitches can combine into something that looks far more complicated than it actually is.
Fans of magical-themed handmade crochet ideas will especially enjoy this one, since it captures that “storybook character” feeling without needing any complicated colorwork or advanced techniques.
Skill Level
Skill Level: Beginner to Intermediate
If you’ve made at least one or two amigurumi animals before and you’re comfortable with single crochet in the round, you’ll be able to follow this pattern without much trouble. Total beginners can still attempt it, but having some experience with increases, decreases, and basic shaping will make the process smoother and less frustrating.
The trickiest parts are usually the hat shaping and attaching the small facial details — everything else follows a fairly standard amigurumi rhythm.
Materials and Supplies You’ll Need
Before diving into the stitches, let’s talk about what’s going into your yarn basket. Every good project starts with the right supplies, and this one is no exception.
Yarn Type
- Worsted weight (medium, 4-ply) cotton or acrylic yarn works best for structure and stitch definition
- Main color for skin tone (light beige, tan, or your preferred shade)
- A dark color for the robe (black, navy, or deep purple all work beautifully)
- A contrasting color for the hat (gold, maroon, or deep green pairs nicely with a dark robe)
- Small amounts of yellow or red for scarf or trim details
- Black yarn or embroidery thread for glasses and facial details
Hook Size
- 3.0mm to 3.5mm crochet hook, depending on your yarn weight and desired tightness of stitches
- A smaller hook than “recommended” for the yarn is often used in amigurumi to keep stitches tight enough that stuffing doesn’t peek through
Extra Tools
- Polyester fiberfill stuffing
- Stitch markers (locking ones work great for tracking rounds)
- Yarn needle for sewing pieces together
- Small pair of scissors
- Safety eyes (or you can embroider eyes if you prefer a softer look)
- Optional: small round glasses charm or wire for the glasses detail
Crochet Stitches and Abbreviations Used
Here’s a quick reference of the stitches you’ll be using throughout this pattern:
- ch – chain
- sc – single crochet
- inc – increase (2 sc in same stitch)
- dec – decrease (invisible decrease preferred for amigurumi)
- sl st – slip stitch
- st(s) – stitch(es)
- rnd – round
- MC – magic circle
- BLO – back loop only (used for some rows to create texture, like the hat brim)
None of these stitches are unusual for anyone who has dabbled in amigurumi before, which is part of why this pattern earns its beginner-friendly reputation.
Step-by-Step Crochet Instructions
Let’s break the wizard boy down into its building blocks. Each section below represents one part of the final doll.
Head and Face
- Start with a magic circle, work 6 sc into it (6 sts)
- Rnd 2: inc in each st around (12 sts)
- Rnd 3: sc, inc repeat around (18 sts)
- Rnd 4: 2 sc, inc repeat around (24 sts)
- Rnd 5: 3 sc, inc repeat around (30 sts)
- Continue increasing evenly for 1-2 more rounds until you reach your desired head size (36-42 sts is common)
- Work several rounds even (no increases) to build head height
- Begin decreasing gradually in reverse order of increases
- Insert safety eyes before closing, then stuff firmly
- Close the opening with an invisible seam
Body
- Begin with a magic circle, similar increase pattern as the head but slightly smaller in final diameter
- Increase for 3-4 rounds
- Work even for several rounds to create body length
- Decrease slightly at the neck opening
- Stuff before closing, leaving enough opening to attach to the head
Arms and Legs
- Make two small tube shapes using magic circle start
- Increase briefly, then work even rounds for length
- Stuff lightly (arms don’t need to be as firm as the head/body)
- Flatten the top and sew closed, then attach to the body
Robe and Hat
- The robe is often worked as a triangular cone shape starting from the neckline and increasing downward, mimicking flowing fabric
- The hat starts with a small magic circle and increases into a cone shape, finishing with a folded brim using BLO stitches for texture
- Attach the hat securely to the head with a few whip stitches
Final Assembly
- Sew the head onto the body
- Attach arms to the sides of the body
- Add the robe over the body like a little cloak
- Embroider or glue on tiny round glasses
- Add a scarf detail in a contrasting color if desired
Helpful Beginner Tips
- Always count your stitches at the end of each round. A Crochet Harry Potter Amigurumi mistake multiplies fast if you skip this step
- Use stitch markers religiously, especially when working in continuous rounds without joining
- Stuff firmly for the head, but slightly softer for the arms so they stay a little floppy and cute
- Block your pieces lightly if the stitches look uneven after stuffing
- Keep tension consistent; tight stitches actually help hide stuffing better in amigurumi
Common Mistakes and How to Fix Them
Mistake: Visible gaps between stitches
Solution: Try going down a hook size, or tighten your tension slightly while crocheting in the round.
Mistake: Head looks lopsided
Solution: Double-check stitch counts after every round. A single missed increase or decrease throws off the whole shape.
Mistake: Safety eyes placed too early
Solution: Always pin the eyes in place first and check the look from multiple angles before locking them in; they can’t be moved once secured.
Mistake: Hat doesn’t sit right on the head
Solution: Make sure the hat’s base circumference roughly matches the head’s circumference at the point of attachment, then adjust with a few extra stitches if needed.
Pattern Customization Ideas
One of the best parts about handmade crochet ideas like this one is how easy they are to personalize. Here are a few fun directions:
- Swap the robe color for house-inspired color schemes (green, blue, yellow, or red)
- Add a tiny crocheted broomstick or wand accessory
- Give your wizard a small owl or cat companion as a mini amigurumi add-on
- Try a female version with a longer robe and different hairstyle
- Use variegated yarn for a more magical, sparkly appearance
- Add a small crocheted scar detail if you want a specific character nod (keep it subtle and generic)
Size and Color Suggestions
Most finished wizard amigurumi dolls end up somewhere between 6 and 9 inches tall, depending on your yarn weight and hook size. If you want a larger display piece, switch to bulky yarn and a bigger hook; for a mini keychain version, use fingering weight yarn with a small hook (around 2.0mm).
Color-wise, classic combinations include:
- Black robe with gold trim
- Deep purple robe with silver accents
- Maroon and gold for a warm, cozy palette
- Emerald green with a soft grey scarf for a wintry feel
Frequently Asked Questions
Is this Crochet Harry Potter Amigurumi pattern good for absolute beginners?
It’s doable for beginners, but having some prior amigurumi experience makes the shaping and finishing steps much easier to manage.
How long does it take to finish this Crochet Harry Potter Amigurumi project?
Most crocheters finish within 4 to 8 hours total, depending on speed and experience, often spread across a couple of sittings.
What yarn weight gives the best results?
Worsted weight (medium) yarn is the most beginner-friendly choice and gives clean, well-defined stitches.
Can I use acrylic yarn instead of cotton?
Yes, both work well. Cotton gives firmer stitch definition, while acrylic is softer and slightly easier on the hands for long sessions.
Do I need safety eyes, or can I embroider them instead?
Either works fine. Safety eyes give a cleaner, more polished look, while embroidered eyes offer a softer, more handmade appearance, great if the toy is meant for a very young child.
Conclusion
This wizard Crochet Harry Potter Amigurumi is proof that a beginner crochet project can still feel enchanting and full of character. With a manageable stitch list, forgiving shaping, and endless room for customization, it’s a pattern that rewards patience without demanding perfection.
Whether you’re building a shelf of handmade crochet ideas or hunting for the perfect gift for a magic-loving friend, this little wizard is ready to be stitched into existence one round at a time.