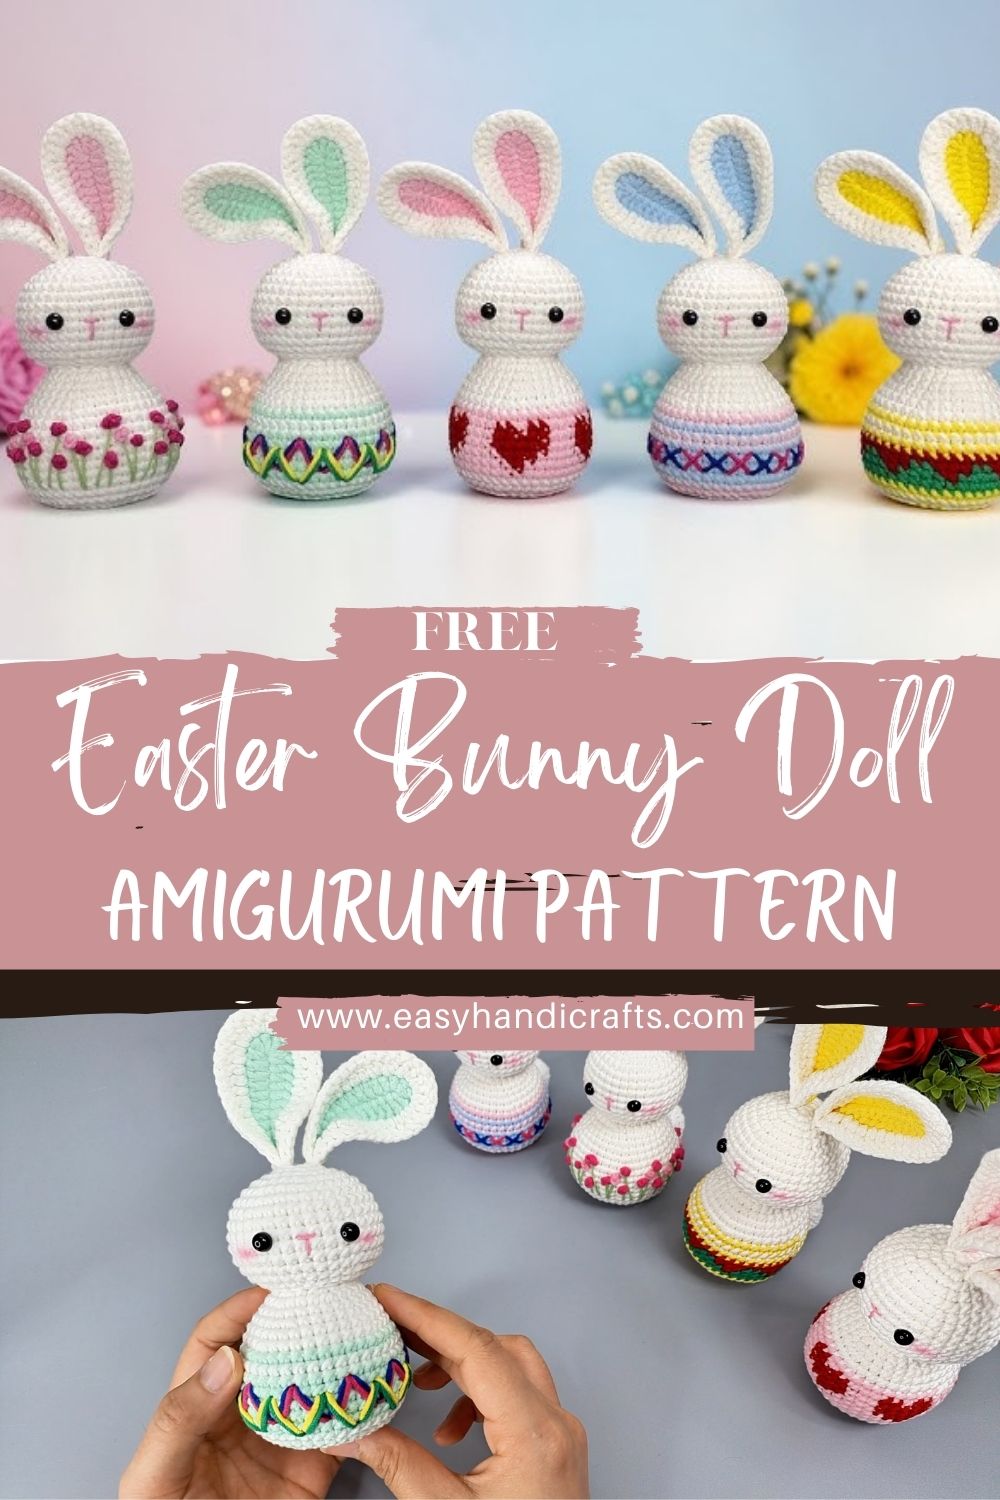
Stitch up a whole crew of tiny Easter bunnies with this mix-and-match amigurumi pattern collection. The shapes are beginner-friendly, the details are charming, and the finished minis are ideal for spring decorating.
Easter bunny amigurumi is popular every year because it’s cheerful, seasonal, and instantly recognizable, plus small bunnies are quick makes that feel rewarding from the very first round. What makes a crochet Easter bunny amigurumi pattern collection extra special is the “collectible” factor: you can create a whole lineup of tiny bunnies, each with its own pastel ear color and decorative body design.
Because the pattern uses basic amigurumi techniques (single crochet in the round, simple increases and decreases, and easy assembly), it’s beginner-friendly and works up quickly. It’s also ideal for Easter gifts, spring décor, classroom goodies, and craft sellers. Small plushies are easy to price and display, and customers love choosing their favorite color or pattern.
Materials Needed
- White yarn (main body + head; cotton or acrylic works well)
- Pastel yarns: pink, blue, yellow, green (ear inner + decorative body patterns)
- Crochet hook: 2.5 mm–3.5 mm (use a smaller hook for tighter stitches)
- Fiberfill stuffing
- Safety eyes (small; size depends on finished bunny, 6–8 mm is common for minis)
- Black embroidery thread (nose + mouth + optional facial touches)
- Yarn needle (tapestry needle)
- Stitch marker
- Scissors
- Pins (for assembly and symmetry)
Optional but helpful: a small measuring tape/ruler and scrap felt for tiny cheek blush or nose accents.
Stitch Abbreviations
- MR – Magic Ring (adjustable starting ring)
- sc – single crochet
- inc – increase (2 sc in the same stitch)
- dec – decrease (sc2tog; invisible decrease recommended)
- sl st – slip stitch
- ch – chain
- BLO / FLO – back loop only / front loop only (optional; useful for clean stripes or attaching details)
Finished Bunny Description
Each finished bunny in this collection has a rounded, egg-like body that feels compact and collectible, topped with a smooth white head that’s slightly smaller for a “cute chibi” proportion. The ears are long and upright, with soft inner pastel panels in pink, blue, yellow, or green, so the set looks coordinated but not identical.
The arms are tiny and subtle, the feet are small and simple, and the face stays minimal: black safety eyes, plus a small embroidered nose and mouth for a sweet expression. The lower body is where each bunny gets its personality—decorate with tiny hearts, a zigzag band, neat stripes, or delicate embroidered florals. Display them together, and they look like a curated spring collection; gift them individually, and each one feels special.
Step-by-Step Crochet Pattern
Pattern Notes (For the Whole Collection)
- Work in continuous rounds unless otherwise stated.
- Use a stitch marker to mark the first stitch of each round.
- Keep your stitches tight to avoid stuffing showing through.
- The pattern below creates one bunny base. Repeat with different ear colors and body decorations to build the full collection.
A) Head (White Yarn)
Shape & structure: A small sphere.
Expected look: Smooth, round head that’s slightly smaller than the body.
- R1: MR, 6 sc (6)
- R2: inc around (12)
- R3: (sc, inc) around (18)
- R4: (2 sc, inc) around (24)
- R5–R7: sc around (24)
- R8: (2 sc, dec) around (18)
- R9: (sc, dec) around (12)
Stuff firmly (smooth, not overstuffed). - R10: dec around (6)
Fasten off, close, and weave in the end.
Beginner guidance: If your head looks pointy, add one more “sc around” round before decreasing.
B) Body (Egg Shape) (White Yarn)
Shape & structure: Egg/oval body that’s wider in the middle and tapers toward the top.
Expected look: Rounded base with a gentle narrowing at the neck.
- R1: MR, 6 sc (6)
- R2: inc around (12)
- R3: (sc, inc) around (18)
- R4: (2 sc, inc) around (24)
- R5: (3 sc, inc) around (30)
- R6–R9: sc around (30)
- R10: (3 sc, dec) around (24)
- R11: sc around (24)
- R12: (2 sc, dec) around (18)
- R13: sc around (18)
Stuffing stage: Start stuffing here. Push stuffing outward to keep the belly smooth and round.
- R14: (sc, dec) around (12)
Add more stuffing,g aim for a smooth egg shape. - R15: dec around (6)
Fasten off, close, and weave in the end.
Tip for a more “egg” look: Keep the bottom fuller by stuffing the base a bit more firmly than the top.
C) Decorative Pattern Section (Colorwork or Embroidery)
This collection is all about giving each bunny a unique ” utfit.” You can crochet color stripes during the body rounds or add embroidery afterward.
Option 1: Simple Stripes (Easiest Colorwork)
How it’s built: Change the yarn color for one or two rounds of the body (e.g., Round 7 or 8).
How to change ccolorneatly:
- Finish the last sc of the old cocolorinsert hook, yarn over, pull up a loop.
- Yarn over with the new color, pull through both loops to complete the stitch.
- Continue crocheting with the new color: Clean pastel bands around the belly.
Option 2: Zigzag Accent (Surface Crochet / Embroidery)
How it’s built: After the body is done, use a pastel yarn strand to embroider a zigzag line around the widest portion.
Look: A playful “Easter sweater” vibe without complicated stitch work.
Option 3: Hearts (Sweet and Minimal)
- Embroider tiny hearts on the front using pastel yarn.
- Keep them small 1–2 hearts looks polished, while too many can look busy.
Option 4: Floral Details (Delicate, Boutique Feel)
- Add a tiny lazy-daisy stitch flower or two on the belly area.
- Perfect for spring décor sets.
Beginner-friendly note: If color changes feel stressful, stick to embroidery, as it has a lower chance of losing stitch count.
D) Ears (Make 2)
You’ll make a white ear with a pastel inner panel for each bunny.
Outer Ear (White Yarn) – Make 2
Shape & structure: Long oval that folds slightly at the base.
- R1: MR, 6 sc (6)
- R2: (sc, inc) around (9)
- R3: sc around (9)
- R4: (2 sc, inc) around (12)
- R5–R9: sc around (12)
Fasten off, leave a long sewing tail. Do not stuff.
Inner Ear (Pastel Yarn) – Make 2 (Pink/Blue/Yellow/Green)
Shape: Slim insert panel.
- ch 6
- In 2nd ch from hook: sc 5 (5)
- ch 1, turn, sc 5 (5)
Fasten off, leave tail.
Attach inner ear: Sew the pastel panel centered on the white ear. This gives a clean, layered look.
Expected look: Upright ears with a soft pop of pastel inside.
E) Arms (Make 2, White Yarn)
Shape: Tiny tubes/nubs.
- R1: MR, 6 sc (6)
- R2–R3: sc around (6)
Fasten off, leave tail. Do not stuff; flatten slightly.
F) Legs / Feet (Make 2, White Yarn)
Shape: Small, rounded feet that help the bunny sit.
- R1: MR, 6 sc (6)
- R2: (sc, inc) around (9)
- R3: sc around (9)
Fasten off, leave tail. Lightly stuff (optional), flatten.
G) Face Details (Eyes + Nose/Mouth)
Eyes (Safety Eyes):
- Place between the upper-middle of the head, about 5–7 stitches apart,t depending on your head size.
- Before locking washers, hold the head against the body to check the “cute” angle (slightly lower eyes can look extra sweet).
Nose + Mouth (Black Embroidery Thread):
- Stitch a small nose (tiny “V” or triangle) centered below the eyes.
- Add a short line down and a small curved smile.
Expected look: Minimal, clean, and expressive.
H) Assembly
What you’re doing: Turning small parts into a cohesive bunny with clean symmetry and aligned patterns.
Assembly Instructions
- Eye placement (if not done): Confirm eye position on the head before attaching it to the body.
- Attach head to body:
- Center the head on top of the body.
- Sew around the neck seam with tight, even stitches.
- Add a pinch more stuffing at the neck if it feels wobbly.
- Ear positioning & symmetry:
- Pin ears on top of the head, evenly spaced.
- Angle slightly outward for a playful look.
- Sew securely at the base.
- Attach arms and legs:
- Legs go low on the front underside so the bunny can sit.
- Arms go on the sides, near the upper belly.
- Keep both sides matched, and use stitch counts as a guide (e.g., “place arms 6 stitches from the front center on both sides”).
- Align decorative patterns:
- If you embroidered hearts/flowers, keep them centered on the belly front.
- If you made stripes, rotate the body so the seam color jog sits toward the back before attaching the head.
- Final embroidery details:
- Add the nose and mouth last if you want to “fine-tune” the expression after seeing the full bunny assembled.
Shaping tip: Gently roll the body between your palms to smooth stuffing and keep the egg shape even.
Finishing Tips
- Maintain even tension for a clean, smooth finish.
- Avoid gaps: if you can see stuffing, switch to a smaller hook or tighten tension.
- Stuff evenly for a smooth, egg-shaped result. Lumps usually come from stuffing clumps in one spot.
- Hide the yarn ends neatly by weaving them through several stitches within the body before trimming.
- Ensure symmetry: step back and check the ears, arms, and feet in the front view before tying the final knots.
Beginner Tips
- Use stitch markers to prevent accidental extra increases/decreases.
- Count stitches at the end of each round (especially on the body).
- Practice color changes on a small swatch before adding stripes to your bunny.
- Pin parts before sewing and adjust until they look balanced.
- TakTakeme witembling your stitching. This is what makes it look ” tore-quality.”
Customization Ideas
- Create a full bunny collection featuring different ear colors and belly patterns (great for Easter displays).
- Add names or initials with simple embroidery on the body.
- Make keychains by adding a small loop at the top of the head (an embroidered loop or a crocheted chain).
- Create larger display bunnies by using thicker yarn and a larger hook.
- Experiment with pattern themes: hearts for Valentine’s Day, spring crossover, stripes for classic Easter, and florals for cottagecore vibes.
- Use velvet yarn for a plush effect (keep features larger and simplify embroidery).
Why You’ll Love This Pattern
This mini bunny collection is quick, fun, and beginner-friendly, yet still lets you “design” each bunny with color and decoration. It’s perfect for Easter and spring, ideal for gifts, and great to sell because the sets look beautiful together and customers love choosing a favorite pattern. Plus, the minimal style photographs well always a bonus for craft fairs and online listings.
Conclusion
If you’ve been wanting a project that’s cute, seasonal, and genuinely enjoyable to make, this collection of crochet Easter bunny amigurumi patterns is a perfect pick. Make one bunny as a sweet spring accent, or create a whole set in pastel colors and watch your Easter décor instantly come alive.