Handmade Crochet Clownfish Amigurumi | Cute Ocean Plush Gift
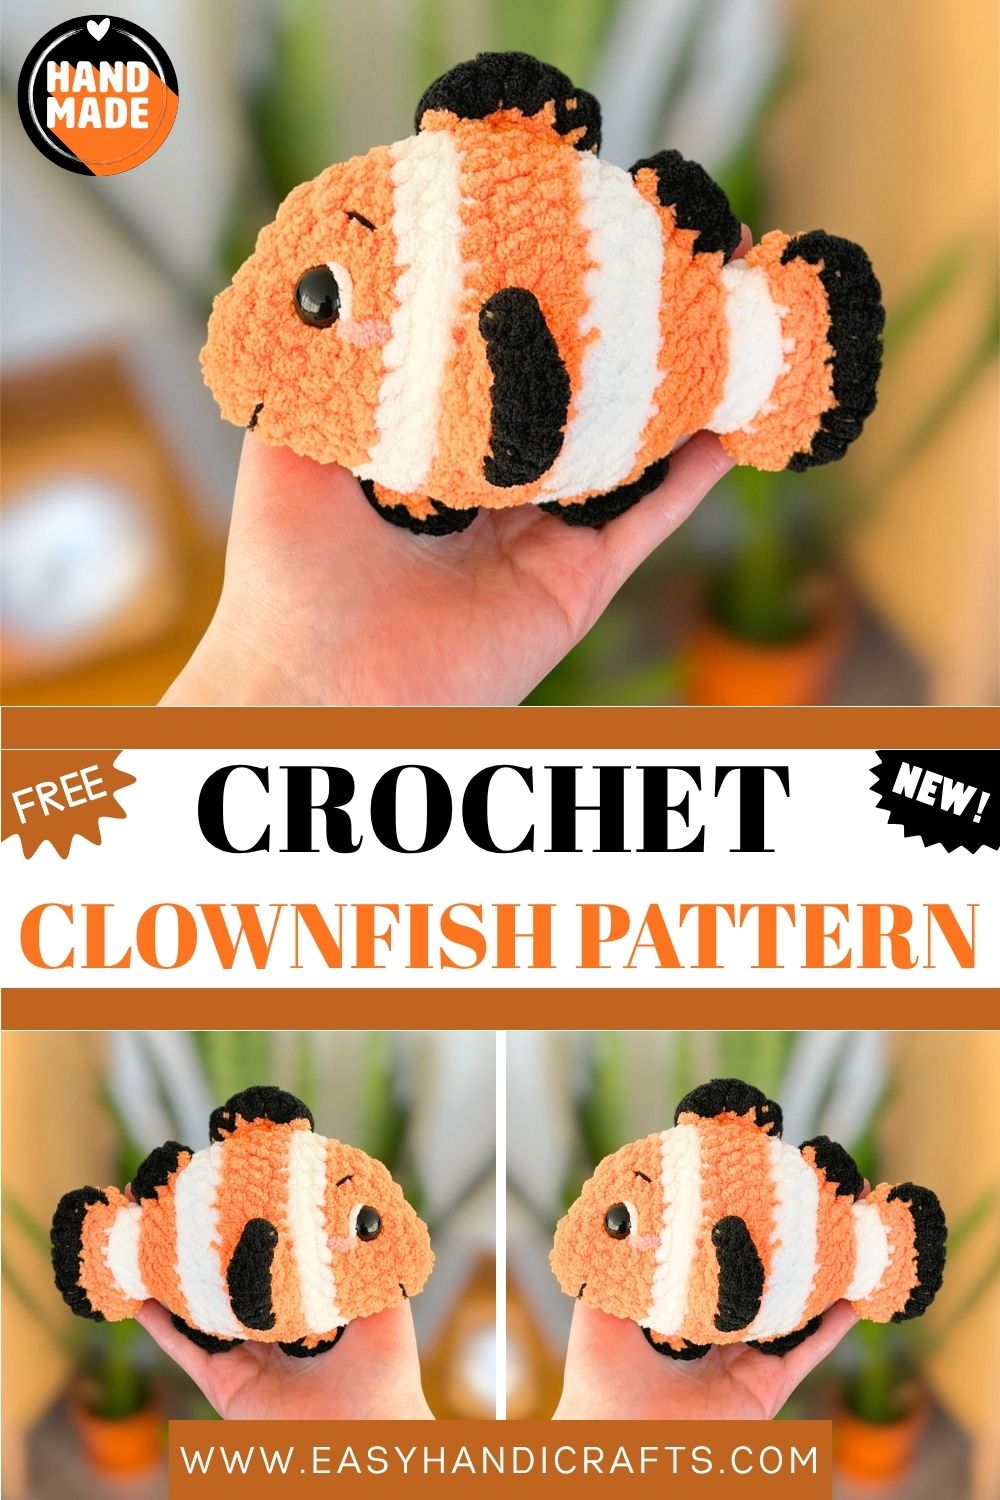
He just fits so perfectly in one hand, and I genuinely don’t know what to do with myself. This handmade crochet clownfish has the chunkiest little body, the crispest white stripes, and one glossy eye that just looks at you like “yes, I am perfect, I know.” Ocean therapy, but make it yarn.
This is a handmade crochet clownfish amigurumi, made one at a time from soft chenille yarn. Palm-sized but chunky. Simple to look at from a distance, detailed up close. The kind of thing that sits on a shand elf and somehow always catches the light just right. It works as a gift for literally anyone, ocean lovers, kids, and adults who just want something handmade and real in their space. No mass production. No shortcuts. Just yarn, time, and a fish that looks a little too confident for something that lives in an anemone.
Skill Level
This pattern suits beginners and intermediate crafters well. As long as you can single crochet, increase, decrease, work a magic ring, and change yarn colours, you already have every skill this charming little clownfish needs from start to finish.
Materials
Yarn:
- Super bulky chenille yarn (weight 6) — Bernat Blanket or Premier Basix Chenille recommended, in Orange, White, and Black
- Thinner acrylic or cotton yarn (weight 3–4) in White for eye highlights and Black for face details
- Pink yarn for blush (optional)
Supplies:
- 5mm crochet hook
- 14mm black safety eyes
- Tapestry needle
- Fiberfill for stuffing
- Stitch markers
- Scissors
- Cosmetic blush (optional)
Abbreviations
- MR: magic ring
- SC: single crochet
- INC: increase
- DEC: invisible decrease
- SLST: slip stitch
- BLO: back loop only
- HDC: half double crochet
- DC: double crochet
- CH: chain
Pattern Notes
- This pattern uses both super bulky chenille yarn for the body and thinner yarn for embroidered face details.
- All instructions follow US crochet terminology.
- Work in a continuous spiral throughout and avoid joining rounds unless the pattern states otherwise.
- Always place a stitch marker to track the beginning of each round.
- Make sure the increases in rounds 3 and 4 sit at the top of the plush for the correct final shape.
- Skills used in this pattern include magic ring, yarn colour changes, and embroidering face details.
Pattern: Head & Body
Start with Orange yarn.
- Rnd 1: 8SC in MR [8]
- Rnd 2: INC in all 8 [16]
- Rnd 3: 6SC, 4 INC, 6SC [20]
- Rnd 4: 6SC, (INC, SC) x4, 6SC [24]
- Rnd 5: SC in all 24 [24]
- Rnd 6: (3SC, INC) x6 [30]
Switch to White yarn.
- Rnd 7: BLO — SC in all 30 [30]
- Rnd 8: (9SC, INC) x3 [33]
Switch to Orange yarn.
- Rnd 9: (5SC, INC, 5SC) x3 [36]
- Rnd 10: SC in all 36 [36]
Insert safety eyes between rounds 4 and 5, leaving 5 to 6 visible stitches between them. Then embroider brows and smile with thin black yarn. Next, add eye highlights with thin white yarn. Finally, embroider blush with pink yarn if desired. Begin stuffing the body and continue adding fiberfill as you go.
Switch to White yarn.
- Rnd 12: BLO — (3SC, DEC, 3SC) x4 [28]
- Rnd 13: SC in all 28 [28]
Orange yarn.
- Rnd 15: BLO — (4SC, DEC) x4 [20]
- Rnd 16: (3SC, DEC) x4 [16]
- Rnd 17: (1SC, DEC, 1SC) x4 [12]
White yarn.
- Rnd 18: BLO — SC in all 12 [12]
- Rnd 19: SC in all 12 [12]
Orange yarn.
- Rnd 20: BLO — (SC, INC) x6 [18]
Switch to Black yarn.
- CH1, turn, and work 9SC across.
- Weave in all remaining yarn ends to finish cleanly.
Tip: Make sure the decreases in round 14 align at the top of the plush for the best final shape.
Pattern: Side Fins (crocheted directly onto the plush)
Left Fin
Start with Orange yarn. Join to round 9 with an SLST, using the middle of the eye as your placement reference.
- Row 1: 3SC, CH1, turn [3]
- Row 2: INC in all 3 stitches [6]
Switch to Black yarn.
- Row 3: CH1, turn — (2SC, INC) x3 [8]
Weave all ends neatly into the plush.
Right Fin
Start with Orange yarn. Join to round 9 with an SLST, placing it 2 to 3 stitches below the eye.
- Row 1: 3SC, CH1, turn [3]
- Row 2: INC in all 3 stitches [6]
Switch to Black yarn.
- Row 3: CH1, turn — (2SC, INC) x3 [8]
Weave all ends neatly into the plush.
Pattern: Top Fins (crocheted directly onto the plush)
Smaller Top Fin
Start with Orange yarn. Join to round 17 with an SLST at the top centre of the plush, using the tail and eyes as placement guides.
- Row 1: 3HDC [3]
Switch to Black yarn.
- Row 2: CH1, turn — SC in all 3 [3]
Weave all ends neatly into the plush.
Bigger Top Fin
Start with Orange yarn. Join to round 12 with an SLST at the top centre, using the smaller top fin and eyes as placement guides.
Switch to Black yarn.
- Row 2: CH1, turn — SC in all 4 [4]
Weave all ends neatly into the plush.
Pattern: Bottom Fins (crocheted directly onto the plush)
Bigger Bottom Fin
Start with Orange yarn. Join to round 17 with an SLST at the bottom centre, using the tail as your placement guide.
- Row 1: 3HDC [3]
Switch to Black yarn.
- Row 2: CH1, turn — SC in all 3 [3]
Weave all ends neatly into the plush.
Smaller Bottom Fin
Start with Orange yarn. Join to round 9 with an SLST at the bottom centre, using the bigger bottom fin and eyes as placement guides.
- Row 1: 2HDC [2]
Switch to Black yarn.
- Row 2: CH1, turn — SC in all 2 [2]
Weave all ends neatly into the plush.
Common Mistakes to Avoid
- Misaligning the increases in rounds 3 and 4 — These increases must sit at the top of the plush to create the correct fish body shape. Therefore, place your stitch marker carefully and check alignment before moving to round 5.
- Skipping the BLO rows — Several rounds in this pattern work into the back loops only, which creates the visible white stripe ridges that define the clownfish look. Missing this instruction flattens those stripes completely.
- Inserting safety eyes too late — Always place the eyes between rounds 4 and 5 before the head closes further. Otherwise, inserting and adjusting them later becomes nearly impossible.
- Under-stuffing as you go — Begin adding fiberfill early and continue throughout. Waiting until the end makes it very difficult to stuff the upper body firmly and evenly.
- Placing fins without a reference point — The pattern gives specific placement guides for every fin. Always use the eye position and tail as a reference before joining yarn for any fin to avoid an unbalanced final result.
- Using the wrong yarn weight for embroidery — The face details require a thinner weight, 3 to 4 yarn, not the bulky chenille. Using the wrong weight makes the embroidery look messy and oversized against the body.
Finishing Tips
- First, weave in every yarn end carefully at each colour change point. Chenille yarn in particular can work loose at stripe transitions, so take extra time securing those ends.
- Next, shape the body gently with both hands after stuffing. clownfish’s body should look full and slightly oval rather than perfectly round or flat on any side.
- Additionally, when embroidering the face details, use a doubled strand of thin black yarn for the brows and smile. This gives a cleaner, bolder result that shows up clearly against the orange chenille.
- After attaching all fins, step back and check that they sit symmetrically on both sides of the body. If any fin looks off, carefully remove it and reattach it using the eye and tail as your alignment guides.
- As a final step, if you choose to add cosmetic blush, apply it lightly with a cotton swab in small circular motions. Less is always more here — a gentle hint of pink looks far more natural than a heavy application.
Customization & Variations
- Try different colour combinations — While orange, white, and black are the classic clownfish palette, this same construction looks stunning in red and white for a deeper ocean look, or even blue and white for a fantasy fish version.
- Add a glossy eye effect — After embroidering the eye highlights, apply a tiny dot of clear nail polish or craft glue over each eye. Once dry, it creates a beautiful glossy finish that makes the eyes look alive.
- Make a keychain version — Use medium-weight yarn with a 3.5mm hook to crochet a miniature clownfish. Then attach keychain hardware to the top fin for a sweet ocean-themed bag charm.
- Create a whole reef scene — Use this same base construction to make other fish in different colours and sizes. Display them together on a shelf or hang them as a mobile for a stunning ocean-themed display.
- Skip the blush for a cleaner look — The pink blush gives a kawaii softness, but leaving it off creates a more realistic and sleek clownfish that suits a different aesthetic entirely.
- Personalise with a name — Use thin black yarn to embroider a small name or initial onto the belly of the fish. This sweet touch makes the plush feel like a completely custom, one-of-a-kind gift.
- Make a matching anemone — Crochet a simple pink and white anemone base from a magic ring and attach it alongside the fish for a display that tells the whole ocean story.
Gifting Ideas
- Ocean lover’s gift — For anyone who loves the sea, marine life, or ocean conservation, a handmade clownfish plush is a thoughtful and meaningful present they will genuinely treasure for years.
- Children’s gift — This soft, chunky plush makes a wonderful toy for kids of all ages. It is safe, squeezable, and sturdy enough to handle enthusiastic play without losing its shape.
- New home gift — A handmade clownfish displayed on a shelf or windowsill adds a cheerful, personal touch to any new living space in a way that a shop-bought decoration simply cannot match.
- Baby shower gift — Pair the clownfish with a soft ocean-themed blanket or a set of baby clothes for a sweet, coordinated handmade gift set that new parents will absolutely adore.
- Craft fair bestseller — Ocean-themed amigurumi consistently draws attention and sells well at fairs and online shops. Because this pattern works up efficiently, producing multiples for a stall is entirely manageable.
- Teacher appreciation gift — Choose a cheerful colour variation and pair it with a handwritten note for a gift that feels genuinely personal and far more memorable than anything store-bought.
- Treat yourself — Not every handmade creation needs to go to someone else. Keep this clownfish for your own desk or shelf and enjoy the quiet satisfaction of having made something this beautiful with your own hands.
Conclusion
This handmade crochet clownfish amigurumi is more than just a plush — it is a little piece of the ocean you can hold in your hands. From the bold orange and white striped body to the surface-crocheted fins and those carefully embroidered facial details, every part of this pattern comes together to create something genuinely special and worth showing off.
Whether you are making it as a gift, selling it at a craft fair, or simply enjoying the process of bringing a beloved sea creature to life stitch by stitch, this pattern rewards you with a result that feels polished, detailed, and completely handmade in the best possible way. Not only is the construction approachable for beginners, but the multi-fin assembly also gives experienced makers something satisfying to work through.
You do not need to live near the ocean to have a little piece of it in your home. So pick up your chenille yarn, set your hook, and get started. Your very own handmade clownfish is only a few rounds away. Happy crocheting!