
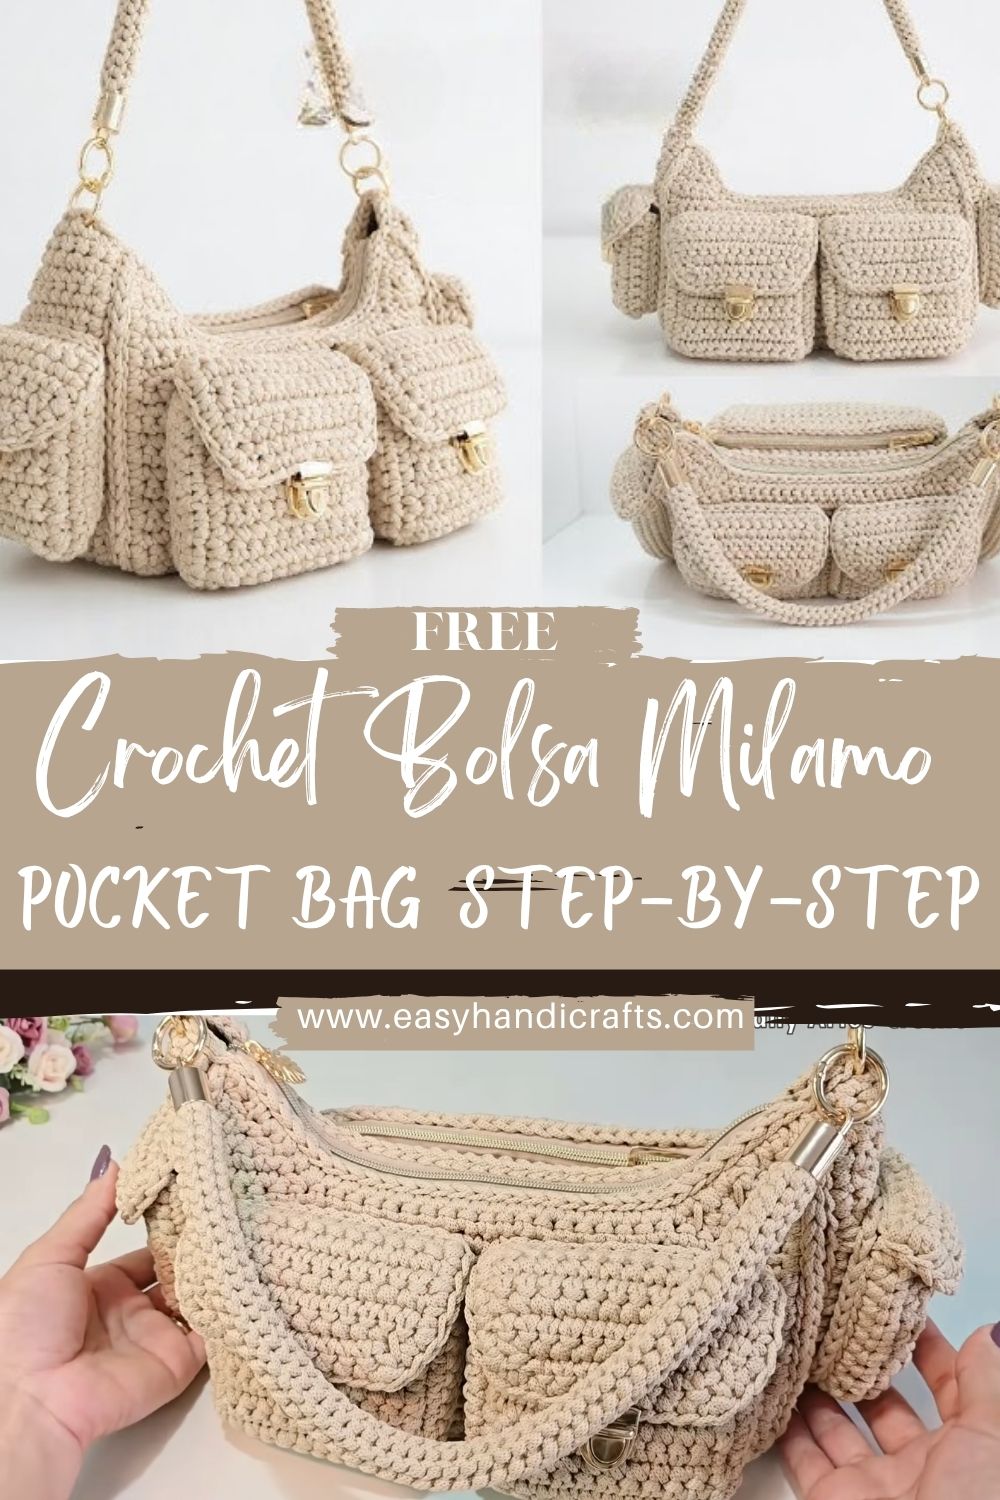
Precious Crochet Bolsa Milamo Pocket Bag A Step-by-Step Pattern
The Crochet Bolsa Milamo Pocket Bag is a stylish, functional crochet project that combines a modern shape with practical pockets perfect for everyday use. If you’ve been looking for an easy crochet bag pattern that feels trendy but is still beginner-friendly, this step-by-step guide will help you create a durable, good-looking bag with a satisfying finish.
Crochet bags are popular for a reason: they’re reusable, customizable, and you can design them to match your wardrobe in a way store-bought accessories rarely do. The Bolsa Milamo Pocket Bag stands out because of its clean structure and the addition of pockets, making it a practical option for carrying small essentials like your phone, cards, keys, lip balm, or earbuds.
This step-by-step crochet bag tutorial is a great fit for confident beginners and intermediate crocheters. You’ll practice key skills like building a sturdy base, evenly building up the side panels, and attaching pockets and straps neatly. The finished bag also makes a thoughtful handmade gift—choose neutral tones for a minimalist look, or go bold with color blocking for a statement accessory that works for casual weekends or dressed-up errands.
Materials Required
Choose materials with structure and durability—bags get a lot of wear.
Yarn (Bag-Friendly Options)
Pick one:
- Cotton yarn (recommended): worsted/aran cotton or cotton rope for a crisp look
- Cotton-blend: slightly softer but still sturdy
- T-shirt yarn / braided cord: very structured, modern “pocket bag” look
Amount (estimate):
- 250–450 g depending on size, yarn thickness, and strap length
Hook & Notions
- Crochet hook:
- Worsted cotton: 4.0–5.0 mm
- Cord/T-shirt yarn: 6.0–8.0 mm
- Stitch markers (at least 2)
- Yarn needle (tapestry needle)
- Scissors
- Measuring tape
- Optional (for extra structure):
- Bag base canvas or felt insert
- Fabric lining + needle/thread
- Magnetic snap or button
- D-rings / swivel clips (for removable straps)
Abbreviations
- ch — chain
- sc — single crochet
- hdc — half double crochet
- dc — double crochet
- sl st — slip stitch
- st(s) — stitch(es)
- inc — increase (2 stitches in one stitch)
- dec — decrease (work 2 together)
- BLO — back loop only
Notes
- This pattern is written for a rectangular base with worked-up sides.
- Use a stitch marker to mark the start of rounds/rows.
- Adjust sizing by adding chains to the base and adding rounds to the height.
Step-by-Step Pattern: Bolsa Milamo Pocket Bag
Finished Size (Adjustable)
A practical pocket-bag size:
- Width: ~22–28 cm (9–11 in)
- Height: ~18–24 cm (7–9.5 in)
- Depth: ~6–10 cm (2.5–4 in)
(You can easily scale up/down—tips at the end.)
Base (Bottom of the Bag)
Goal: create a flat oval/rectangle-like base by working around a starting chain.
Base Setup
- Ch 31 (adjust: more chains = wider bag)
- Row/Round 1: sc in 2nd ch from hook and across to last ch
- In the last ch, work 3 sc (to turn the corner)
- Continue on the underside of the chain: sc across
- In the final stitch (the first chain end), work 2 sc (to complete the oval/rectangular loop)
- Do not turn—continue in rounds.
Build the Base in Rounds
Work 3–6 rounds, depending on how deep you want the bag to be.
- Round 2: sc around, placing increases at the corners:
- In the 3-sc corner from Round 1: inc in the middle corner stitch (or place 2 sc in each of those 3 sts if you want a rounder base)
- On the opposite end (the 2-sc end): add 1 extra sc evenly so it stays flat
- Rounds 3–5: sc around, adding small increases only at the ends/corners as needed to keep it lying flat.
Base tip: If the base cups, you have too few stitches—add increases at corners. If it ripples, you have too many—reduce increases.
Main Body (Work Up the Sides)
Goal: turn the base into “walls” for the bag.
Turning Round (Creates Crisp Edge)
- Next Round: sc around in BLO (back loop only)
This creates a defined fold and helps the bag stand up.
Side Rounds
- Continue with sc around (both loops now) for 12–20 rounds, depending on desired height.
Optional texture (clean + durable):
- Alternate rounds of sc and hdc for a subtle rib/stacked look, or
- Use hdc only for faster height growth (slightly softer structure).
Pockets (Crochet Pocket Sections)
You can make one large front pocket, two smaller pockets, or a front + back pocket. Below are two popular options.
Option A: One Large Front Pocket
- Decide on the pocket width: measure the bag’s front panel width and subtract ~2–3 cm (1 in) to prevent it from wrapping around the sides.
- Ch to that width (example: ch 21–25)
- Row 1: sc in 2nd ch from hook and across
- Rows 2–8 (or desired height): ch 1, turn, sc across
- Fasten off, leave a long tail for sewing.
Pocket edging (optional, neat finish):
- sc evenly around pocket edges before attaching.
Option B: Two Smaller Pockets (More “Pocket Bag” Style)
Make 2 identical pockets:
- Ch 12–15
- sc across, then work 6–8 rows total
- Optional: add a top border row of sl st for firmness.
Pocket divider idea: After sewing the pocket panel on, stitch a vertical seam down the middle to create two compartments.
Straps (Handle Options)
Choose the strap style that matches how you’ll use the Bolsa Milamo Pocket Bag.
Strap Option 1: Short Handles (Tote Style, sturdy)
Make 2.
- Ch 45–55 (adjust length to your preference)
- Row 1: sc in 2nd ch and across
- Row 2: ch 1, turn, sc across
- Repeat until the strap is 2–3 cm (0.75–1.25 in) wide (usually 2–4 rows)
- Fasten off, leave tails for sewing.
Strap Option 2: One Long Strap (Crossbody)
- Ch 120–150 (try it across your body before committing)
- Work sc back along the chain
- For extra strength, work a second row of sc on top.
Pro durability tip: Use thermal stitch or waistcoat stitch for straps if you want minimal stretch, especially with cotton.
Assembly (Attach Pockets + Straps)
Attach Pockets Neatly
- Pin pockets in place using stitch markers or sewing pins.
- With matching yarn and a tapestry needle, whip- or mattress-stitch the sides and bottom of the pocket to the bag.
- Reinforce pocket corners with a few extra stitches (high-stress area).
- If making a divided pocket, stitch a seam up the center.
Attach Straps Securely
- Mark strap placement: typically 6–8 stitches in from each side.
- Sew each strap end to the inside/top edge of the bag using multiple passes.
- Optional reinforcement:
- Stitch a small box shape and an X through it (like backpack straps) using yarn.
Assembly Instructions (Finishing Touches)
- Top edge finish (optional but polished):
- Work 1 round of sl st or sc around the top opening.
- Weave in all ends by running yarn tails through multiple stitches in different directions.
- Add closure (optional):
- Sew on a magnetic snap, button + loop, or a small drawstring channel.
- Add lining (optional but recommended):
- A simple fabric lining prevents stretching and keeps items from poking out.
Tips for Beginners (Crocheting Bags Successfully)
- Choose durable yarn: Cotton or cord is best for a structured crochet bag that won’t sag quickly.
- Keep stitch consistency: Uneven tension shows more on large surfaces. Pause and check your edges every few rounds.
- Use stitch markers: Mark the start of rounds and pocket placement points for symmetry.
- Tighten your stitches: A slightly smaller hook helps create denser fabric that looks professional and holds its shape.
- Test pocket placement: Place a phone or cardholder in the pocket area before sewing to confirm the size and height.
Conclusion
The Crochet Bolsa Milamo Pocket Bag is a stylish, practical project you can truly make your own. Experiment with yarn colors, add extra pockets, try a contrast brim at the top edge, or swap to a crossbody strap for a modern look. However, you customize it, you’ll end up with a handmade accessory that’s both functional and uniquely yours.


