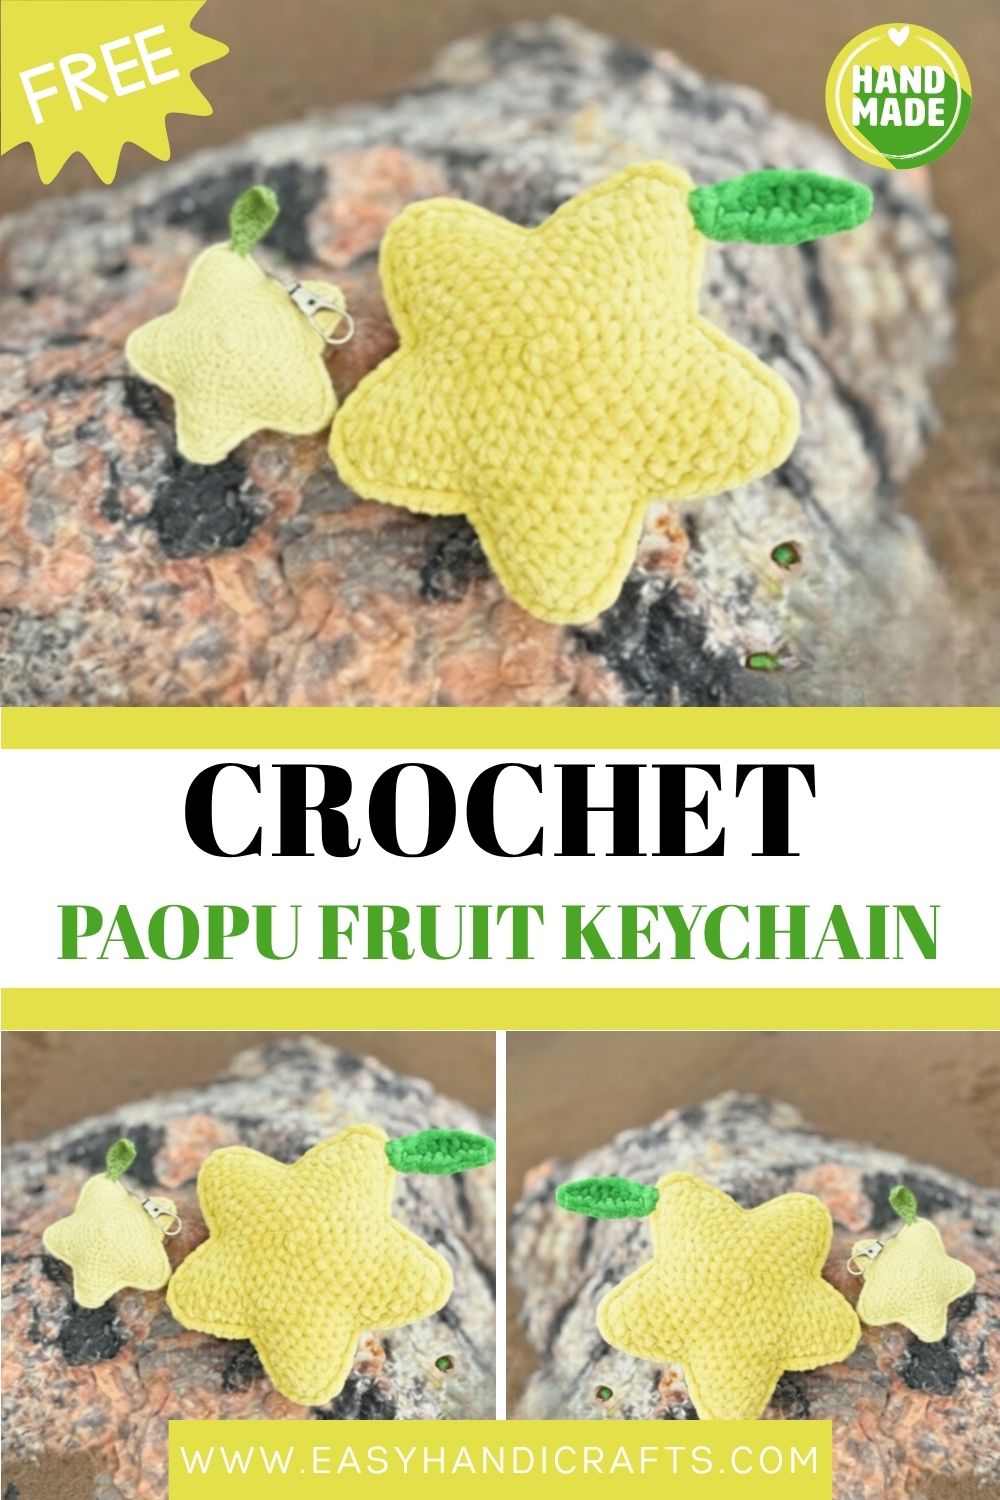
Crochet Paopu Fruit Keychain Amigurumi Pattern for Beginners
Bring a little Kingdom Hearts magic to your hooks! This beginner-friendly Crochet Paopu Fruit Keychain is quick, cute, and perfect for gifting to anyone who loves heartfelt, hand-made little treasures.
The Crochet Paopu Fruit Keychain is one of gaming’s most iconic symbols of connection, and crocheting one yourself makes a charming keepsake. This pattern walks you through two simple star-shaped pieces joined into a plump amigurumi, finished with a tiny leaf. Whether you keep it or gift it, the result is irresistibly sweet.
Pattern Overview
Before you pick up your hook, here is the big picture of how this little star comes together:
- Two identical halves. You crochet the same shape twice a flat round base topped with five pointed tips and then join them back to back into a single puffy star.
- The body is worked in the round. A simple magic ring grows outward through seven rounds of single crochet and increases until you have a neat disc to build the points on.
- The points are worked in flat rows. Each of the five star tips is shaped by skipping a stitch and decreasing row by row, then edging down the side. You repeat this five times per piece.
- A joining round unites the halves. Instead of fastening off the second piece, you single crochet around both layers at once, stuffing as you go.
- A leaf and ring finish it off. A tiny crocheted leaf is sewn at the top, and a keychain ring turns the smaller version into a clip-on charm.
Materials
- Yarn of your choice in yellow and green
- For the larger piece, I used Hobbii’s Honey Bunny (colors #22 and #104) — super bulky weight
- For the smaller piece, I used YarnArt Jeans (colors #67 and #11) — sport weight
- Crochet hook of your choice
- For the larger piece, I used a 4.5 mm hook for the body and a 3 mm hook for the leaf
- Note: Using 3 mm for the leaf is optional you can also use 4.5 mm for the whole piece
- For the smaller piece, I used a 2 mm hook throughout
- Sewing needle
- Scissors
- Stitch markers
- Stuffing
Finished sizes: roughly 20 cm (super bulky) or 16 cm (sport weight) across the star; about 10 cm or 8 cm tall.
Abbreviations
- ch = chain
- dc = double crochet
- dec = decrease
- hdc = half double crochet
- inc = increase
- mr = magic ring
- sc = single crochet
- sk = skip
- sl st = slip stitch
- st = stitch
Skill Level
This project sits at the beginner level. If you can work a magic ring, single crochet, increases, and basic rows, you already have every skill this cheerful pattern needs.
Special Techniques
There is nothing scary hiding in this pattern, but a couple of moves are worth a quick word so they feel familiar before you start:
- The skip-and-turn shaping is what gives each point its slanted, tapered edge. At the start of most point rows you chain one, turn, and skip the next stitch before working across. That skipped stitch is doing the decreasing for you, so resist the urge to crochet into it.
- Edging down the side of a point in Row 8 is the trick that gives you a clean, even tip. You work six stitches down the slanted edge — five along the side and one in the corner which sets up the stitch counts you’ll need later for joining.
- The join-as-you-go round is the real magic. Because you never fasten off the second piece, the working yarn is ready to single crochet straight around both layers, closing the star in one smooth pass while you stuff.
The Pattern
Body (worked in continuous rounds)
- Rnd 1: 6 sc in mr (6)
- Rnd 2: (inc) x6 (12)
- Rnd 3: (sc, inc) x6 (18)
- Rnd 4: (2sc, inc) x6 (24)
- Rnd 5: (3sc, inc) x6 (30)
- Rnd 6: (4sc, inc) x6 (36)
- Rnd 7: (8sc, inc) x4 (40)
Points (worked in rows)
Each point is built on 8 stitches from the body.
- Row 1: 8 sc (8)
- Row 2: ch 1, turn, sk next st, 7 sc (7)
- Row 3: ch 1, turn, sk next st, 6 sc (6)
- Row 4: ch 1, turn, sk next st, 5 sc (5)
- Row 5: ch 1, turn, sk next st, 4 sc (4)
- Row 6: ch 1, turn, sk next st, 3 sc (3)
- Row 7: ch 1, turn, sk next st, 2 sc (2)
- Row 8: 6 sc down the side of the point (5 sc along the side and 1 sc in the corner)
After Row 8 you should have 8 “visible” stitches on the left side and 6 stitches on the right side — 14 stitches total for one point.
Repeat Rows 1–8 a total of 4 more times (five points in all). Slip stitch to the first corner and fasten off — no need to leave a long tail. Once all five points are finished, you should have 70 stitches in total.
Now make a second piece by repeating the body and the points. Do not slip stitch or fasten off the second piece leave the yarn attached, because you’ll single crochet around both halves to join them.
Leaf (worked in rows)
Leave a longer tail at the beginning, since you’ll use it to sew the leaf onto the fruit later.
Tip for heavier-weight yarns: use a smaller hook for the leaf than for the body to make the leaf denser.
Start with a slip knot.
- Row 1: ch 10
- Row 2: sk first ch, 2 sc, hdc, 3 dc, hdc, sc, sl st (8)
- Row 3: ch 1, sl st, sc, hdc, 3 dc, hdc, 2 sc (8)
Fasten off and weave in the end.
Assembly
Here is where the two halves become one tidy little star:
- Place the pieces wrong sides together so the right (neat) sides face outward.
- Line up all five corners first. Pop a stitch marker on each matching corner to keep everything from shifting while you work.
- Stagger the points correctly. Align each point so the first visible stitch of the front piece meets the second visible stitch of the back piece this offset keeps the seam even.
- Single crochet around, stuffing as you go (75). Work an sc through both layers all the way around, adding stuffing before you close each section. Remember to place 1 sc on each of the five corners; every point should end up with 14 stitches and every corner with 1 sc.
- Fasten off and weave in the end once you’ve gone all the way around.
- Sew the leaf on at the top of one point, attaching it to the right side using the long tail you left earlier.
- Add a keychain ring to the smaller fruit for an adorable clip-on charm.
Common Mistakes
A few small slip-ups trip up most beginners keep these in mind:
- Crocheting into the skipped stitch. The skip is intentional. Working it back in flattens the point and throws off your counts.
- Fastening off the second piece. It’s tempting out of habit, but you need that yarn live to join the halves.
- Skipping stitch markers. Without them, the corners drift and the two stars refuse to line up neatly.
- Over- or under-stuffing. Add a little at a time; a firm but not bulging star holds its shape best.
- Forgetting the corner sc. Missing the single stitch on each corner during the join round leaves gaps and uneven points.
Important Remarks
- Hook and yarn are flexible. Any colors and weights work your finished size simply changes with them.
- Tension matters more than yarn brand. Aim for tight, even stitches so no stuffing peeks through the fabric.
- The leaf hook is optional. Going down a size only makes the leaf denser; one hook for everything is perfectly fine.
- Count after every round. A thirty-second check now saves a lot of frogging later.
- Make it a pair. Crochet Paopu Fruit Keychain are symbols of shared destiny, so two of these make a heartfelt gift.
Conclusion
And there you have it a plump, star-shaped Crochet Paopu Fruit Keychain that fits right in your palm. This little make is proof that beginner patterns can still feel special, blending simple stitches with a shape full of meaning. Hang it from your keys, clip it to a bag, or share one half of a matching set with someone you adore. However you finish yours, take a moment to enjoy the cheerful result of your own two hands. Happy crocheting, and may your Paopu fruit bring a little extra magic to your day.