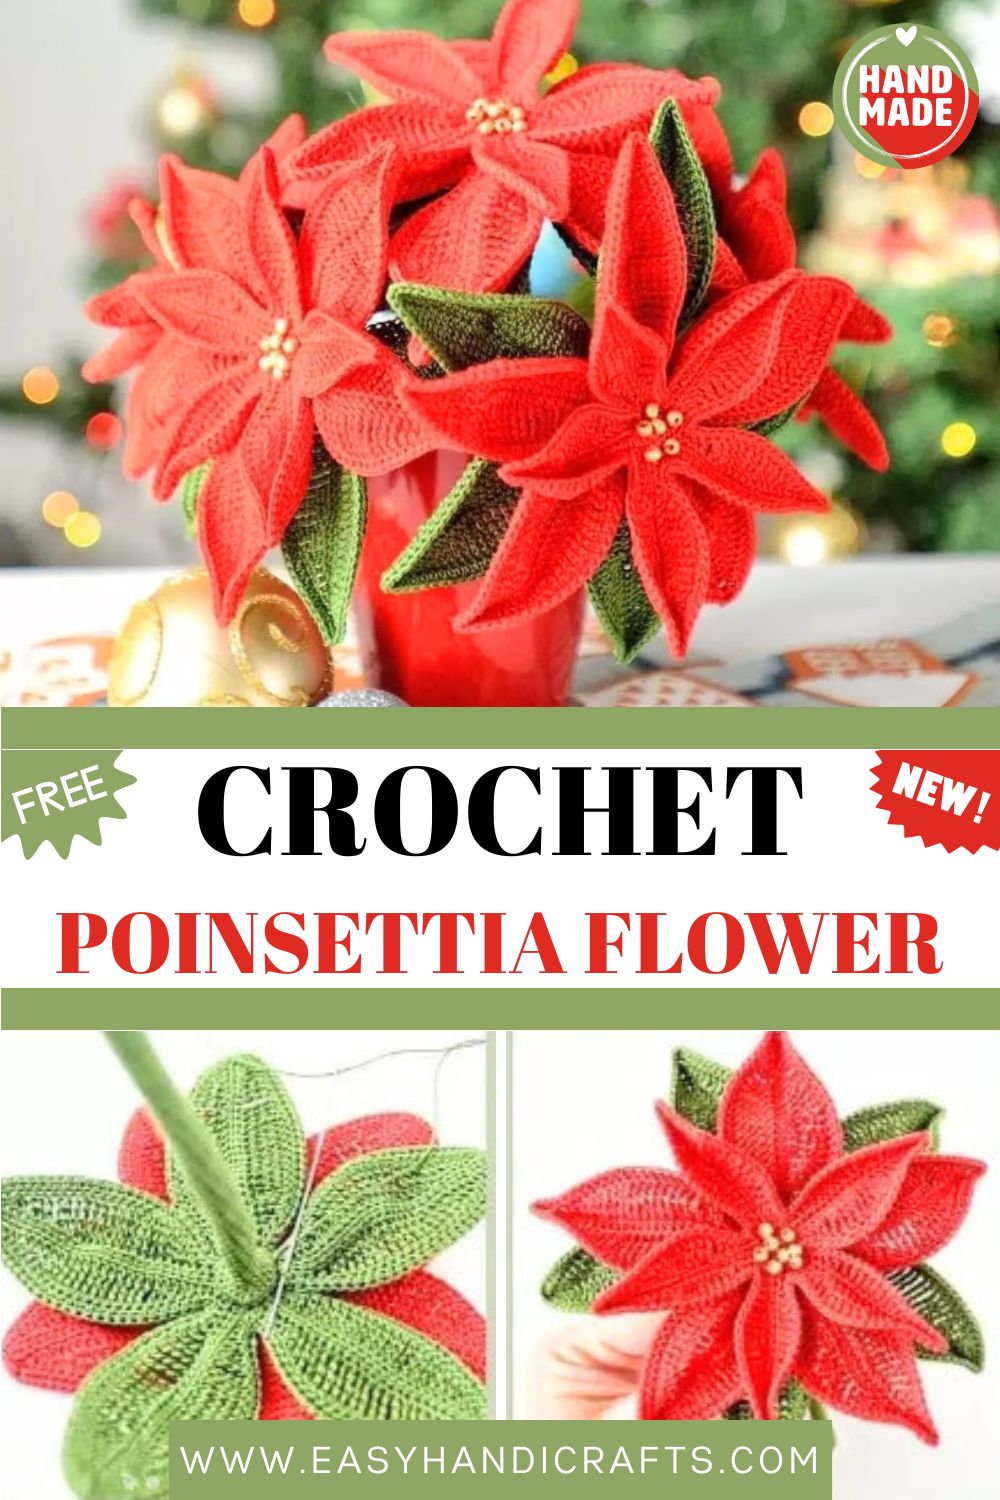
Free Crochet Poinsettia Flower Pattern for Holiday Home Decor
Bring festive cheer into your home with this Free Crochet Poinsettia Flower pattern. Stitch a lasting red-and-green bloom that never wilts, perfect for brightening tables, mantels, and holiday corners all season long.
The poinsettia is the unofficial star of the winter holidays, and this crocheted version captures its bold beauty without the fuss of a real plant. Made from soft cotton yarn and shaped with hidden wire, each flower keeps its form beautifully. Follow along and craft a whole bouquet for your décor.
Pattern Overview
Before you pick up your hook, here is a quick look at how this project comes together so you know what to expect from start to finish:
- The finished poinsettia is built from four separate crocheted pieces: little petals, big petals, leaves, and a stem.
- Each petal layer and the leaf layer are worked in the round from a magic ring, with long chains forming the length of every petal.
- A thin copper wire is crocheted directly into the third row of every petal and leaf, which lets you bend and pose the flower into a natural shape.
- The stem is a slim crocheted tube that gradually widens at the base and slides over a solid core wire for support.
- A handful of yellow beads sit in the center of the little petals to mimic the real flower’s tiny golden buds.
- The author’s sample bouquet uses five flowers, four stems about 11 cm (4.33 in) long and one stem about 13 cm (5.12 in) long, all arranged in a small vase.
Materials
- Yarn, 100% cotton, 50 g / 335 m, in red and green.
- Thin copper wire, 0.3 mm.
- Solid core copper wire, 3 mm.
- Duct tape.
- Yellow beads.
- Crochet hook No. 1.
- Sewing needle.
- Scissors.
- Wire cutters.
- A flower vase about 8.5 cm high.
The Pattern
1. Little Flower Petals
Foundation Ring
Start with 5 sc in a magic ring (5). Then work 5 inc (10), and join with a sl st to form the ring.
Row 1
20 ch, 19 sc starting from the second chain from the hook, 1 sc in the 2nd loop of the ring, 1 sc in the 3rd loop of the ring. Repeat the chain-and-return sequence across the ring: 20 ch, 19 sc, then 1 sc in the 4th loop and 1 sc in the 5th loop; again for the 6th and 7th loops; again for the 8th and 9th loops; and finally 20 ch, 19 sc, with 1 sc in the 10th loop of the ring.
Row 2
2 sc, 1 hdc, 1 dc, 1 tr, 6 dtr, 3 tr, 2 dc, 1 hdc, 2 sc, 3 ch, then continue down the other side of the petal: 2 sc, 1 hdc, 2 dc, 3 tr, 6 dtr, 1 tr, 1 dc, 1 hdc, 2 sc. Skip the loop on the ring, then 1 sc in the next loop of the ring. Repeat this 4 more times to shape all five petals.
Row 3
Now crochet together with a thin wire, leaving the short end of the wire free (about 6 cm or 2.36 in). Work 18 sc, then 3 sc into the space of the three chains at the tip, spreading the wire over the petal as you go. Work 18 sc back down the other side, then dec by crocheting the last loop of the current petal together with the first loop of the next petal (skip the sc on the ring). Repeat 4 times. At the end of the fifth petal, work a slip stitch instead of a decrease. Cut the wire and leave its short end free, then cut the yarn and hide the thread.
2. Big Flower Petals
Foundation Ring
Begin with 10 sc in a magic ring, sl st (10) to form the ring, but do not tighten it all the way.
Row 1
26 ch, 25 hdc from the second chain from the hook, 1 sc in the 2nd loop of the ring, 1 sc in the 3rd loop. Repeat across: 26 ch, 25 hdc, with two single crochets into successive ring loops each time, until you reach the 10th loop of the ring.
Row 2
2 sc, 1 hdc, 1 dc, 1 tr, 2 dtr, 9 trtr, 3 dtr, 2 tr, 2 dc, 1 hdc, 1 sc, 4 ch, then on the other side: 1 sc, 1 hdc, 2 dc, 2 tr, 3 dtr, 9 trtr, 2 dtr, 1 tr, 1 dc, 1 hdc, 2 sc. Skip the loop on the ring, then 1 sc in the next loop. Repeat 4 times.
Row 3
Crochet together with a thin wire, leaving a 6 cm free end. Work 2 sc, 22 hdc, then 4 hdc into the space of the four chains at the tip, spreading the wire as you go. Continue 22 hdc, 2 sc on the other side, then dec into the next petal. Repeat 4 times, ending the fifth petal with a slip stitch. Cut the wire and yarn and hide the thread.
3. Flower Leaves
Foundation Ring
Make 10 sc in a magic ring, sl st (10), leaving the ring loose.
Row 1
29 ch, 28 hdc from the second chain from the hook, then 1 sc into the 2nd and 3rd loops of the ring. Repeat the long chains and returns across the ring up to the 10th loop.
Row 2
2 sc, 1 hdc, 1 dc, 1 tr, 2 dtr, 11 trtr, 3 dtr, 3 tr, 2 dc, 1 hdc, 1 sc, 4 ch, then on the other side: 1 sc, 1 hdc, 2 dc, 3 tr, 3 dtr, 11 trtr, 2 dtr, 1 tr, 1 dc, 1 hdc, 2 sc. Skip the ring loop, 1 sc in the next. Repeat 4 times.
Row 3
Crochet with thin wire, leaving a 6 cm free end. Work 2 sc, 25 hdc, 4 hdc into the four-chain space, spread the wire, then 25 hdc, 2 sc, and dec into the next leaf. Repeat 4 times, finishing the fifth leaf with a slip stitch. Cut the wire and yarn, hide the thread.
4. Flower Stem
5 sc in a magic ring (5), then 5 inc (10). Work 10 sc, crocheting to the desired length. Then shape the base: (1 sc, inc) *5 (15), (2 sc, inc) *5 (20), (3 sc, inc) *5 (25). Leave a long tail for sewing. The sample uses four 111-cm stems and one 113-cm stem.
Special Techniques
This Free Crochet Poinsettia Flower pattern looks intricate, but it leans on just a few core techniques that you will repeat over and over. The first is the magic ring, which gives each piece a tight, adjustable center. The second is working tall stitches across a long chain, where the height of the stitch climbs from sc up to triple treble in the middle, then drops back down. That rise and fall is exactly what gives every petal its pointed, leaf-like shape. The most distinctive technique is crocheting over a thin copper wire in the third row. You simply lay the wire along the top of your stitches and trap it under each new stitch, leaving the ends free. Once the piece is done, that hidden wire lets you bend and curl the petals into a lifelike pose, which is the secret behind realistic crocheted flowers.
Skill Level
This is an intermediate Free Crochet Poinsettia Flower project. You should be comfortable with tall stitches, the magic ring, and working in rounds. Crocheting over wire is new for many makers but easy to learn quickly.
Common Mistakes to Avoid
- Tightening the magic ring too soon. For the big petals and leaves the ring should stay loose so all ten loops stay accessible while you work.
- Miscounting the tall stitches. The trtr and dtr clusters in the middle of each petal are what create the point, so dropping even one stitch changes the shape.
- Pulling the wire too tight. Keep the copper wire relaxed as you crochet over it, or the petal edge will buckle instead of lying smooth.
- Cutting wire ends too short. Always leave about 6 cm free at each end. You need that length later to twist the petals onto the stem wire.
- Skipping the slip stitch finish. The fifth petal ends with a slip stitch, not a decrease, which keeps the ring closed neatly.
Assembly
- Sew the beads into the center of the little petals.
- Layer the little petals, the big petals, and the leaves together.
- Twist the thin wires from the petals and leaves around the solid stem wire to connect them.
- Wrap the joined wires firmly with duct tape so everything holds.
- Slide the wrapped wire into the crocheted stem, then sew the stem to the leaves.
- Gently bend and curl each petal and leaf into a pointed shape. Your poinsettia is ready.
Important Remarks
- Make a full bouquet. A single bloom is lovely, but five flowers grouped in a small vase create the fuller, fuller-looking display shown in the sample.
- Choose true poinsettia colors. Bright red petals with green leaves read instantly as a holiday flower; you can also try white or pink for variety.
- Block lightly if needed. A quick steam helps the petals open up and lie flat before you shape them with the wire.
- Mind your hook size. A No. 1 hook keeps the cotton stitches tight and crisp, which makes the wire easier to hide.
- Save your wire scraps. Leftover thin copper wire is handy for reinforcing weak joins during assembly.