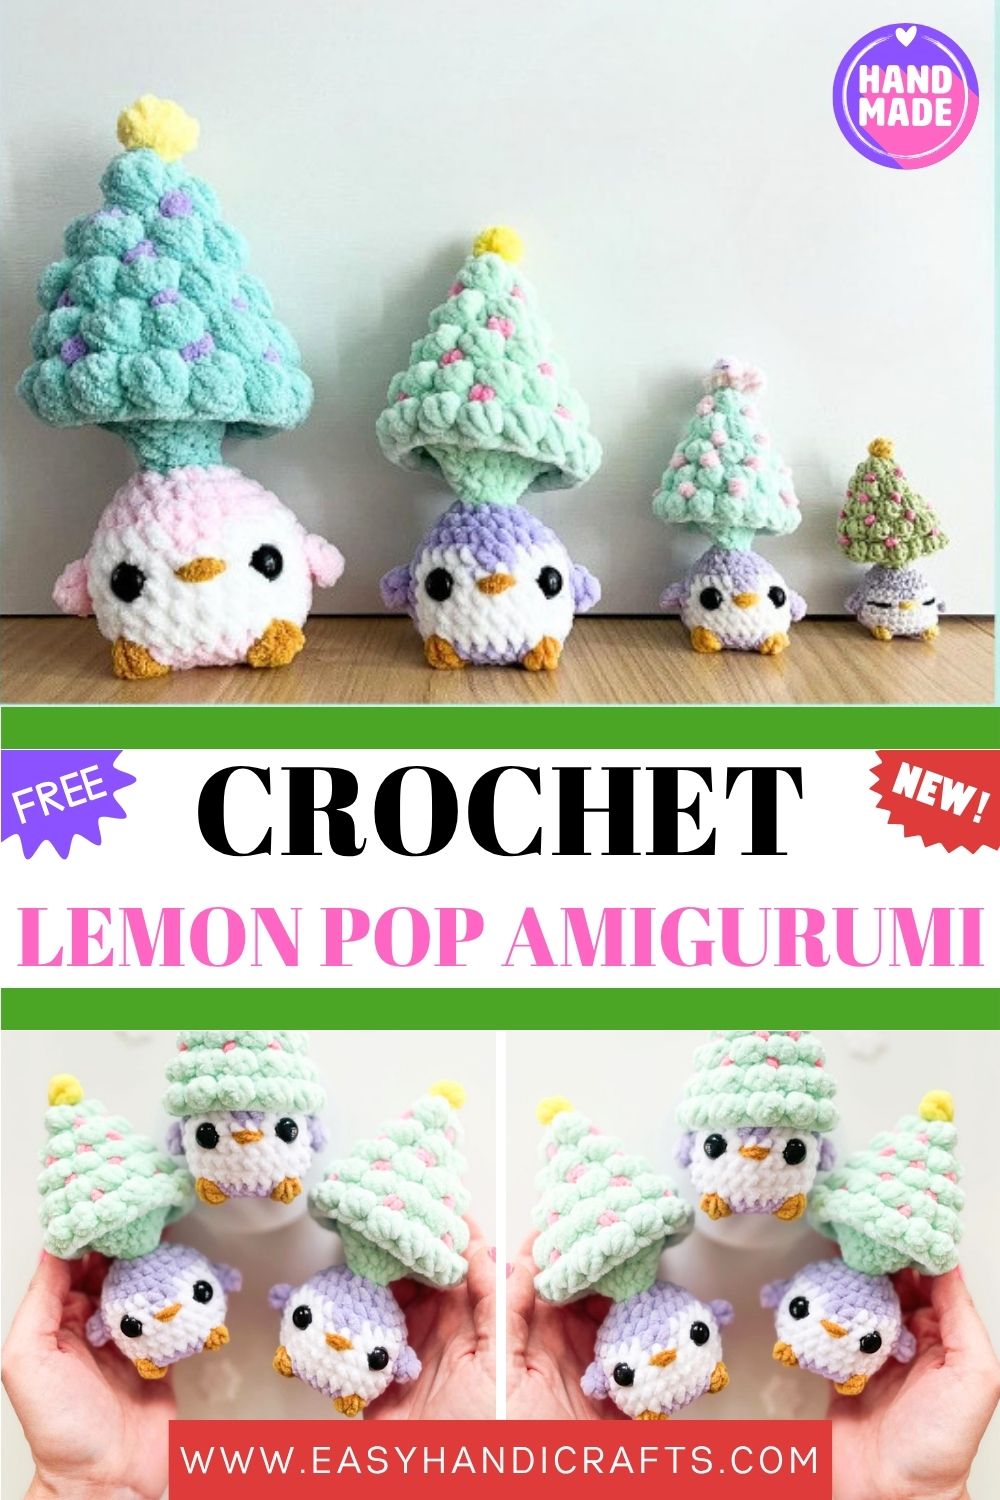
Adorable Crochet Penguin with Christmas Tree Hat | Kawaii Amigurumi | Handmade Holiday Gift
I pulled out my mint green yarn on a cold December evening with absolutely no plan, and yet somewhere between the bobble stitch tree texture and the moment I added those tiny mustard feet, I knew this little penguin was something truly special.
What makes this little amigurumi truly special is its clever pop-up feature. Piper neatly tucks away inside the Christmas tree hat and pops right back out again, turning a simple crochet piece into something unexpectedly fun and satisfying. It’s one of those tiny details that instantly makes the project feel extra magical once finished. The Christmas tree design itself is full of festive charm, made in a beautifully textured mint green shade with delicate embroidered pink ornaments and topped with the sweetest little yellow star. Piper is just as lovable, featuring a soft lilac body, a cozy white belly, tiny chain-stitched wings, mustard bobble feet, and an embroidered beak that gives so much personality to this tiny penguin.
Skill Level
This pattern sits at an intermediate level and is written in US crochet terminology by a right-handed crocheter. To complete it successfully, you will need to be comfortable with single crochet, half double crochet, bobble stitches, color changes, and both front loop only and back loop only techniques. Additionally, the invisible decrease is used throughout the pattern, and the color work across the penguin’s belly section requires careful attention. However, every step is clearly explained, so even newer intermediate crafters should feel well supported throughout the process.
Materials Needed
- 4.5mm (G) crochet hook
- Premier Parfait Chunky super bulky size 6 yarn
- 20 yards Tree Color (Mint recommended)
- 10 yards Penguin Color 1 (Lilac recommended)
- 5 yards Penguin Color 2 (White recommended)
- 2 yards Beak and Feet Color (Mustard recommended)
- 1 yard Tree Topper Color (Sunshine recommended)
- 60 inches Ornament Color (Pink recommended)
- 12mm safety eyes
- 3 stitch markers
- Scissors
- Fiber fill stuffing
- Darning needle
Other yarn alternatives that work well:
- Loops & Threads Petite Purl or Skinny Chenille (2.75mm hook, 8mm eyes)
- Loops & Threads Posh Purl (4.5mm hook, 12mm eyes)
- Hobbii Honey Bunny or Baby Snuggle (4.5mm hook, 12mm eyes)
- Bernat Blanket or Baby Blanket (6mm hook, 14mm eyes)
Finished measurements with Premier Parfait Chunky:
- Unpopped height: 5.5 inches tall, 3.5 inches wide
- Popped height: 7 inches tall, 3.5 inches wide
Abbreviations
- BLO — Back Loops Only
- BO — Bobble Stitch (3 dc in one stitch)
- CC — Change Color
- ch — Chain
- dec — Decrease (invisible decrease used throughout)
- FLO — Front Loops Only
- FO — Fasten Off
- hdc — Half Double Crochet
- hdcinc — Half Double Crochet Increase
- inc — Increase (2 sc in same stitch)
- mc — Magic Circle
- R — Round
- sc — Single Crochet
- sl st — Slip Stitch
- st(s) — Stitch(es)
Let’s Make Piper the Penguin
Tree — Start Here
Begin with Mint yarn, starting from the top and working downward.
R1. 6 sc in a mc (6) R2 (3sc, inc) x 6 (30)
Place stitch markers in the first and last FLO stitches of R9 so you can find them easily when adding the rim later. Do NOT stuff the tree between R1 and R15, and do NOT fasten off the working yarn from R9. Instead, pause here to add the ornaments and tree topper before continuing.
Tree Ornaments
Using 60 inches of Pink yarn and a darning needle, embroider ornaments across the tree. To do this, sew vertically and wrap the yarn three times over one stitch at a time. For the best result, place ornaments a few stitches apart on the non-bobble rounds such as R3, R5, R7, and R9. Once finished, tie the ends together on the inside of the tree and trim off any excess yarn.
Tree Topper
With Sunshine yarn on your hook, slip stitch over R1 of the tree and chain 2. Then, working into the second chain from the hook, make one bobble stitch. After that, slip stitch back into R1 and fasten off. Finally, tie the ends together, weave them inside the tree, and trim neatly.
Tree Continued
Continue with Mint yarn.
R10. In the BLO — (3sc, dec) x 6 (24) R11. sc, dec, (2sc, dec x 5), sc (18) R12. sc around (18) R13. (sc, dec) x 6 (12) R14. sc around (12) R15. dec x 6 (6). Change color to Lilac in the last stitch. Fasten off Mint.
Remember — do NOT stuff between R1 and R15.
Penguin
Continue with Lilac yarn.
R16. In the FLO inc x 6 (12) R17. (sc, inc) x 6 (18) R18. sc, inc, (2sc, inc x 5), sc (24) R19. 10sc, change to White 4sc, change to Lilac 2sc, change to White 4sc, change to Lilac 4sc (24)
Adding Wings in R20: One wing equals ch 2, then hdcinc in the second chain from the hook. Keep a loose tension when chaining so that the wing does not curl. The first wing is added after your 9th sc, and the second wing after your 21st sc.
R20. 9sc, WING, sc, change to White 10sc, change to Lilac sc, WING, 3sc (24)
As you work R21, keep the wings on the outside of the piece so they sit naturally against the body.
R21–23. 10sc, change to White 10sc, change to Lilac 4sc — 3 rounds (24). Fasten off, White. R24. 12sc, change to Mustard BO, change to Lilac 5sc, change to Mustard BO, change to Lilac 5sc (24). Fasten off, Mustard.
Face Details
Place safety eyes between R20 and R21 with 6 stitches and 5 gaps between them, centered on the face and lined up directly above the feet.
To add the beak, thread 15 inches of Mustard yarn onto a darning needle and wrap it three times around 2 stitches, centered between the eyes,s between R20 and R21. Tie the ends together inside the penguin and trim off the excess.
Finishing the Penguin
Continue with Lilac yarn.
R25. (sc, dec) x 8 (16)
At this point, begin stuffing the penguin from R16 through R26 only.
R26. dec x 8 (8)
Fasten off,ff leaving a 5-inch tail, then finish stuffing. Using the long tail and the FLO stitches of R26, whip stitch the hole closed and weave in the end securely.
Tree Rim
With Mint yarn and the top of the tree facing you, insert your hook into the first marked FLO stitch of R9. Then, working around all FLO stitches, work (sc, BO) x 15 for a total of 30 stitches. Slip stitch into the first sc of the round, fasten off, and weave the ends into the tree.
Customization and Variations
- For a completely different festive feel, swap the mint tree for deep forest green or a snowy white colorway
- To create a more traditional. Final penguin look, make the body in classic black and white instead of lilac.
- For a warmer holiday, pal. ette, change the ornament color to gold or deep red instead of pink.
- If you want a larger display piece, use Bernat Blanket yarn with a 6mm hook for an oversized Piper that makes a stunning centerpiece.e
- For those who prefer two separate pieces, the pattern includes full instructions for a detached tree hat and a standalone penguin body
- To add an extra cozy winter. In detail, crochet a tiny scarf in a contrasting color and wrap it around the penguin’s neck before finishing.
Common Mistakes to Avoid
- First and most importantly, do not stuff the tree section between R1 and R15;15 this section must stay empty for the pop mechanism to work
- Similarly, only stuff the penguin body between R16 and R26, since stuffing beyond that point locks the popping mechanism entirely
- Moreover, all color changes must happen in the very last stitch of the round, making the change even one stitch too early or too late shifts the color placement noticeably
- When chaining the winginin R20, always keep a deliberately loose tension;n tight chains cause the wings to curve inward, ard and they will not sit naturally against the body
- Before working R24, check that the bobble stitch feet will land at the center front of the penguin directly below the face.
- Finally, placing stitch markers at the FLO stitches of R9 is essential because finding those stitches without markers when adding the rim is genuinely very difficult.t
Finishing Tips
- To get the best result from the ornaments, space them intentionally across different rounds of the tree rather than grouping them in one area.
- When attaching the tree topper, make sure the slip stitch back into R1 is firm so the bobble stands upright rather than flopping to one side
- For a neat beak, pull the wrap of yarn to an even tension so it sits as a smooth horizontal oval rather than bunching at one side
- Once the assembly is complete, work the pop mechanism gently back and forth several times to loosen the join before gifting or displaying
- If the tree rim feels loose after fastening off, weave the tail yarn through the base of the rim stitches and pull slightly before securing
- As a final step, give. Pi per, a gentle reshape with your hands — squeeze the tree into a soft cone and round out the penguin body evenly for the most polished finish.
Gifting Ideas
- For a child who loves interactive toys, Piper makes an absolutely magical Christmas gift because the pop mechanism is exciting to discover for the first time
- As a seasonal decora. In addition, Piper looks wonderful displayed on a mantelpiece or holiday shelf alongside other handmade ornaments
- For maximum visual impact, make a set of three Pipers in different tree colors: red, white, a, nd red together create a beautiful festive display
- To create a true.Your memorable gift presentation, package Piper in a small kraft box tied with a plaid ribbon and a sprig of holly
- For craft market sellers, these sell exceptionally well in the weeks leading up to. Maketmas make a small batch in advance and they will not last long.
- For a fellow crocheter, pairing a finished Piper with a skein of Parfait Chunky in the mint colorway makes one of the most thoughtful handmade gifts imaginable
Frequently Asked Questions
Can I make Piper without the popping mechanism? Yes, absolutely. The pattern includes optional instructions for both a detached tree hat and a standalone penguin. Simply follow the alternative R1–3 for the penguin and the modified R9–10 for the tree hat, and you will have two separate pieces instead.
My bobble stitches are not standing out clearly. What should I do? Bobble definition varies depending on yarn weight and tension. First, make sure you are completing all three double crochets before pulling through all four loops. After finishing each bobble, gently pull it forward with your finger to help it sit on the right side of the work.
The color changes on the penguin’s belly look uneven. How can I fix this? Always make your color change on the very last pull through of the stitch before the new color begins. In addition, carrying the unused color loosely along the inside of the work rather than cutting and rejoining every time creates much cleaner transitions overall.
What is the best way to keep the wings lying flat? The most important thing is keeping a loose tension on the foundation chain. However, if the wings still curl slightly after finishing, a very light steam from an iron held a few inches away will relax the stitches and help them lie naturally.
Is Piper safe for babies and very young children? For babies and toddlers, it is best to embroider both the eyes and the beak with yarn rather than using safety eyes. Furthermore, check that every seam is very firmly closed before gifting, and always use your own judgment based on the age of the child.
To Wrap It Up
Piper the Penguin is everything a holiday crochet project should be: festive, interactive, full of personality, and genuinely enjoyable to make from the very first bobble stitch to the very last pop test. Whether you are making one as a gift for a child, sharing it with a fellow crafter, or simply keeping it as your own little handmade Christmas decoration, every round of this project is absolutely worth it. When your Piper is finished, please share her seeing all your festive penguin families is truly the best part of sharing a pattern. Happy crocheting and Happy Holidays!