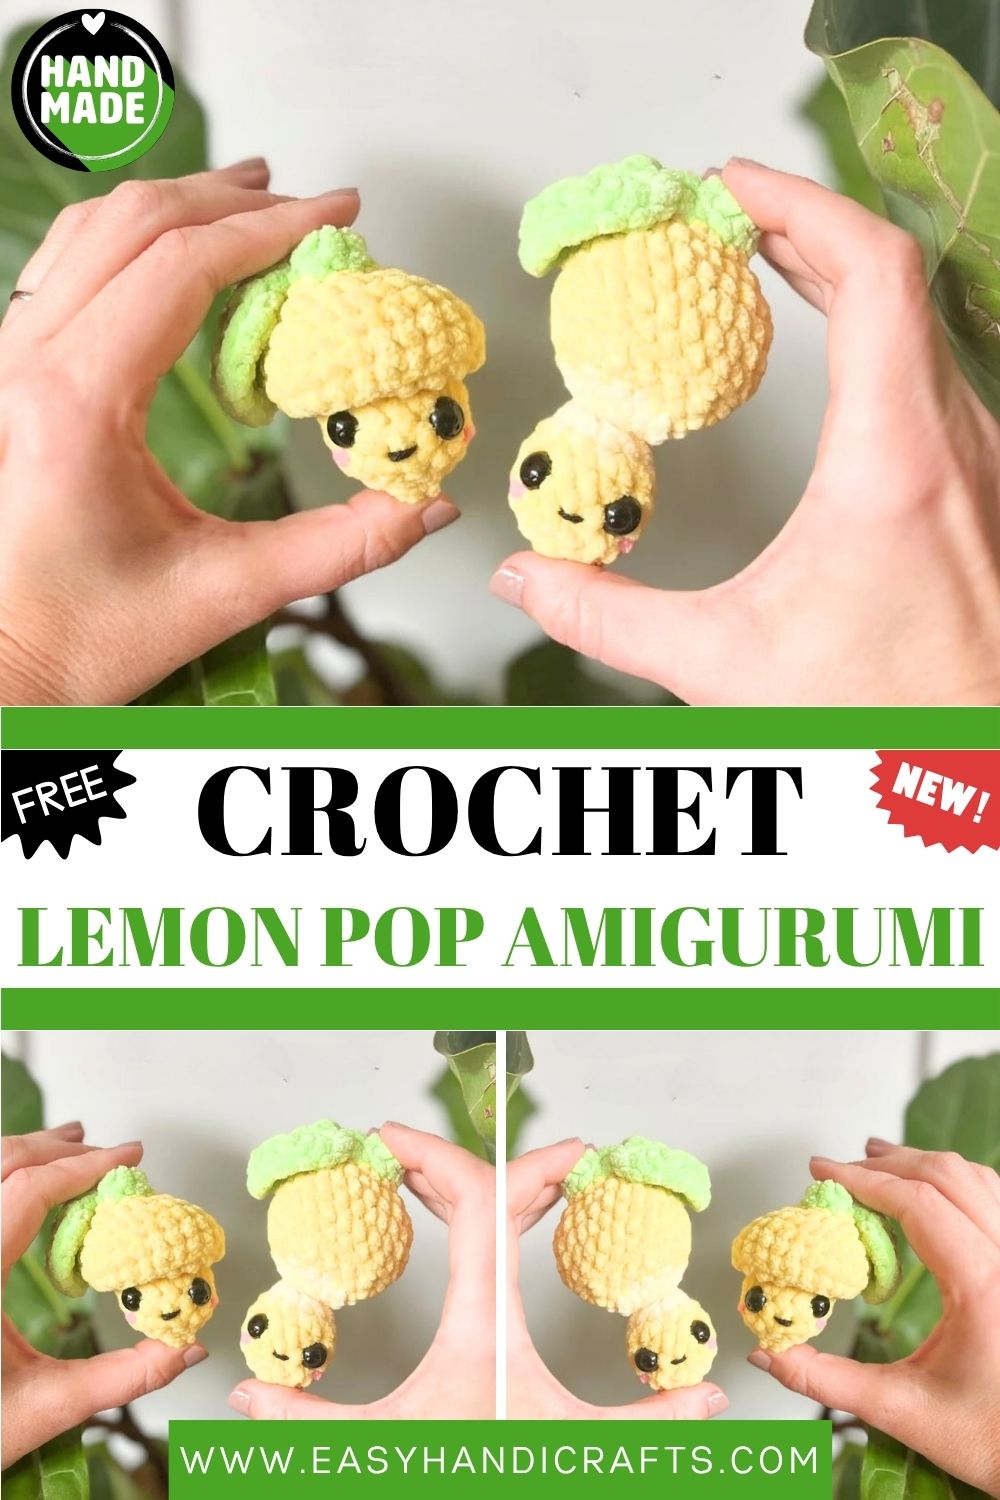
Kawaii Crochet Lemon Pop Amigurumi Duo | Cute Handmade Fruit Plushie | Perfect Gift
I picked up this pattern on a whim one evening, thinking it would be a quick little project, and three hours later, I was still completely absorbed, genuinely delighted, and already planning my next color variation before I had even finished the first one.
Lottie the Lemon is a kawaii fruit amigurumi with a seriously clever pop mechanism built right into her design. The lemon cap sits on top, and the squishy little head pops in and out, which sounds simple but is genuinely one of the most satisfying things you will ever do with a finished crochet piece. The design features a bright yellow body, a tiny green stem, a delicate leaf stitched to the side, and the sweetest little embroidered face with rosy pink cheeks and a small black mouth. Every detail is considered, and every round serves a purpose. Whether you make her in classic lemon yellow, switch things up with a lime colorway, or go full contrast with blanket yarn for a chunkier version, Lottie is the kind of project that reminds you exactly why you fell in love with crochet in the first place.
Skill Level
This is an intermediate-level pattern written in US crochet terminology by a right-handed crocheter. You will need to be comfortable with single crochet, half double crochet, double crochet, triple crochet, color changes, and both front loop only and back loop only techniques. The leaf involves a combination of stitches worked into the same stitch, which sounds tricky but becomes very intuitive once you try it.
Materials Needed
- 4.5mm (G) crochet hook
- Premier Parfait Chunky super bulky size 6 yarn
- 5 yards Green (Key Lime)
- 18 yards Dark Yellow (Sunshine)
- 5 yards Light Yellow (Yellow)
- 10 inches Pink (Pink Lemonade) for embroidery
- 10 inches Black worsted weight yarn for embroidery
- 10mm safety eyes
- Stitch marker
- Scissors
- Fiber fill stuffing
- Darning needle
Other yarn alternatives that work well:
- Big Twist Posh (4.5mm hook, 10mm eyes)
- Hobbii Honey Bunny or Baby Snuggle (4.5mm hook, 10mm eyes)
- Bernat Blanket (6mm hook, 12mm eyes)
Abbreviations
- BLO — Back Loops Only
- CC — Change Color
- ch — Chain
- dc — Double Crochet
- FLO — Front Loops Only
- FO — Fasten Off
- hdc — Half Double Crochet
- inc — Increase
- mc — Magic Circle
- R — Round
- sc — Single Crochet
- sk — Skip
- sl st — Slip Stitch
- st(s) — Stitch(es)
- tr — Triple Crochet
- {…} — All stitches worked into the same stitch
Let’s Make Lottie the Lemon
Lemon Cap Start Here
Work with Green yarn, starting from the top.
R1. 6 sc in a mc (6) R2. sc around (6). Change color to Dark Yellow in the last stitch. Fasten off, Green. R3. inc x 6 (12) R4. (sc, inc) x 6 (18) R5. sc, inc, (2sc, inc) x 5, sc (24) R6–8. sc around 3 rounds (24) R9. In the BLO sc, dec, (2sc, dec) x 5, sc (18) R10. sc around (18). Change color to Light Yellow in the last stitch. Fasten off Dark Yellow. R11. (sc, dec) x 6 (12) R12. sc around (12) R13. dec x 6 (6)
Do NOT stuff R1–13. Do not fasten off.
Optional tip: If you are worried about stuffing passing through from the lemon head into the cap, loosely sew a strand of the same color yarn over the hole between them using the back loops before continuing.
Lemon Head
Continue with Light Yellow yarn.
R14. In the FLO inc x 6 (12). Change color to Dark Yellow in the last stitch. Fasten off Light Yellow. R15. (3sc, inc) x 3 (15) R16–17. sc around — 2 rounds (15) R18. (3sc, dec) x 3 (12)
Place safety eyes between R16 and R17 with 4 stitches and 3 gaps between them. Begin stuffing the head from R14 onwards only.
R19. dec x 6 (6)
Finish stuffing the head.
R20. (dec, sc) x 2 (4)
Fasten off, leaving a long tail. Use the leftover BLO stitches of R20 to whip stitch the head closed.
Leaf
Work with Green yarn.
R1. 5 sc in a mc (5) R2. sl st in first stitch, {3 hdc} in next stitch, {2dc, tr, ch 1} in next stitch, {tr, 2dc} in next stitch, {3 hdc} in next stitch, then sl st into the first stitch of R2.
Fasten off,f leaving a long tail for sewing. Sew the leaf onto the side of the stem between R2 and R3.
Embroidery
With Pink yarn: Embroider horizontal lines wrapping yarn twice over one stitch, between R17 and R18 on the outside underneath each eye. This creates the rosy blush cheek effect.
With Black worsted weight yarn: Embroider a single horizontal line wrapping yarn once over one stitch, centered between the eyes between R17 and R18, for the small mouth detail.
Customization and Variations
- Use light green yarn with a dark green leaf to turn Lottie into a li, me a wonderful color contrast that looks stunning in person.
- Make a darker yellow lemon body with a lighter yellow inside section for higher contrast and a more realistic peeled lemon effect
- Use Bernat Blanket yarn with a 6mm hook and 12mm eyes for an oversized version that makes an impressive shelf display piece
- Try the optional color change to Light Yellow in R10–14 for a subtle peeled lemon look that adds beautiful dimension to the finished cap
- Make a whole fruit.To bowl set a lemon, a lime, and an orange using the same base pattern with different color combinations
- Embroider tiny seeds onto the lemon body using white yarn for an extra realistic and charming detail
Common Mistakes to Avoid
- Do not stuff R1–13 under any circumstances. This section must be empty for the pop mechanism to work correctly
- Only stuff the head. section between R14 and R20. Stuffing beyond this point will lock the pop and ruin the interactive element
- Color changes must. happen in the very last stitch of the round, not the first stitch of the next round. Getting this wrong shifts the stripe placement noticeably
- The leaf involves multiple stitch types worked into the same stitch. Read the R2 carefully before starting,g and refer to the diagram so you understand the direction before picking up your ho. ok
- Blanket yarn creates a noticeably larger and taller finished product than Parfait Chun. If your lemon looks too elongated or pointy, go up one hook size
- Pinch the section just above the head closed while stuffing to make sure no fiber fill sneaks up into the cap section
Finishing Tips
- When. Whip stitching the head closed using the BLO stitches of R20, pull the yarn firmly and evenly so the closure sits flat and does not pucker
- The embroidery details are small, but they completely transform the face. Take your time placing the cheeks and mouth symmetrically before committing to the final stitch
- Sew the leaf at a very slight angle against the stem,m rather than perfectly flat, which gives Lottie a more natural and organic look
- If the pop mechanism feels a little stiff at first, work it gently back and forth a few times to loosen the joint between the cap and head
- Use a bobby pin or a straight pin to hold the leaf in position while sewing to keep it from shifting around.
- Once fully assembled, give Lottie a gentle squeeze and reshape with your hands the round lemon head, which, in particular, benefits from a little careful reshaping after the seams are closed.
Gifting Ideas
- Lottie makes the most cheerful desk companion or bedside decoration, a gift for someone who needs a little brightness in their day.
- Package her in a small yellow gift box with tissue paper and a handwritten tag for a presentation that is as sunny as the plushie itself
- Make a set of three fruit pops: lemon, lime, and orange,nge and present them together in a little basket for a gift that is genuinely unlike anything available in shops
- These sell incredibly well at summer craft markets and pop-up stalls. The interactive pop feature draws people in immediately, ly and they are very hard to put back down
- A Lottie Lemon paired with a jar of homemade lemon curd or a packet of lemon tea makes a wonderfully themed gift set that feels both personal and thoughtful.
- For a child’s birthday, make one in their favorite fruit color with their name embroidered on the body, a completely one-of-a-kind keepsake they will treasure
Frequently Asked Questions
How does the pop mechanism actually work? The BLO decreases in R9 create a natural ridge that acts as a hinge point between the cap and the head. Because the cap section is left completely unstuffed, it collapses inward when pressed and snaps back into shape when released, creating that deeply satisfying pop.
My lemon looks too tall and pointy — what should I do? This is almost always a yarn weight issue. Bulkier yarns like Bernat Blanket naturally create a taller finished shape. Try going up one hook size, or switch to the recommended Premier Parfait Chunky for the most accurate proportions.
Can I skip the color change to Light Yellow in R10–14? Absolutely. The Light Yellow section is completely optional and simply adds a subtle peeled lemon effect. If you prefer a solid yellow lemon, just continue in Dark Yellow throughout, and the pattern works perfectly well without it.
What is the best way to keep the embroidery looking neat? Use a darning needle with a blunt tip and work slowly, pulling each wrap of yarn to an even tension before moving to the next stitch. Securing the ends very firmly on the inside of the head prevents the embroidery from loosening over time.
Is this pattern safe for young children? With firmly secured safety eyes and well-closed seams, this plushie is suitable for older children. For babies or toddlers, embroider the eyes with black yarn instead and double-check every seam before gifting.
To Wrap It Up
Lottie the Lemon is one of those patterns that looks impressive, feels satisfying to make, and brings an instant smile to anyone who picks her up and discovers the pop. From the color-changing cap to the tiny embroidered face and the delicate little leaf, every element of this design is just right. I really hope you enjoy making her as much as I did. When your Lottie is finished, please share her. I genuinely cannot wait to see all the beautiful fruity versions you create. Happy crocheting!