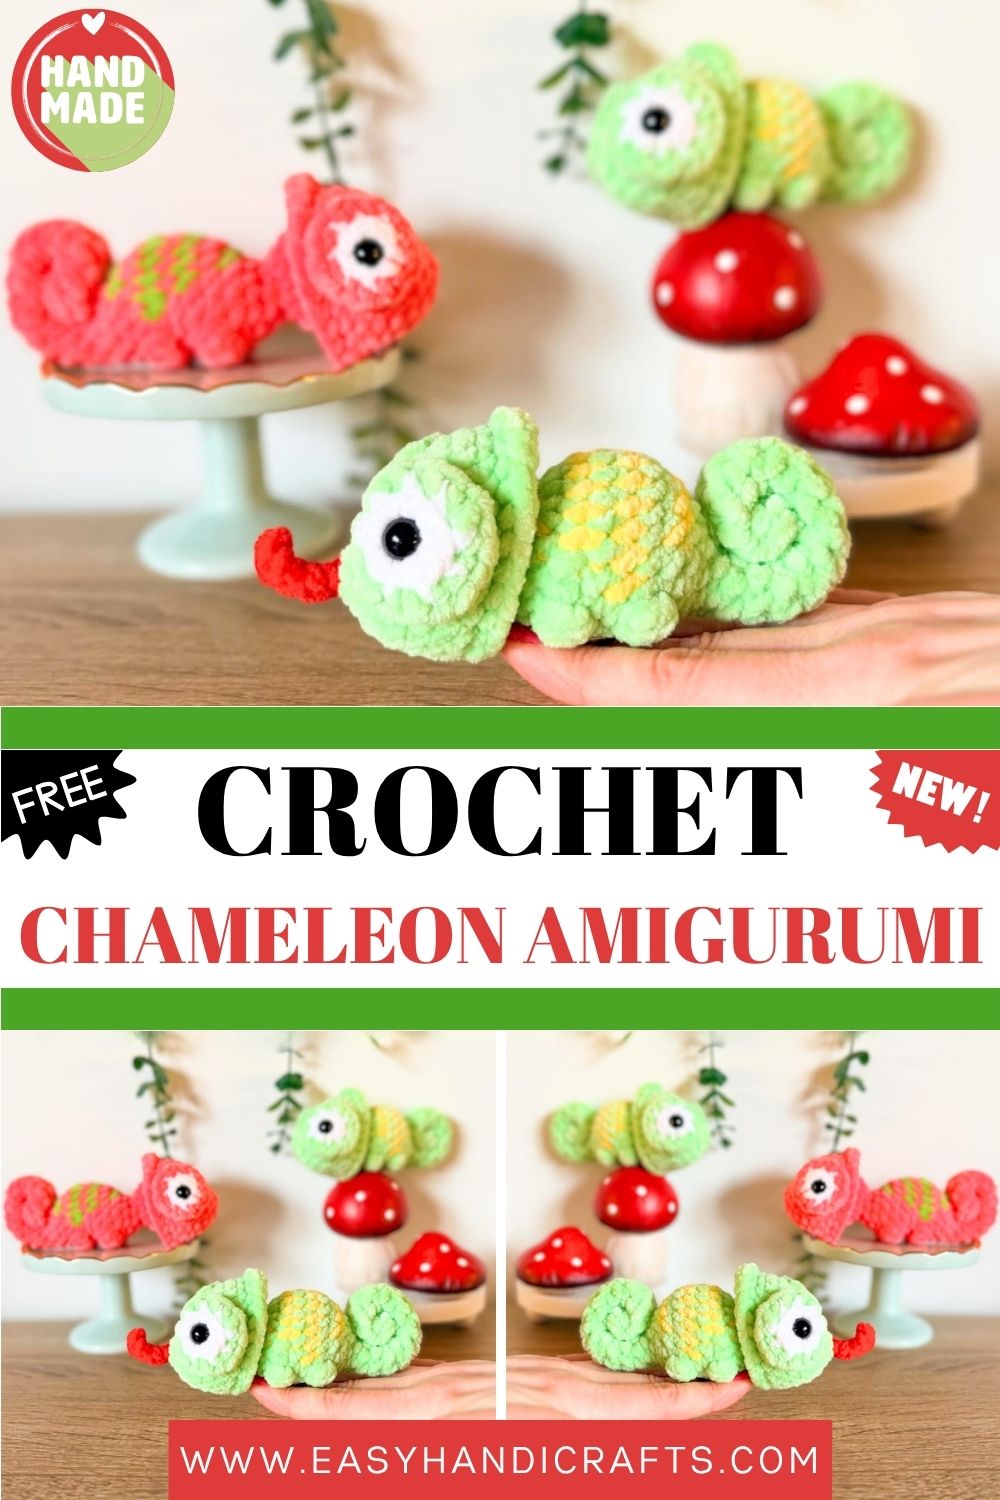
Handmade Crochet Chameleon Amigurumi | Cute Colorful Plushie | Kawaii Stuffed Toy
I started making this little chameleon on a quiet afternoon with no particular plan, and somewhere between the bobble stitch legs and the spiral tail, I completely fell in love with it. There is honestly nothing quite like it in my whole crochet collection.
Meet Katie the Chameleon, quite possibly the most uniquely satisfying amigurumi project you will ever take on. What makes this one so special is the pop mechanism built right into the body. The head actually tucks into the neck and pops back out, which means this little guy is not just cute to look at but genuinely fun to play with, too. The chunky chenille yarn gives it that irresistibly soft and velvety finish, the white circle eyes with green rims are full of personality, and the optional red tongue adds just the right amount of playful drama. Yellow stripe details run along the body, bobble stitches form the tiniest little legs, and the tail curls into a perfect spiral at the back. Every single detail on this pattern is considered and deliberate, and working through it feels genuinely rewarding from the very first round to the very last stitch.
Skill Level
This is an intermediate-level pattern written in US crochet terminology. You will need to be comfortable with single crochet, increases, decreases, color changes, bobble stitches, and both front loop only and back loop only techniques. The invisible decrease is used throughout and makes a real difference to the finished look. The pattern walks you through it step by step, so do not let it intimidate you.
Materials Needed
- 4mm (G) crochet hook
- Premier Parfait Chunky super bulky size 6 yarn
- 40 yards Green (Key Lime recommended)
- 8 yards Yellow (Sunshine recommended)
- 6 yards White
- Optional: 20 inches Red (Poppy recommended) for the tongue
- 10mm safety eyes
- 5 stitch markers
- Scissors
- Fiber fill stuffing
- Darning needle
Other yarn alternatives that work beautifully:
- Loops & Threads Petite Purl or Skinny Chenille (2.75mm hook, 8mm eyes)
- Loops & Threads Posh Purl (4mm hook, 10mm eyes)
- Hobbii Honey Bunny or Baby Snuggle (4mm hook, 10mm eyes)
- Bernat Blanket or Baby Blanket (6mm hook, 12mm eyes)
Abbreviations
- BLO — Back Loops Only
- BO — Bobble Stitch (4 dc in one stitch)
- CC — Change Color
- ch — Chain
- dc — Double Crochet
- dec — Decrease (invisible decrease used throughout)
- FLO — Front Loops Only
- FO — Fasten Off
- inc — Increase (2 sc in the same stitch)
- mc — Magic Circle
- R — Round
- sc — Single Crochet
- sk — Skip
- sl st — Slip Stitch
- st(s) — Stitch(es)
Finished measurements:
- Unpopped length: 5 inches
- Popped length: 6 inches
- Height: 2.5 inches
Let’s Make Katie the Chameleon
Eyes — Make Two
Work with White yarn.
R1. 8 sc in a mc (8). Change color to Green in the last stitch and fasten off White. R2. In the BLO — inc x 8 (16)
Sl st into the first stitch and fasten off, leaving a long green end for sewing. Tie the remaining ends together and trim excess yarn, keeping the long green end intact. Set the eyes aside for now.
Head
Work with Green yarn.
R1. 8 sc in a mc (8) R2. inc x 8 (16) R3. 6 sc, inc x 4, 6 sc (20) R4. 8 sc, inc x 4, 8 sc (24)
Place stitch markers over the second and third increases in R4 to help with eye placement later.
R5–7. sc around — 3 rounds (24)
Place stitch markers in the first and last FLO stitches of R7 to mark them for the head rim. Do NOT stuff the head. Do NOT fasten off. Proceed to attaching the eyes.
Attaching the Eyes
Align the eyes on either side of the increases from R3 and R4, positioned over R2–7 of the head. Use bobby pins or straight pins to hold them in place. With the long green end on your darning needle, sew along the top of each eye rather than whip stitching; this keeps a clean visible edge around them. Tie the ends together inside the head and trim off the excess yarn.
Body
Continue with Green yarn.
R8. In the BLO — 7 sc, dec x 6, 5 sc (18) R9. sc around (18) R10. (sc, dec) x 6 (12) R11. sc around (12)
Do a pop test here — tuck the neck into the head to make sure it sits properly before continuing.
R12. dec x 6 (6)
Do NOT stuff between R1–12.
R13. In the FLO — inc x 6 (12) R14. 6 sc, sc, inc x 2, sc, 2 sc (14) R15. 7 sc, inc x 4, 3 sc (18) R16. sc, BO, 2 sc, BO, 2 sc, 10 sc, sc (18) R17. sc around (18) R18. Dec, 4 sc, 11 sc, inc (18) R19. sc, BO, 2 sc, BO, 13 sc (18) R20. 7 sc, sc, dec x 4, sc, sc (14)
Fasten off Yellow.
Begin stuffing the body from R13–23 only.
R21. 8 sc, dec x 2, 2 sc (12) R22. 6 sc, dec x 3 (9) R23. dec, 3 sc, dec x 2 (6)
Finish stuffing the body. Do not stuff beyond this point.
Tail
Continue with Green yarn.
R24–40. sc around — 17 rounds (6)
Fasten off, leaving a long end. Whip stitch around the FLO stitches of R40 and pull tight to close the hole. Weave in the end and trim.
Tail Spiral
Starting from the tip of the tail, curl it onto itself to form a spiral. Place a 10-inch strand of green yarn on a darning needle and weave it up through the bottom, then through all layers of the spiral to the outside layer. Weave it just underneath the outside layer and back down to where you started, securing all layers without the strand being visible. Tie the two ends together and weave them into the body.
Head Rim
Work with Green yarn, with the front of the head facing you. Begin in the first marked FLO stitch from R7.
R1. 11 sc, inc x 4, 9 sc (28)
Sl st to the first stitch of the round and fasten off. Weave ends into the head and trim.
Optional Tongue
Work with Red yarn, with the top of the chameleon facing you. Begin working directly into the first round of the head.
R1. Sl st and ch 7. Starting in the third ch from the hook and working down the chain 5 sl st (5)
Sl st back into the head and fasten off. Weave ends in and trim.
Customization and Variations
- Swap the Key Lime green for a teal, purple, or burnt orange color. Chameleons come in every color imaginable, so there are no wrong choices here
- Make the yellow street. rips in a contrasting bright color like coral or turquoise for an even more vibrant look
- Skip the tongue for a clearer, simpler finish, or make two tongues in different colors for a forked effect
- Use a slightly larger hook if your yarn is on the bulkier side. This pattern is very sensitive to yarn weight, eight so do not be afraid to swatch first.
- Add tiny embroidered nostrils above the mouth area for extra character
- Make a whole family in graduating sizes by simply changing your yarn weight: fingering weight for a tiny version, chunky for the standard, and super bulky for an oversized shelf piece
Common Mistakes to Avoid
- Not placing stitch markers at the increases in R4 makes eye placement very difficult later. Mark them as soon as you finish that round.d
- Stuffing the head or the neck section between R1–12 completely ruins the pop mechanism. That section must stay unstuffed for the head to tuck in properly
- Only stuff the body between R13–23. Stuffing the tail section makes it stiff and impossible to curl into a spiral
- Blanket yarn and other bulky weights behave very differently from Parfait Chunk. If your pop looks pointy or skinny, go up one hook size immediately
- The bobble stitch.h legs in R16 and R19 must sit on the underside of the body. Check their alignment before working those rounds
- Rushing the tai.l spiral and not weaving the securing strand through all layers properly means the curl will loosen over time. Take your time with this step
Finishing Tips.
- The invisible decrease is used throughout this pattern for a reason: it creates a much smoother surface than a standard decrease and really elevates the finished look. Practice it a few times on scrap yarn before starting if it is new to you. u
- When sewing the eyes on, sew along the top edge rather than whip stitching around the entire eye; it gives a much cleaner, more professional look. finish
- Block the head rim very gently after fastening off to help it sit flat and even against the head
- The pop mechanism works best when the neck section is firmly and evenly crocheted. Looseose tension in R8–12 makes the pop feel sloppy rather than satisfying
- Use bobby pins rather than straight pins to hold the eyes in place during sewing. They grip the stitches more securely and do not shift around
- Give the finished chameleon a gentle reshape with your hands after assembly, paying special attention to the spiral tail and making sure it sits evenly curled
Gifting Ideas
- This chameleon makes a genuinely unforgettable gift for any child who loves animals. The pop mechanism alone will keep them entertai.ned for ages.
- Package it in a clear box tied with a colorful ribbon so the recipient can see the chameleon before even opening it. The presentation doubles the excitement.
- Make one in a recipient’s favorite color combination for a fully personalized gift that feels incredibly thoughtful
- These. sell brilliantly at craft markets and pop-up stalls, the interactive pop feature makes them a genuine conversation starter on any display table
- A Katie Chameleon paired with a small potted plant, or terrarium, makes a wonderful nature-themed gift set for a reptile lover of any age
- For a teacher’s appreciation gift, make one in the school colors with a tiny apple embroidered on the body, unique, handmade, and completely memorable
Frequently Asked Questions
What makes the head pop in and out? The pop mechanism comes from the combination of the BLO decreases in R8 and the unstuffed neck section. When you tuck the neck into the hea,d it creates tension that snaps back, which is why stuffing that section would ruin the effect entirely.
My chameleon looks too tall or pointy. What went wrong? This almost always comes down to yarn weight. Bulkier yarns like Bernat Blanket create a taller, less compact shape. Try going up one hook size, or switch to the recommended Premier Parfait Chunky for the most accurate results.
Can I use safety eyes instead of the sewn white circle eyes? The pattern is designed around the sewn circle eyes because they give the chameleon its signature wide, expressive look. Safety eyes alone will give a very different finish. If you want to use them, consider still making the white circles and placing the safety eye through the center of each one.
How do I keep the tail spiral from unraveling over time? Make sure you weave the securing strand through every single layer of the spiral and pull it firmly before tying off. A few extra passes of the strand through the layers adds extra security without being visible.
Is this pattern suitable for children to play with? With securely sewn eyes and firmly closed seams, this chameleon is suitable for older children. For babies or toddlers, embroider the eyes instead of using felt or safety eyes. Yes, double-check every seam before gifting.
To Wrap It Up
Katie the Chameleon is one of those patterns that genuinely surprises you. You sit down expecting a cute little plushie, and you end up with something interactive, detailed, and completely unlike anything else in your finished object pile. The pop, the spiral tail, the bobble,l the legs, every element of this design just works together so beautifully. I really hope you enjoy making her as much as I did. Share your finished chameleon when she is done. I cannot wait to see all the colorful versions you come up with. Happy crocheting!