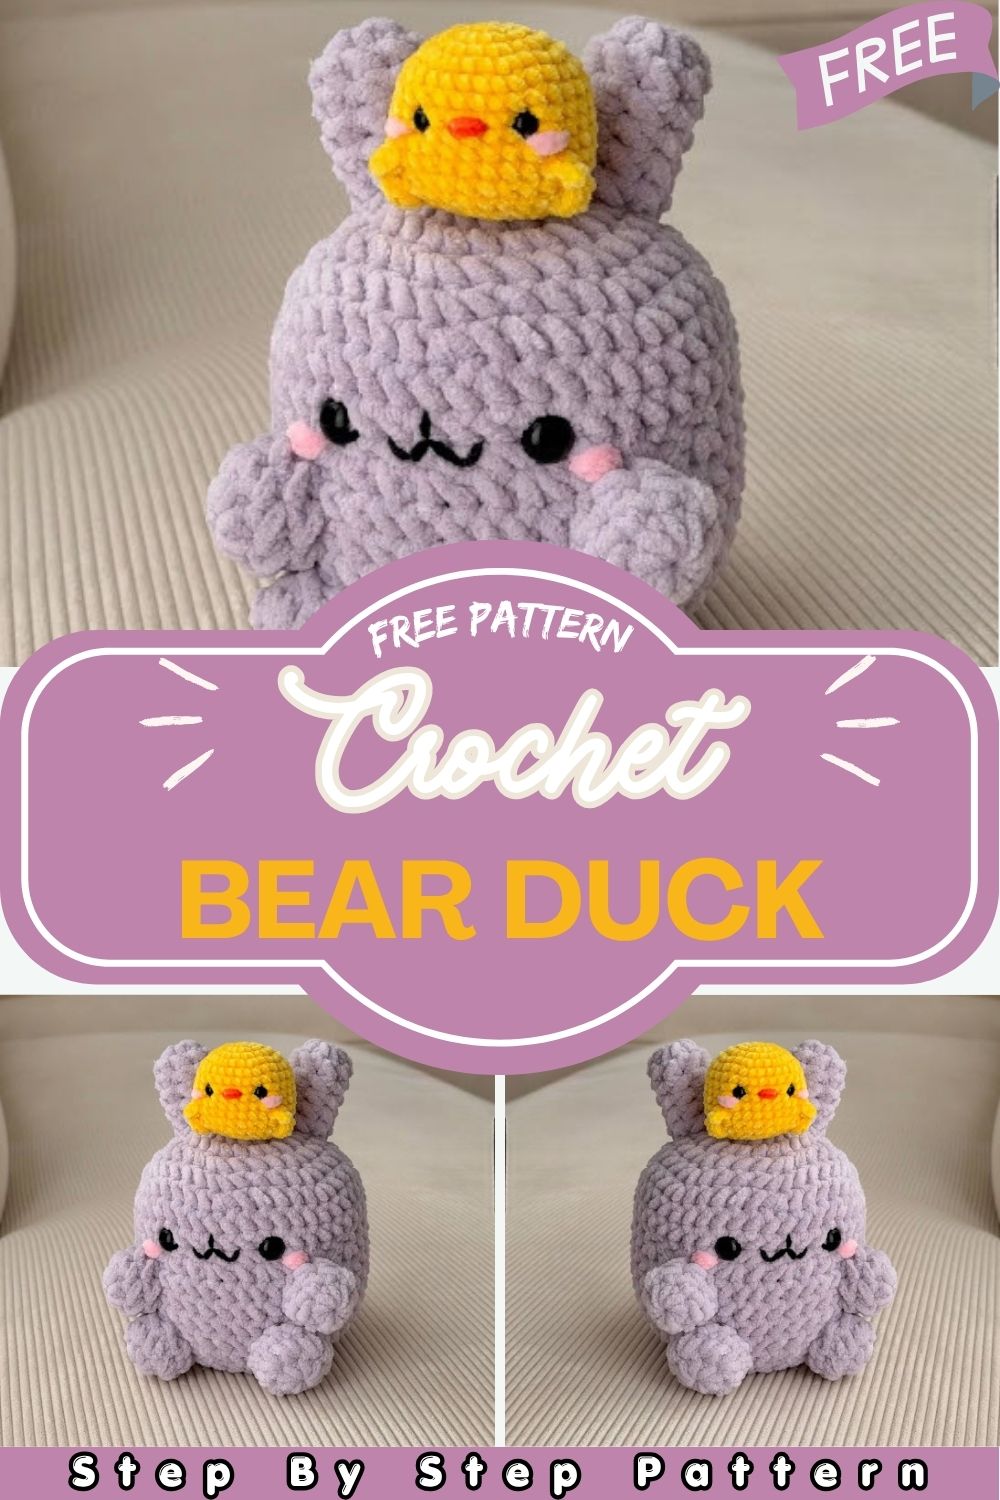
Free Crochet Bear Duck Amigurumi Duo Pattern Tutorial
A sweet little bear carrying a tiny duck friend this adorable Crochet Bear Duck Amigurumi duo is the perfect beginner project. Grab your hook and yarn and let’s dive in!
Amigurumi is the Japanese art of crocheting small stuffed toys, and this bear-and-duck duo is one of the most heartwarming beginner-friendly projects you will ever make. Worked in simple single crochet rounds from the magic ring, this pattern teaches you all the foundational skills increases, decreases, and basic shaping while producing a finished result that looks absolutely professional. Whether you are picking up a crochet hook for the very first time or returning to the craft after a break, this pattern walks you through every step with clarity and encouragement. The soft bear cradles a tiny chick perched right on its head, creating a duo that is as fun to make as it is charming to display or gift.
Skill Level
Beginner-friendly. If you can chain, single crochet, and work into a magic ring, you have everything you need to complete this Crochet Bear Duck Amigurumi project with confidence.
Materials You Will Need
For the Bunny/Bear:
- Light purple for the body
- Black for the mouth embroidery
- Pink for the cheeks
For the Chick:
- Yellow for the body
- Orange for the beak
- Pink for the cheeks
Other Supplies:
- Crochet hook — 5 mm for the bunny, 2.5 mm for the chick
- Safety eyes for both pieces
- Tapestry needle
- Scissors
- Polyfill stuffing
Abbreviations
- MR — Magic Ring
- SC — Single Crochet
- INC — Increase
- DEC — Decrease
- CH — Chain
- HDC — Half Double Crochet
- BO — Bobble Stitch
- FO — Fasten Off
Pattern: Bunny / Bear
Head + Body
R1. 8 sc in MR (8) R2. inc x 8 (16) R3. (sc, inc) x 8 (24) R4. (3sc, inc) x 6 (30) R5. (4sc, inc) x 6 (36) R6. (5sc, inc) x 6 (42) R7–8. sc around for 2 rounds (42) R9. 12 sc, (sc, dec) x 6, 12 sc (36) R10. 12 sc, (sc, inc) x 6, 12 sc (42) R11–15. sc around for 5 rounds (42)
Insert safety eyes between R8–9, 5 stitches apart. Place them on the side where decreases were made.
R16. (5sc, dec) x 6 (36) R17. (4sc, dec) x 6 (30) R18. (3sc, dec) x 6 (24)
Begin stuffing firmly.
R19. (sc, dec) x 8 (16)
Add more stuffing as needed.
R20. dec x 8 (8)
Fasten off and sew the opening closed. Embroider the mouth and add pink cheeks.
Hands — Make 2
R1. 8 sc in MR (8) R2–3. sc around for 2 rounds (8)
Fasten off and leave a long tail for sewing.
Feet — Make 2
R1. 8 sc in MR (8) R2. inc x 8 (16) R3. dec x 8 (8)
Stuff lightly. Fasten off and leave a long tail for sewing.
Ears — Make 2
R1. 8 sc in MR (8) R2–6. sc around for 5 rounds (8)
Stuff lightly. Fasten off and leave a long tail for sewing.
Tail
R1. 6 sc in MR (6) R2. inc x 6 (12) R3. dec x 6 (6)
Stuff. Fasten off and leave a long tail for sewing.
Pattern: Chick
R1. 7 sc in MR (7) R2. inc x 7 (14) R3. (sc, inc) x 7 (21) R4. (2sc, inc) x 7 (28) R5–8. sc around for 4 rounds (28) R9. 5 sc, wing, 9 sc, wing, 14 sc (28)
Wings: Chain 3, work a sc in the 2nd chain from the hook, then an HDC in the next chain.
R10–11. sc around for 2 rounds (28) R12. 4 sc, BO, 10 sc, BO, 12 sc (28)
Insert safety eyes between R7–8, 4 stitches apart.
R13. (2sc, dec) x 7 (21) R14. (sc, dec) x 7 (14)
Stuff the chick firmly.
R15. dec x 7 (7)
Fasten off and sew the opening closed. Embroider the beak and add pink cheeks.
Customization and Variation Ideas
- Swap yarn colors completely a classic cream bear with a white chick gives a natural, earthy look that feels timeless.
- Use a 3 mm hook with thinner DK weight yarn to create a miniature version that fits right in the palm of your hand.
- Stitch a tiny bow or flower onto the bear’s ear for a sweet feminine touch that makes it feel extra special.
- Swap the chick out for a tiny pumpkin, snowball, or flower to match any season, holiday, or occasion.
- Try different eye placements — moving the eyes slightly closer together gives a classic toy look, while wider spacing creates a more modern character style.
- Add a small crocheted scarf or hat separately and attach it for extra personality and charm.
Common Mistakes to Avoid
- Losing stitch count: Use a stitch marker at the start of every round even experienced crocheters skip this and end up regretting it.
- Stuffing too late or too little: Stuff firmly before the opening becomes too small, adding filling gradually in layers as you work.
- Placing safety eyes too late: Always insert and lock safety eyes before stuffing once the piece is fully closed there is no going back.
- Pulling the magic ring too tight: Leave just enough of an opening to work your first round comfortably before tightening gradually.
- Skipping the invisible decrease: A regular decrease creates a visible ridge. Use the invisible decrease through front loops only for a smooth, clean finish.
- Uneven face embroidery: Practice on a scrap piece first and use straight pins to mark mouth placement before committing with yarn.
Finishing Tips
- Use the long yarn tail and a tapestry needle to sew all pieces together with a tight ladder stitch for invisible, secure joins.
- Pin all limbs and ears in place before sewing to check the overall balance and natural pose of the bear.
- Weave in all yarn ends securely with at least two directional changes to prevent any unraveling over time.
- For the chick sitting on the bear’s head, stitch through the base several times into the bear’s head to keep it firmly in position.
- A light steam press using a damp cloth can smooth out uneven tension without distorting the stuffed shape.
- Store finished amigurumi away from direct sunlight to keep yarn colors looking fresh and vibrant for longer.
Gifting Ideas
- Tuck the duo into a small woven basket with tissue paper for a handmade baby shower gift that feels genuinely personal and thoughtful.
- Attach a handwritten tag with the recipient’s name and a short note it transforms a crafted toy into a lasting keepsake.
- Pair it with a matching crochet blanket or hat for a cohesive handmade gift set that shows real effort and care.
- These make wonderful Easter basket additions, birthday surprises for toddlers, or charming desk companions for friends who love cute collectibles.
- Consider making a set of three in different color palettes one to keep for display and two ready to give away whenever the occasion calls.
- Package in a clear gift box tied with ribbon so the recipient gets to see the finished piece even before unwrapping it.
Conclusion
This Crochet Bear Duck Amigurumi duo is living proof that beginner crochet can produce genuinely beautiful, professional-looking results. With a bit of patience and a whole lot of heart, you will have a pair of soft squishy companions ready to delight anyone lucky enough to receive them. Work through each piece at your own pace, trust the stitch counts, and most of all every single round. Here’s to your little duo coming to life right in your hands.