Remarkable Crochet Kawaii Jellyfish Amigurumi Pattern Soft & Squishy Plushie
Kawaii-style crochet toys feel extra special because they’re small, soft, and full of personality. Plus, their simple shapes make them relaxing to crochet.
Crochet Kawaii Jellyfish Amigurumi is especially fun because it mixes a smooth dome-shaped head with flowing tentacles that curl and bounce. After that, playful color changes and a ruffled edge turn a simple plush into something truly eye-catching, even for complete beginners.
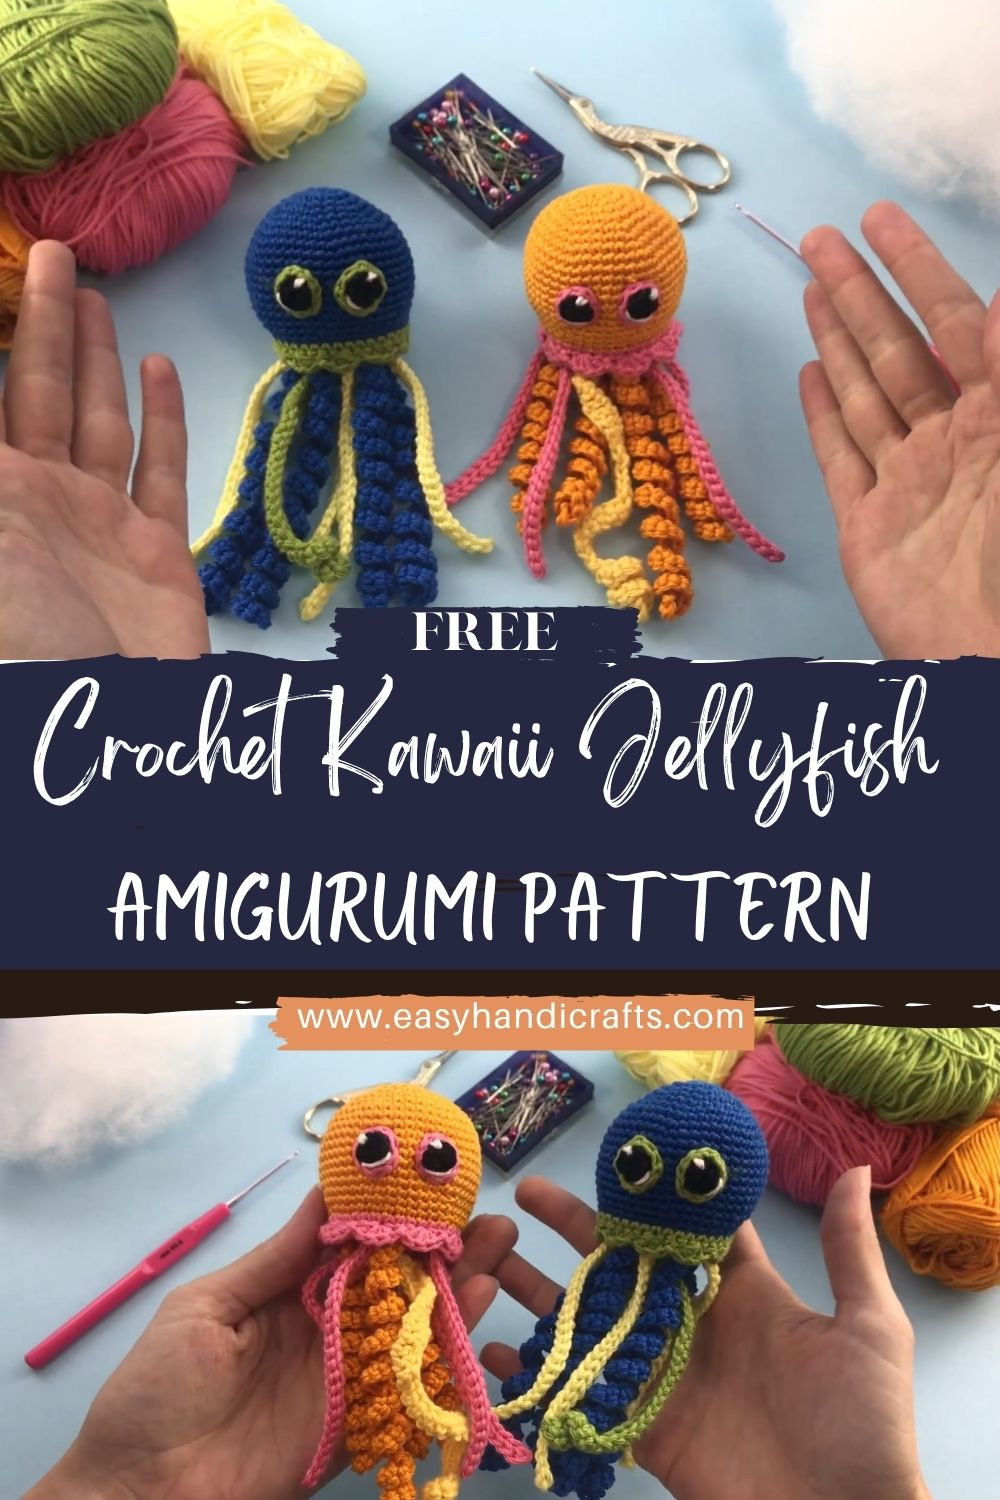
Meanwhile, jellyfish designs are popular because they are naturally beginner-friendly: the head is round and forgiving, and the tentacles can be as simple or fancy as desired. Next, the flowing strands add movement and texture without complicated shaping, so the project stays relaxing from start to finish.
Finally, this Crochet Kawaii Jellyfish Amigurumi is easy to customize with color choices, cute face options, and different tentacle styles. At the same time, it helps beginners practice key skills like counting rounds, placing features evenly, and adding decorative edges neatly.
Materials Needed
- Yarn (medium-weight / worsted / size 4 cotton or acrylic):
- Main head color: 50–70 g
- Bottom accent color (optional): 20–30 g
- Tentacle colors (2–3 bright shades recommended): 10–15 g each
- Crochet hook: 3.5 mm to 5.0 mm (choose one that gives tight stitches for amigurumi)
- Safety eyes: 8–12 mm (10 mm is a great middle choice)
- Stuffing: 15–25 g polyfill (light stuffing works best)
- Stitch markers: 1–2
- Yarn needle: 1
- Scissors: 1
- Optional: 1 keychain ring (2.5–3 cm) or small bow/beads (secured safely)
Skill Level
Beginner / Easy
First, the rounds use basic increases and decreases. Next, the tentacles are simple repeats, and after that, the ruffled edge is just a fun finishing touch.
Making Time (Overview)
Approximately 2–3 hours
Meanwhile, adding extra tentacles or detailed eyes can take a bit longer, and that’s completely normal.
Instructions
Quick Notes
- Work in continuous rounds for the head unless stated.
- Use a stitch marker to mark the first stitch of each round.
- Abbreviations: MR (magic ring), sc (single crochet), inc (increase), dec (decrease), sl st (slip stitch), hdc (half double crochet), dc (double crochet), ch (chain).
Body (Main Head Shape)
Making time: 60–90 minutes
1) Start with a magic ring
- Rnd 1: 6 sc in MR (6)
- Tighten the ring firmly so the center stays closed.
2) Expand the shape (dome top)
- Rnd 2: inc around (12)
- Rnd 3: (sc, inc) around (18)
- Rnd 4: (2 sc, inc) around (24)
- Rnd 5: (3 sc, inc) around (30)
- Rnd 6: (4 sc, inc) around (36)
- Rnd 7: (5 sc, inc) around (42)
- Rnd 8: (6 sc, inc) around (48)
Next, the dome becomes taller.
- Rnd 9–16: sc around (48)
3) Shape, stuff, and prepare to close
- Rnd 17: (6 sc, dec) around (42)
- Rnd 18: sc around (42)
- Rnd 19: (5 sc, dec) around (36)
After that, lightly stuff the head. First, add small pieces, and next, spread them toward the sides so the top stays smooth. Meanwhile, avoid packing it too tightly, because a slightly squishy jellyfish looks cuter.
Additional Parts
Tentacles
Making time: 30–45 minutes
A kawaii jellyfish looks best with a mix of tentacle styles. First, choose 2–3 colors, and next, make sets that vary slightly in length for a natural “floating” look.
Style A: Curly spiral tentacles (Make 4)
- Ch 41
- Skip the first chain.
- Work 2 sc into each chain across (this makes it curl into a spiral).
- Fasten off, leaving a tail for attaching.
Next, repeat until there are 4 spirals.
Style B: Slim wavy tentacles (Make 4)
- Ch 25
- Skip the first chain.
- Work sl st into each chain across.
- Fasten off, leaving a tail.
After that, repeat until there are 4 slim strands.
Style C: Mixed-stitch “flowy” tentacle (Make 1)
- Ch 36
- Skip the first chain.
- On the next 10 chains, make inc (2 sc in each chain) to create a curl.
- On the next 10 chains: make 1 hdc in each chain.
- On the remaining 15 chains: make 1 dc in each chain.
- Fasten off, leaving a tail.
Meanwhile, this mixed tentacle adds variety and a graceful “drift” effect.
Frill / Skirt Edge
Making time: 15–20 minutes
This ruffled edge gives the jellyfish that playful kawaii finish. First, use a contrasting color if desired, and next, work along the bottom opening.
- Join yarn at the bottom edge.
- Repeat around:
- Skip 1 stitch
- 4 dc in next stitch
- Skip 1 stitch
- sl st in next stitch
- Continue until the ruffle circles the entire bottom.
- Fasten off and weave in the end.
After that, gently fan out the ruffles with fingers so they sit evenly.
Accessories / Details
Making time: 10–15 minutes
First, add tiny details that feel “kawaii” without making the project complicated:
- Blush: Use pink yarn or embroidery thread to add small ovals on the cheeks.
- Tiny bow: Crochet a mini bow or stitch a ribbon bow near the side.
- Keychain option: Add a small loop at the top (chain 10–15, slip stitch back) and attach a keychain ring securely.
Next, keep all accessories firmly attached, especially for gifts.
Face & Assembly
Making time: 20–30 minutes
1) Place the eyes
First, decide on the front of the jellyfish. Next, insert safety eyes evenly spaced:
- Place eyes between Rounds 12–14 (adjust slightly depending on preferred expression).
- Keep about 6–8 stitches between the eyes for a sweet, open look.
Meanwhile, if using embroidered eyes, stitch small curved lines or tiny ovals instead.
2) Stitch a cute expression
Next, embroider a small mouth:
- Use black or dark brown thread.
- Make a tiny “u” smile centered below the eyes.
- Add a small vertical stitch above the mouth to create a simple nose, if desired.
After that, add blush stitches lightly so they look soft rather than bold.
3) Attach the tentacles
Now attach tentacles to the underside:
- Arrange tentacles first: place the curlies, then the slim strands, and finally the mixed flowy ones for a “centerpiece” look.
- Tie each tentacle tail through the bottom edge with a tight double knot.
- Tuck tails inside the head so they stay hidden.
Next, adjust spacing until the tentacles look balanced from every angle.
4) Close and shape
Finally, make sure the tuffing looks even. Then:
- Smooth the head with fingers.
- Check the face alignment.
- Make sure ruffles sit nicely around the edge.
Special Features
- Texture: Soft, squishy, and lightweight for a perfect plush feel
- Expression: Classic kawaii face that can look shy, sleepy, or cheerful with small changes
- Design: Flowing tentacles with colorful combinations for a playful ocean look
Sizing Tips
First, yarn weight significantly affects the final size. Medium-weight yarn with a 4.0–5.0 mm hook makes a bigger plush, while thinner yarn with a smaller hook makes a mini jellyfish.
Next, hook size affects firmness:
- Smaller hook: tighter stitches, smaller toy, cleaner look
- Larger hook: looser stitches, softer toy, but may show gaps
Meanwhile, for amigurumi, tighter stitches nearly always look best. After that, if gaps appear, switch to a smaller hook or slightly tighten the tension.
Finishing Tips
- First, count stitches at the end of the increase rounds to stay on track.
- Next, keep stitches tight and consistent so stuffing does not peek through.
- Meanwhile, secure the tentacles firmly with strong knots and tuck the ends.
- After that, hide yarn ends by weaving through several stitches before trimming.
- Finally, shape gently after stuffing by pressing the dome and smoothing the sides.
Common Mistakes to Avoid
- Uneven tentacle lengths: measure chains or line strands up before attaching.
- Loose stitches causing gaps: use a smaller hook and keep tension steady.
- Misplaced facial features: pin eye positions first or mark with yarn scraps.
- Overstuffing the head: too much stuffing can stretch stitches; add small amounts and stop when it feels softly firm.
Variations & Customization Ideas
First, try color themes:
- Pastel jellyfish (mint, lavender, baby pink)
- Rainbow tentacles with a white head
- Ocean tones (teal, deep blue, seafoam)
Next, change the size:
- Mini: thinner yarn + smaller hook
- Jumbo: bulky yarn + larger hook (and larger safety eyes)
Meanwhile, add special effects:
- Sparkly yarn for a magical “fantasy sea” jellyfish
- Seasonal colors (red/green for winter, yellow/pink for spring)
- Little star or heart appliqués on the head
Finally, experiment with different faces: sleepy eyes, tiny fangs, or embroidered lashes can completely change the personality.
Tutor Suggestions for ( Crochet Kawaii Jellyfish Amigurumi)
- First, use a stitch marker every round so counting stays easy.
- Next, count carefully after each increase round to prevent wobble.
- Meanwhile, maintain even tension, especially on the tentacles, because loose stitches can quickly look messy.
- After that, take time to arrange the tentacles before tying the final knots so the flow looks natural.
- Finally, keep practicing gently and steadily. This pattern is a great confidence builder for beginners.
Conclusion
A Crochet Kawaii Jellyfish Amigurumi is a bright, cheerful project that feels relaxing from the first round to the final ruffle. First, the smooth dome head builds strong amigurumi basics, and next, the tentacles add playful movement with simple stitches. Finally, with a few color changes and tiny facial details, each jellyfish can look unique, making it a perfect handmade gift or a fun little collection to keep growing.