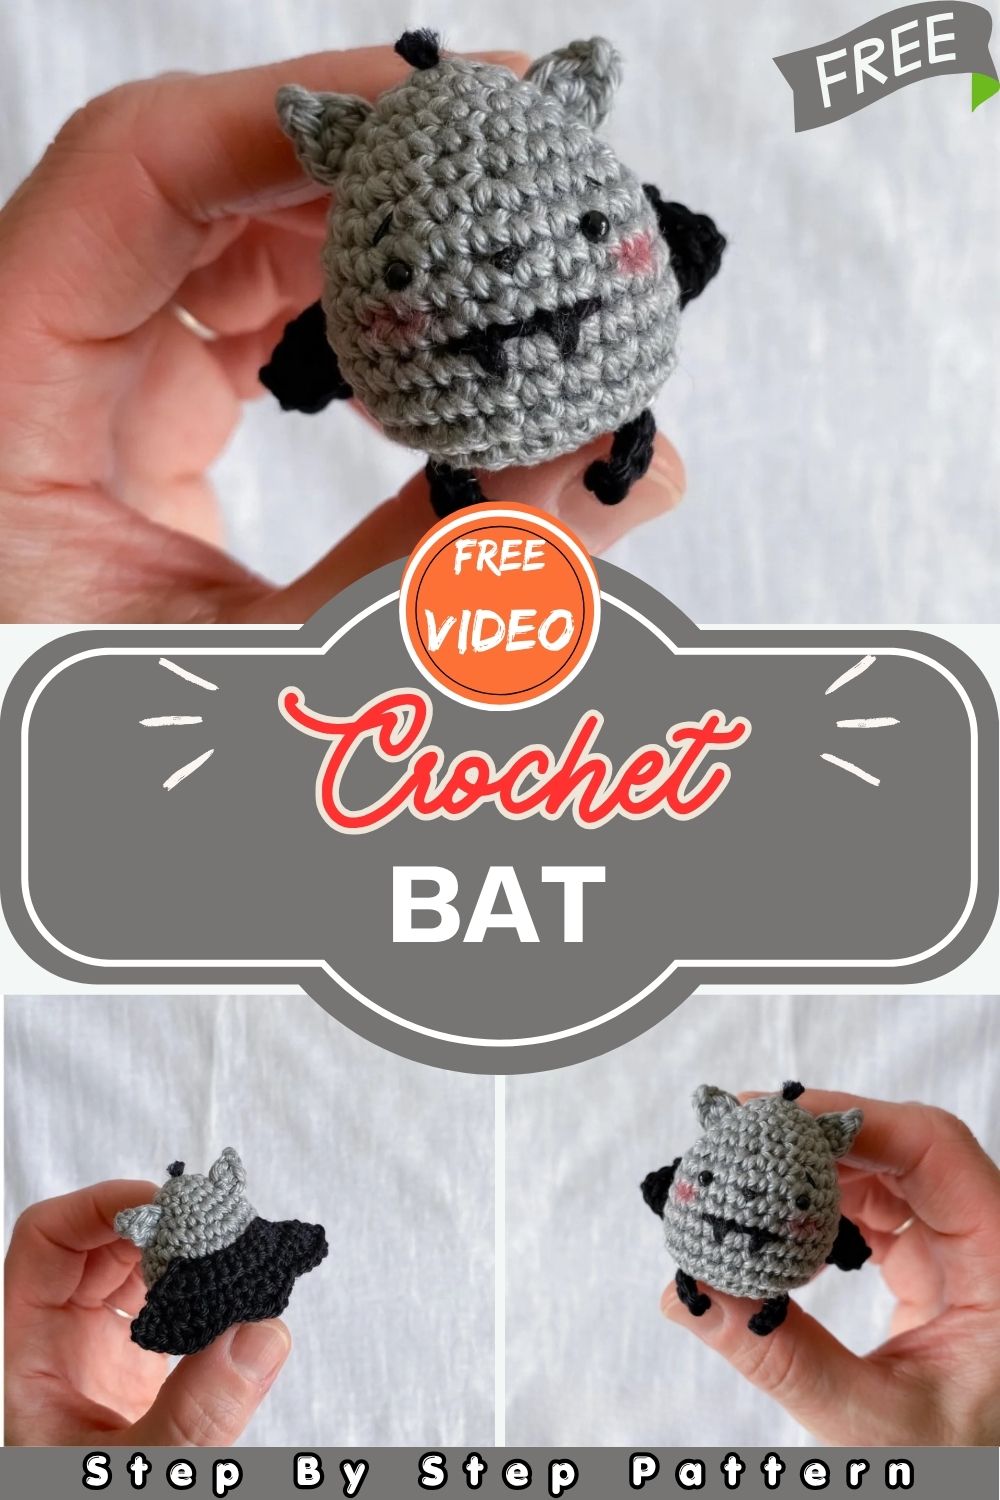
Make This Adorable Crochet Bat in Just a Few Hours With Free Amigurumi Pattern
-A tiny hook, some grey yarn, and honestly zero patience required this little Adorable Crochet Bat comes together so fast it is almost suspicious. Cute, spooky, and completely addictive to make!
So here is the thing about small crochet projects they are dangerously addictive. You pick up your hook thinking it will take forever and before you know it, a tiny stuffed bat is sitting in your hand staring back at you with little bead eyes. This pattern is genuinely simple. No fancy stitches, nothing intimidating, just rounds of single crochet that slowly build into the cutest little Adorable Crochet Bat creature. The wings are the most fun part and they come together much faster than they look. Make him once and you will be making five more by the end of the week.
Skill Level
Honestly, even if you just started crocheting last week, you will be totally fine with this one. Basic stitches only, nothing scary, nothing complicated!
Materials and Tools
- Crochet hook – 2.5 to 3 mm
- Cotton yarn – grey and black
- Yarn needle
- Beads for eyes
- Polyester fiberfill stuffing
Abbreviations
- sc — Single crochet
- inc — Increase (2 sc in same stitch)
- dec — Decrease
- dc — Double crochet
- hdc — Half double crochet
- sl st — Slip stitch
- ch — Chain
- MR — Magic ring
- BLO — Back loop only
Procedure
Head
Yarn: Grey – begin from the head
- R1: 6 sc in MR (6)
- R2: (sc, inc) × 3 (9)
- R3: (2 sc, inc) × 3 (12)
- R4: (3 sc, inc) × 3 (15)
- R5: (4 sc, inc) × 3 (18)
- R6: (2 sc, inc) × 6 (24)
- R7–12: 24 sc (6 rounds) (24)
- R13: (2 sc, dec) × 6 — stuff the head (18)
- R14: (sc, dec) × 6 (12)
- R15: 6 dec — close (6)
Wings (Make 2)
Yarn: Grey
- R1: Ch 9 + 1
- R2: Inc in 2nd st from hook, 7 sc, inc, ch 1, turn (11)
- R3: Inc, 9 sc, inc, ch 1, turn (13)
- R4: Inc, 11 sc, inc, ch 1, turn (15)
- R5: sc, hdc, inc dc, hdc, sc, sl st, sc, (hdc, dc, hdc) in same st, sc, sl st, sc, hdc, inc dc, hdc, sc (19)
Cut yarn and secure. Sew wings onto the back.
Legs (Make 2)
Yarn: Black
- Ch 5, sl st in 2nd ch from hook, sl st, sl st
Fasten off and sew onto the bottom of the body.
Ears (Make 2)
Yarn: Grey – work entirely in a magic ring
- sc, hdc, ch 2, sl st in 2nd ch from hook, hdc, sc all worked into the magic ring.
Fasten off and sew onto the top of the head.
Assembly
1 -Face Details
- Sew bead eyes firmly onto the head. Thread multiple times before knotting so they never come loose.
- Embroider the nose with black yarn right in the center, keeping it very small and neat.
- Stitch the mouth just below the nose with black yarn simple and minimal looks best on such a tiny face.
2 Body Details
- Lay both wings flat against the back of the body first and pin them in place before sewing so they sit evenly on both sides.
- Sew the legs onto the bottom of the body with equal spacing between them — uneven legs are very noticeable on a small project like this.
3 -Final Touches
Ear Placement
- Pin both ears onto the top of the head before sewing and step back to check they look even. Sew them at a slight outward angle for maximum character.
Last Check
- Weave in all ends deep into the stuffing, give your bat a gentle squeeze all over to make sure nothing feels loose or uneven, and it is finished!
Common Mistakes and How to Avoid Them
Stitch Count Issues
- Losing count mid-round: Sounds simple but it happens to everyone. Put a stitch marker in and actually count after every single round do not trust your eyes alone on this one.
Stuffing and Shaping
- Stuffing too little: People always understuff small projects thinking a little is enough. It never is. Push more stuffing in than feels comfortable and your bat will thank you for it.
- Wings not lying flat: If you skip shaping them with your fingers while damp they will curl up and look messy. Two extra minutes of shaping saves the whole look.
Assembly Mistakes
- Bead eyes coming loose: Thread through at least three or four times before knotting. One pass is never enough and a one-eyed bat is not the vibe.
- Ears looking uneven: Pin them both before committing to sewing. What looks straight in your hand looks completely wonky once it is actually on the head.
-
Finishing Tips
These small things make a surprisingly big difference at the end:
- Weave ends deep inside: Do not just weave through a few stitches and call it done. Push that needle deep into the stuffing and pull tight ends that are not properly hidden have a habit of poking back out later.
- Shape before it sets: Once you are done crocheting the wings, put them flat on a table and press them down with your hand for a minute. Sounds too simple but it actually works really well.
- Check everything before sewing: Lay all the pieces out together first head, wings, legs, ears and look at them as a whole before you start attaching anything permanently.
- Go slow on the face: The embroidery on the nose and mouth takes maybe three minutes but rushing it is how you end up with a lopsided face that bothers you every time you look at it.
- Final check after assembly: Once everything is sewn on give him a gentle squeeze all over and make sure nothing feels loose or uneven before you call him truly finished
.
Customization and Variations
Color Variations
Grey and black is the classic bat color combination but there is so much room to get creative here. Try deep purple and black for a more dramatic Halloween look, or go completely unexpected with pastel pink and white for the most adorable kawaii-style bat imaginable. Orange and black would also make a fantastic festive Halloween colorway that stands out instantly.
Size Changes
Want a bigger Adorable Crochet Bat? Simply go up in hook size and yarn weight and he will grow proportionally without changing a single stitch count.
Detail Changes
You can also add a tiny cape using a small rectangle of black yarn sewn around the neck for extra drama. Swap the bead eyes for safety eyes if you are making him for a child, and add a little embroidered smile instead of a straight mouth to give him a friendlier expression.
Hook and Yarn Alternatives
Any cotton yarn works perfectly fine for this Adorable Crochet Bat pattern; you do not need a specific brand. Thicker yarn with a bigger hook gives a chunkier bat while thinner yarn creates a more delicate finished look.
Gifting Ideas
This little Adorable Crochet Bat makes people genuinely happy. Here are some fun ways to gift him:
- Halloween surprise: Slip him into a treat bag instead of candy and watch whoever opens it completely lose their mind over how cute he is.
- Desk buddy gift: Some people just need a tiny weird creature watching over them while they work. Box him up with a little note and you have the most thoughtful coworker gift ever.
- Kids party favor: Make a bunch in different colors, pop them in clear bags with some ribbon, and honestly the kids will love these more than anything store bought.
- Spooky decor gift: For that one friend who decorates for Halloween in August this bat on a little string hanging in a window is exactly what their home needs.
- Just because gift: Bats do not need a special occasion. Sometimes you just finish one, think of someone, and drop it in an envelope with a note. That is genuinely the best kind of gift.
Conclusion
Grey yarn and a small hook do not seem like much at the start. But somewhere between the first magic ring and sewing on those tiny little legs, something clicks,s and suddenly an actual bat is sitting in front of you that your own hands made from scratch.
Keep him, gift him, hang him from a window honestly do whatever feels right. Just know that once this one is finished the urge to immediately cast on another one in purple or orange is very real and very hard to resist.