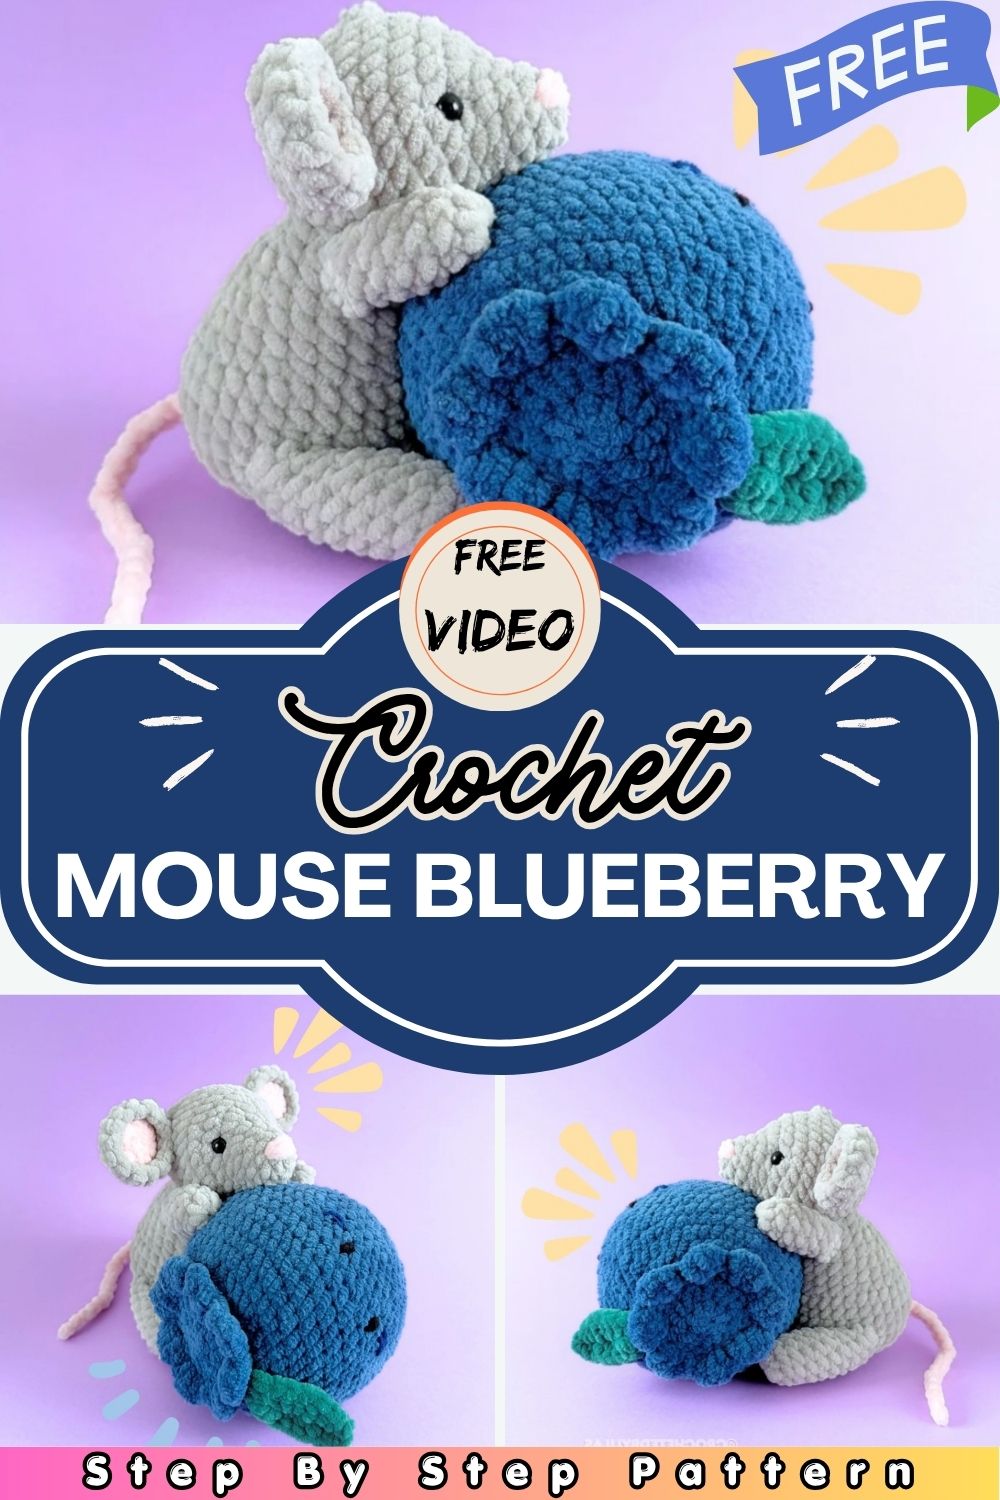
Crochet a Tiny Mouse with a Blueberry: Free Amigurumi Pattern + Step-by-Step
Have you ever seen something so tiny and cute that you just had to make it yourself? This free crochet mouse and blueberry amigurumi pattern is exactly that — a little gray mouse snuggled against a chubby blueberry, ready to steal every heart!
This free crochet mouse and blueberry pattern includes two separate characters assembled at the end. You will crochet the blueberry body, blossom end, a leaf, and the mouse’s head, body, ears, arms, and legs. If you love amigurumi crochet patterns, you will also enjoy making other cute animal crochet patterns like bunnies and bears. Each piece is worked individually and sewn together to create one irresistible hugging pose.
Pattern Info Box
Skill Level: Intermediate Estimated Time: 6–10 hours Hook Size: 4mm Yarn Weight: Chunky — Hobbii Honey Bunny Safety Eyes: 8mm
This pattern is free and took me a long time to make. I would really appreciate if you could follow me on Instagram!
Materials
Yarn: Hobbii – Honey Bunny
Colors:
- Blue — Blueberry
- Dark Blue — Blueberry
- Green — Blueberry
- Black — Blueberry
- Gray — Mouse
- Pink — Mouse
- Thin yarn — Mouse
Tools & Supplies:
- Crochet hook: 4mm
- Safety eyes: 8mm
- Darning needles
- Stuffing
- Stitch markers
- Scissors
Stitch Abbreviations (US Terms)
- MR — Magic Ring
- sc — Single Crochet
- inc — Increase
- dec — Decrease
- hdc — Half Double Crochet
- hdcinc — Half Double Crochet Increase
- dc — Double Crochet
- ch — Chain
- slst — Slip Stitch
- st(s) — Stitch(es)
- FLO — Front Loop Only
- BLO — Back Loop Only
- Rnd(s) — Round(s)
- Rw(s) — Row(s)
- FO — Fasten Off
- … x … — Repeat instructions between asterisks the given number of times
Blueberry
This pattern is crocheted in continuous rounds unless otherwise specified.
Body
In blue:
Rnd 1: 8 sc in MR (8 st) Rnd 2: 8 inc (16 st) Rnd 3: 1 sc, 1 inc x 8 (24 st)
Mark the front loop of sts 1 and 24 of Rnd 3. It will be useful when crocheting the blossom end.
Rnd 4: In BLO: 2 sc, 1 inc x 8 (32 st) Rnd 5: 3 sc, 1 inc x 8 (40 st) Rnd 6: 4 sc, 1 inc x 8 (48 st) Rnd 7: 11 sc, 1 inc x 4 (52 st) Rnd 8–15 (8 Rnds): 52 sc (52 st) Rnd 16: 11 sc, 1 dec x 4 (48 st) Rnd 17: 4 sc, 1 dec x 8 (40 st)
Start stuffing.
Rnd 18: 3 sc, 1 dec x 8 (32 st) Rnd 19: 2 sc, 1 dec x 8 (24 st) Rnd 20: 1 sc, 1 dec x 8 (16 st) Rnd 21: 8 dec (8 st)
Finish stuffing firmly.
FO and close the opening by weaving your needle through the front loops of Rnd 21.
Body finished.
Blossom End
Attach blue yarn in the FLO of st 24 of Rnd 3 (previously marked), with the blossom end pointing up.
Ch2, 3 dc in the same st, 2 sc x 8 (8 petals)
FO and weave in the ends.
Blossom end finished.
Blueberry Face
With black yarn, embroider 2 eyes between Rnds 11 and 13 (on Rnd 12), 1 st long, leaving 5 sts between them.
Embroider dark blue cheeks on each side of the face between Rnds 12 and 13, 2 sts long.
Blueberry face finished.
Leaf
In green yarn:
Ch 10.
In the 2nd stitch from the hook: 1 slst, 1 sc, 1 hdc, 3 dc, 1 hdc, 1 sc, 1 slst, ch1,
On the other side of the chain: 1 slst, 1 sc, 1 hdc, 3 dc, 1 hdc, 1 sc, 1 slst.
FO and leave a long tail for sewing.
Leaf finished.
Assembly:
Using a yarn needle, pass the yarn through the first st of the leaf.
Sew the leaf under the blossom end.
Blueberry finished!
Mouse
Head
Crochet the head in joined rounds — ch1 at the beginning of each Rnd and close each round with 1 slst in the first stitch of the Rnd.
In gray:
Rnd 1: 6 sc in MR (6 st) Rnd 2: 1 sc, 1 inc x 3 (9 st) Rnd 3: 2 sc, 1 inc x 3 (12 st) Rnd 4: 4 sc, 4 inc, 4 sc (16 st) Rnd 5: 5 sc, 1 inc, 1 sc, 2 inc, 1 sc, 1 inc, 5 sc (20 st) Rnd 6: 4 sc, 1 inc x 4 (24 st) Rnd 7: 3 sc, 1 inc x 6 (30 st)
Insert the eyes between Rnds 5 and 6, 8 sts apart. Adjust the position if needed to make sure they are perfectly aligned.
Rnd 8–10 (3 Rnds): 30 sc (30 st) Rnd 11: 3 sc, 1 dec x 6 (24 st) Rnd 12: 24 sc (24 st) Rnd 13: 1 sc, 1 dec, 2 sc, 1 dec x 5, 1 sc (18 st)
Start stuffing.
Rnd 14: 1 sc, 1 dec x 6 (12 st) Rnd 15: 6 dec (6 st)
Finish stuffing firmly.
FO and close the opening by weaving your needle through the front loops of Rnd 15.
Head finished.
Head Shaping
Using a thinner yarn (cotton or acrylic), preferably gray:
- Insert the needle at the back of the head and bring the yarn out at the lower inner corner of one eye.
- Insert the needle at the upper inner corner of the same eye and bring the yarn out at the lower inner corner of the second eye.
- Insert the needle at the upper inner corner of the second eye and bring it back to the starting point at the back of the head.
Pull both ends of the yarn tightly to shape the head and tie a knot.
This yarn should not be visible — it will pass under the eyes when pulled.
Head shaped.
Nose Embroidery
In pink yarn:
Embroider a nose from one side of the MR of the head to the other.
Make a horizontal line and go over it 3 to 4 times to give it some thickness.
The nose should cover the upper part of the MR.
Nose finished.
Ears (x 2)
Pink part:
In pink:
Rnd 1: 6 sc in MR (6 st) Rnd 2: 6 inc (12 st)
FO and make an invisible join, or simply weave in the ends.
Gray part:
In gray:
Rnd 1: 6 sc in MR (6 st) Rnd 2: 6 inc (12 st)
Don’t cut the yarn! We will use it to assemble the two parts together.
Assembling the two parts:
Place the pink part onto the gray part, with the wrong sides facing each other.
Complete the first Rnd by working through both layers:
Rnd 1: Ch1, turn the project (pink side facing you), 1 sc, 1 inc x 6 (18 st) Rnd 2: 4 sc, 1 dec x 3 (15 st)
FO and leave a long tail for sewing.
Pass the yarn tail through the first and last sts of Rnd 2 several times to shape the ear.
Ear finished. (Make 2)
Body
Crochet the body in joined rounds — ch1 at the beginning of each Rnd and close each round with 1 slst in the first stitch of the Rnd.
In gray:
Rnd 1: 8 sc in MR (8 st) Rnd 2: 8 inc (16 st) Rnd 3: 1 sc, 1 inc x 8 (24 st) Rnd 4: 1 sc, 1 inc, 2 sc, 1 inc x 7, 1 sc (32 st) Rnd 5: 7 sc, 1 inc x 4 (36 st) Rnd 6–7 (2 Rnds): 36 sc (36 st) Rnd 8: 1 sc, 1 dec, 1 sc, 1 dec, 24 sc, 1 dec, 1 sc, 1 dec, 1 sc (32 st) Rnd 9–10 (2 Rnds): 32 sc (32 st) Rnd 11: 2 sc, 1 dec x 8 (24 st) Rnd 12–13 (2 Rnds): 24 sc (24 st)
Start stuffing.
Rnd 14: 6 sc, 1 dec, 1 sc, 1 dec, 2 sc, 1 dec, 1 sc, 1 dec, 6 sc (20 st) Rnd 15: 20 sc (20 st) Rnd 16: 6 sc, 4 dec, 6 sc (16 st) Rnd 17: 16 sc (16 st)
FO and leave a long tail for sewing.
Body finished.
Arms (x 2)
In gray:
Rnd 1: 6 sc in MR (6 st) Rnd 2: 2 sc, 1 inc x 2 (8 st) Rnd 3–5 (3 Rnds): 8 sc (8 st) Rnd 6: 2 sc, 1 dec x 2 (6 st) Rnd 7: 6 sc (6 st)
Stuff. Fold the work in half and make 3 sc by stitching through both layers.
FO and leave a long tail for sewing.
Arms finished. (Make 2)
Legs (x 2)
In gray:
Rnd 1: 8 sc in MR (8 st) Rnd 2: 3 sc, 1 inc x 2 (10 st) Rnd 3–6 (4 Rnds): 10 sc (10 st) Rnd 7: 3 sc, 1 dec x 2 (8 st) Rnd 8–9 (2 Rnds): 8 sc (8 st)
Stuff. Fold the work in half and make 4 sc by stitching through both layers.
FO and leave a long tail for sewing.
Legs finished. (Make 2)
Assembly
Body: Sew the belly part of the mouse’s body to the blueberry. The blossom end should be positioned on either the right or left side, with the face facing forward.
Ears: Sew one ear on each side of the head between Rnds 9 and 12, 9 sts apart. Sew not only the tip but also along the edge.
Head: Sew the mouse’s head to the body. You can also sew the mouse’s muzzle to the blueberry to secure it in place.
Arms: Sew one arm on each side of the mouse’s body, between Rnds 13 and 17. The arms should frame the mouse’s head. Sew the tips of the arms to the blueberry to keep them in place.
Legs: Sew one leg on each side of the mouse’s body between Rnds 4 and 8. Sew the tips of the legs to the blueberry to keep them in place.
Final touch — Tail: Attach pink yarn between Rnds 6 and 7 at the center back of the body. Ch20, FO and weave in the ends.
Tail finished.
Important Notes — Avoid These Common Mistakes
- Mark front loops of sts 1 and 24 in Rnd 3 of the blueberry — needed later for the blossom end.
- Blueberry = continuous rounds. Mouse head and body = joined rounds. Do not mix these up.
- Insert safety eyes before closing and stuffing the head.
- Keep head-shaping yarn hidden under the safety eyes.
- Stuff all pieces firmly and evenly for a clean finish.
- Pin arms and legs before sewing to ensure symmetry.
Conclusion
This sweet little duo makes a perfect handmade gift for any occasion. Tag @crocheted_lilas on Instagram to show off your finished project. Happy crocheting!