Enchanting Mini Crochet Hello Kitty Christmas Tree Amigurumi Quick Pattern
Holiday amigurumi always feels extra cozy, especially when cute characters meet classic Christmas shapes. First, this Crochet Hello Kitty Christmas Tree idea brings instant festive charm, and next, it turns into a soft decoration that looks adorable on a shelf or desk.
Even better, this Amigurumi project is beginner-friendly. After that, simple stitches quickly build the tree’s body, and then the sweet Hello Kitty-style face details make the whole plush feel special.
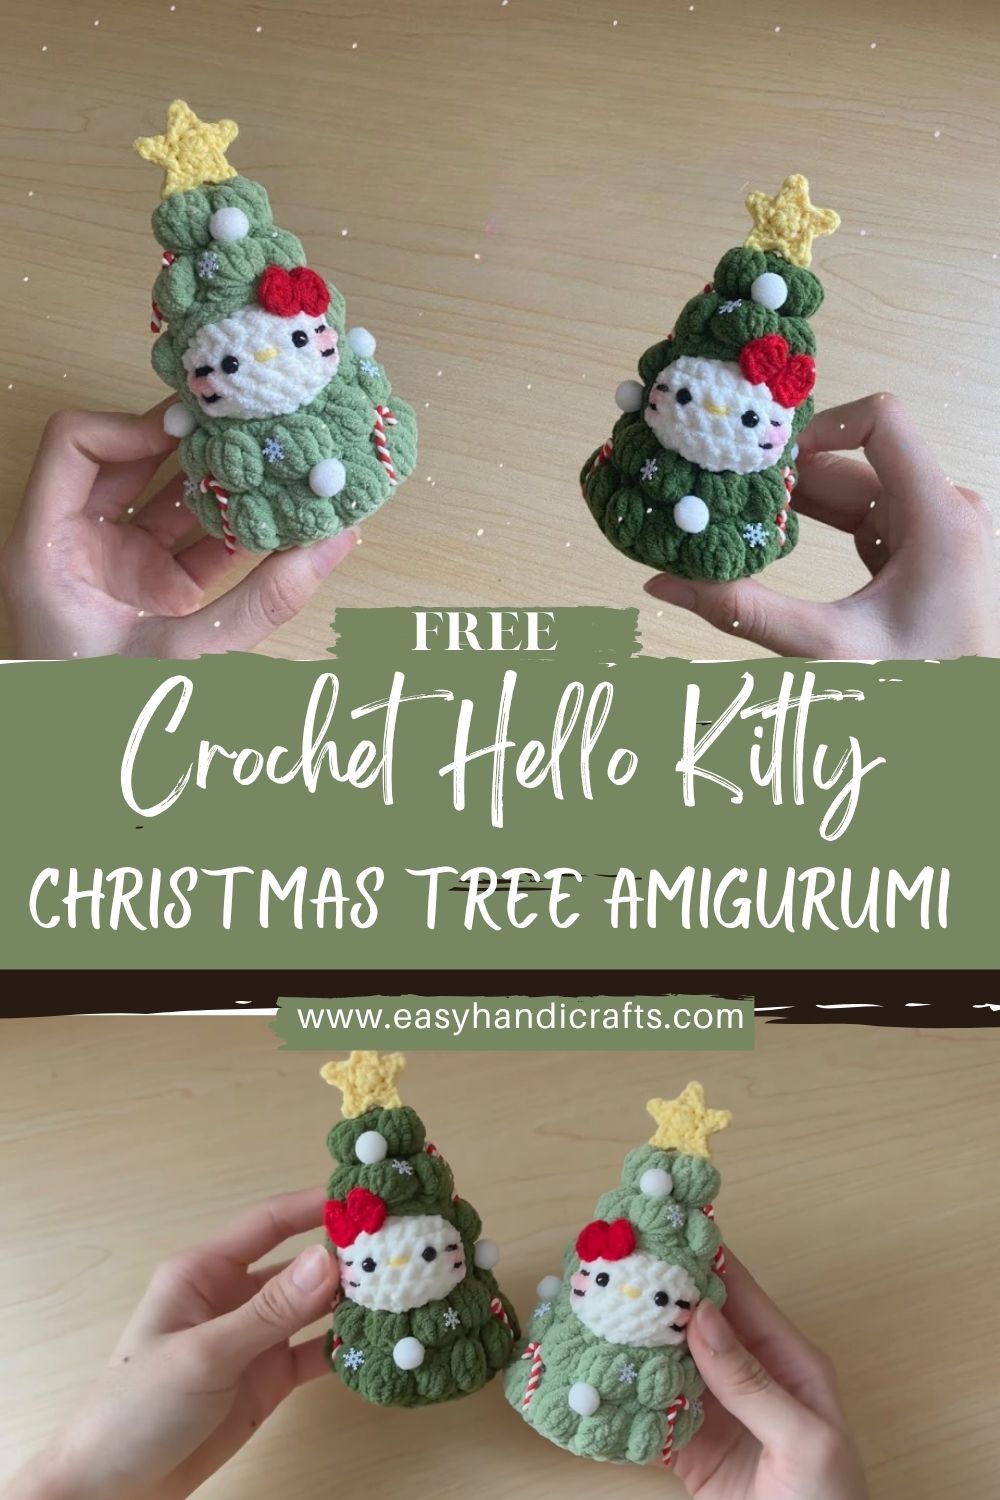
It’s perfect for beginners who want a holiday project that looks impressive without tricky construction. Next, it also suits gift makers who need something small, lightweight, and meaningful. Meanwhile, holiday crafters will love how quickly it works up, especially when using soft yarn and simple rounds.
What makes this design so fun is the balance between “cute” and “Christmas.” After that, the tree body is easy to customize with little ornaments and embroidery. Finally, the finished plush can be used as a tabletop decoration, stocking stuffer, or even a bag charm if a keychain ring is added.
Materials Needed
- Yarn (soft cotton or chenille, medium weight / Category 4 recommended):
- Green (tree): 60–90 g
- White (face panel, small details): 15–25 g
- Red (bow, ornaments): 10–20 g
- Yellow (star topper, tiny accents): 10–15 g
- Crochet hook: 3.5 mm–4.5 mm
- Use 3.5 mm for tighter stitches with cotton
- Use 4.0–4.5 mm for chenille, depending on thickness
- Safety eyes (optional): 8–10 mm
- OR black embroidery thread for stitched eyes
- Nose (optional): yellow embroidery thread or a small felt oval
- Fiberfill stuffing: 25–40 g
- Stitch markers: 2–4
- Yarn needle: 1 tapestry needle
- Scissors: 1 pair
- Small decorative elements: 6–12 mini pompoms or 6–12 small beads (optional), plus embroidery thread for snowflakes
- Keychain ring (optional): 1 ring (20–25 mm)
Skill Level
Beginner / Easy
First, the tree uses basic rounds with simple increases and decreases. Next, the face details are small and forgiving, so placement can be adjusted before stitching permanently.
Making Time (Overview)
Approximately 3–5 hours, depending on yarn type, decoration detail, and how much embroidery is added.
Instructions
1. Tree Body (Main Base Shape)
The goal is a cone that starts at the bottom and narrows toward the top.
- Start with a magic ring:
First, make a magic ring using green yarn. Next, crochet 6 single crochets into the ring, then pull it tight. - Increase to build the base circle:
Next, increase evenly for several rounds to create a flat base. After that, keep the base moderate so the tree stays compact and gift-friendly.
Beginner note: even increases mean adding stitches in a consistent rhythm around the round. - Build the cone shape:
After that, crochet a few rounds without increasing. Then, add gentle increase rounds occasionally so the tree widens gradually rather than becoming a straight tube.
Meanwhile, place a stitch marker at the start of each round to keep counting easily. - Begin narrowing toward the top:
Next, stop increasing and crochet several rounds evenly. After that, switch to decreasing rounds spaced out every few rounds so the cone slowly tapers. - Stuff as the opening becomes smaller:
Then, add fiberfill in small pinches. Next, shape the tree by pressing stuffing toward the sides and smoothing the surface with fingertips.
Finally, keep stuffing firm enough to stand upright, but not so tight that stitches stretch. - Close the top neatly:
Finally, decrease until the top closes. After that, fasten off and weave in the yarn tail securely.
Making time for tree body: 75–120 minutes
2. Hello Kitty Face Section
This part is a small white panel that gets stitched onto the front of the tree.
- Crochet a small round face panel:
First, create a magic ring with white yarn. Next, crochet in rounds to form a small circle or soft oval.
After that, stop once the panel looks proportional to the tree’s front, large enough to show features, but not so large that it covers the whole tree. - Lightly stuff (optional):
Next, add a tiny wisp of fiberfill behind the face panel if a puffy look is preferred. Meanwhile, keep it thin so it still sits smoothly against the tree. - Make the bow detail:
After that, crochet a simple red bow: a small rectangle cinched at the center with a few wraps of yarn. Then, stitch it near the top edge of the face area so it feels character-like and festive.
Making time for face + bow: 30–50 minutes
3. Additional Parts
Ears
- Crochet two small, rounded triangles:
First, crochet two tiny ear shapes in white. Next, keep them minimal so they look sweet rather than oversized. - Flatten and set aside:
After that, flatten each ear and leave a long tail for sewing.
Making time for ears: 10–20 minutes
Arms (Optional Cute Detail)
- Make two simple,e short pieces:
First, crochet two tiny tubes or so, ft.,t rounded shapes in white. Next, leave them lightly stuffed or unstuffed for a gentle, floppy feel. - Set aside for later:
After that, keep the arms symmetrical in length so they sit evenly on the tree.
Making time for arms (optional): 10–20 minutes
Tree Top Star
- Crochet a small star (or stitch one):
First, use yellow yarn to crochet a tiny star shape. Next, keep it small so it sits neatly on the tree tip without drooping. - Alternative option:
After that, if crocheting a star feels fiddly, stitch a simple star outline with yellow yarn on a small circle and attach that instead.
Making time for star: 10–20 minutes
4. Accessories & Details
This is where the Christmas tree personality really shows.
- Add tiny ornaments:
First, sew on mini pompoms or small beads like little baubles. Next, space them evenly around the tree front and sides so the design feels balanced. - Add stripes or garland lines:
After that, embroider a swirl line around the tree using red or white yarn to mimic a garland. Meanwhile, keep the line gentle and curved so the cone shape looks smooth. - Embroider snowflakes (optional):
Later, add a few tiny “x” stitches using white embroidery thread to make quick snowflakes.
Making time for decorations: 20–45 minutes
Face & Assembly
- Attach the face panel securely:
First, pin the white face panel onto the front of the green tree using stitch markers. Next, stitch around the edge with small, neat stitches.
After that, tug gently as sewing progresses so the panel lies flat without puckering. - Add eyes, nose, and whiskers:
Next, place safety eyes evenly if using them. Otherwise, embroider simple oval eyes using black thread.
After that, add a small yellow nose centered below the eyes. Then, stitch whiskers with thin black thread, three short lines on each side, keeping them level. - Attach ears and bow:
Next, sew the ears above the face panel so they sit symmetrically. After that, sew the bow near one ear for that classic character look. - Attach the star topper:
Finally, stitch the yellow star at the tree tip. If the top feels pointy, add a couple of anchoring stitches deeper into the cone so the star stands upright. - Optional keychain finish:
Finally, if turning this into a keychain, stitch a keychain ring into the top before attaching the star, then secure with several passes of yarn for strength.
Special Features
- Festive Christmas theme: classic tree shape with holiday decorations
- Cute character expression: simple eyes, nose, and whiskers create instant charm
- Soft textured tree shape: cozy and squishy, especially with chenille yarn
- Compact and gift-friendly: small, portable, and perfect for holiday bundles
Sizing Tips
- Yarn type changes size:
First, chenille yarn usually makes a larger plush with a softer look. Next, cotton yarn makes a smaller, crisp, well-defined shape. - Hook size impacts tightness and shape:
Next, a smaller hook creates tighter stitches and a firmer tree that holds its cone shape better. Meanwhile, a larger hook makes a looser fabric that may need extra stuffing. - Make mini or larger versions:
After that, for a mini version, stop increasing earlier and keep the tree shorter. For a larger version, add extra increase rounds at the base and a few additional even rounds in the body.
Finishing Tips
- First, kejoints are cleaned by working in continuous rounds and marking the start of each round.
- Next, weave ends through multiple stitches, then change direction once before trimming for extra security.
- After that, secure all small parts firmly, lly especially the ears, bow, and star.
- Finally, shape evenly while stuffing by adding small pinches and smoothing often.
Common Mistakes to Avoid
- Uneven cone shaping:
First, avoid random increases. Next, space increases evenly, so the tree expands smoothly. - Loose stitches causing gaps:
After that, use a smaller hook or tighter tension so stuffing doesn’t peek through. - Misplaced facial features:
Next, pin eye positions before stitching. Meanwhile, step back and check symmetry before committing. - Overstuffing or understuffing:
Finally, overstuffing stretches stitches and distorts the cone, while understuffing makes the tree slump. Aim for firm but squishy.
Variations & Customization Ideas
- Different tree colors:
First, try light green for a soft look, dark green for a classic tree, or pastel green for a cute theme. - Change bow color:
Next, use pink, red, gold, or even a sparkly yarn bow for a festive pop. - Add glitter yarn or accents:
After that, embroider a garland with metallic thread or add tiny sequins (if the item is decorative). - Turn it into an ornament or keychain:
Finally, add a hanging loop on top for a tree ornament, or attach a keychain ring for a bag charm.
Tutor Suggestions for ( Crochet Hello Kitty Christmas Tree)
First, focus on making tight, even stitches, because amigurumi looks best when gaps are minimal. Next, count rounds patiently and place markers wherever increases happen, because that keeps the cone smooth and symmetrical. After that, assembling slowly, pinning pieces first, makes a big difference in the final expression. Finally, treat decorations like the “sprinkles on top”: a few well-placed ornaments often look cleaner than too many crowded details.
Conclusion
This Crochet Hello Kitty Christmas Tree Amigurumi is a sweet holiday project that combines a classic festive shape with an irresistibly cute character style. First, the cone tree body works up quickly, and next, the face panel, bow, and star topper add personality without complicated skills. Finally, with a few simple color changes and decorations, this plush can become a handmade gift or holiday decoration that feels truly memorable.