Energetic Crochet a Skater Skirt Step-by-Step Pattern Circle Skirt
This free crochet skater skirt pattern is a fun, wearable project that creates a cute, flared skirt with lots of movement—perfect for warm weather and everyday outfits. If you’re looking for an easy beginner crochet skirt, this pattern uses simple shaping and basic stitches to help you make a stylish crochet skirt without complicated construction.
A crochet skater skirt is a fitted-at-the-waist, flared-at-the-hem skirt that gets its signature “spin” from gradual increases that create a smooth, flowy shape. This free crochet skater skirt pattern is designed to be approachable, so you can build the skirt in a simple, repeatable way—making it an excellent first project if you’re new to crochet wearables but still want something you’ll actually wear.
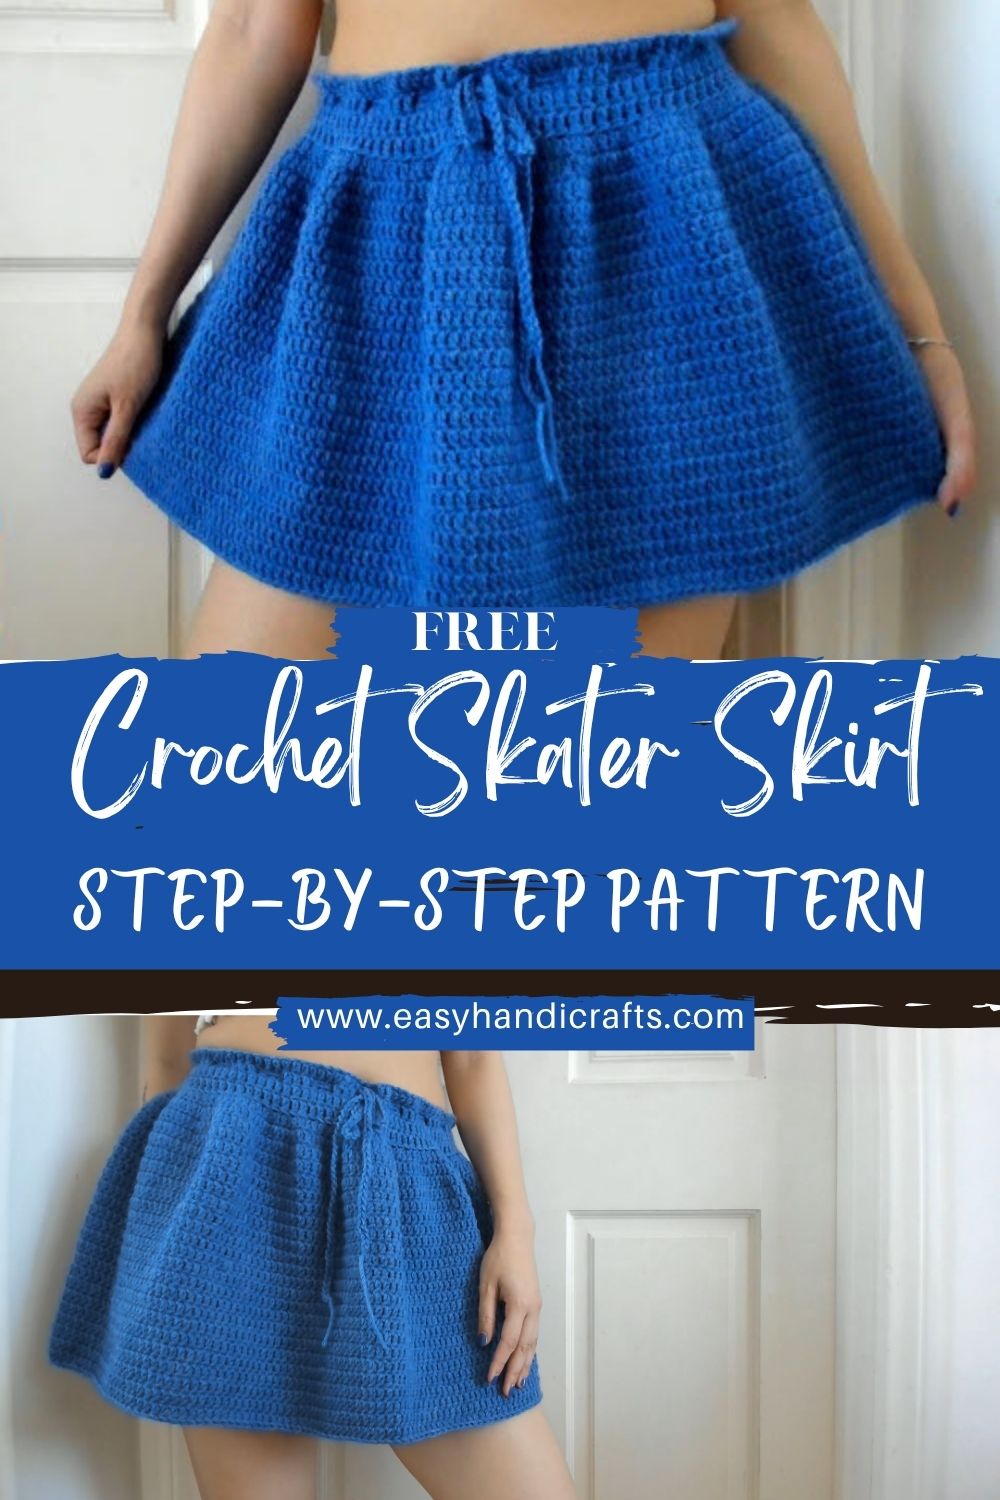
What makes this skirt such a great choice is how comfortable, stylish, and easy it is to make. With the right yarn (especially breathable cotton or cotton blends), it becomes a lightweight crochet summer skirt that drapes nicely and feels good against the skin. The flared silhouette is also forgiving and flattering, and it pairs easily with tank tops, tees, or cropped sweaters—so it’s a practical staple you can dress up or down.
This project is ideal for beginners ready to move beyond scarves and blankets, as well as intermediate crocheters seeking a relaxing pattern with satisfying results. In this article, you’ll learn how the crochet skater skirt is constructed, how to choose yarn for warm weather, how to size the skirt to your body, and what stitches and techniques you’ll use—plus tips for getting a neat waistband and a clean, twirly finish.
Materials Needed
- Yarn (Category 4 / Worsted weight recommended):
- Fiber options: cotton (cool and sturdy), acrylic (soft and budget-friendly), or a cotton blend (great balance)
- Amount: 350–650 g, depending on size and length
- Suggested yardage range: 700–1300 yards (approx.)
- Crochet hook: 5.0 mm (or 4.5 mm for tighter stitches)
- Waist finish option (choose one):
- Drawstring cord: crochet chain cord 90–110 cm (35–43 in)
- Elastic band (optional alternative): 2–3 cm (¾–1¼ in) wide, length equal to waist minus 2–5 cm (1–2 in) for gentle stretch
- Stitch markers: 2–6 (helpful for countingincreasede spacing)
- Yarn needle: 1 tapestry needle
- Measuring tape: 1
- Scissors: 1
Skill Level
Beginner / Easy
First, only basic stitches are needed (chains, slip stitch, double crochet). Next, the shaping is created with simple increases, so confidence builds quickly while the skirt starts to flare.
Making Time (Overview)
Approximately 5–8 hours, depending on size, desired length, and how often measurements are taken along the way.
Instructions
1. Waistband (Foundation)
- Measure correctly before starting:
First, measure around the waist (or the spot where the skirt should sit). Next, measure around the hips too, because the waistband must stretch or open enough to slide over them. - Create the foundation chain:
Next, make a slipknot and chain a length that fits comfortably around the body. For a helpful real-life example, about 89 cm (35 in) can work for many sizes, but the best result always comes from measuring and testing the chain around the waist and hips. - Join in a ring without twisting:
After that, run fingers along the chain to make sure it faces one direction. Then, join the first chain with a slip stitch to form a circle. - Work double crochet rounds for the band:
Next, chain 3 (counts as a double crochet), then double crochet around. After that, slip stitch to the top of the starting chain-3 to close the round.
Then, repeat until the waistband is the preferred height. A clean, beginner-friendly target is 4 rounds, which often ends up being roughly 5 cm (about 2 in) depending on yarn and tension. - Choose an elastic or drawstring approach:
- Drawstring method (simple and adjustable): keep the waistband as-is and add a drawstring later.
- Elastic method (extra secure): later, weave elastic through the waistband and sew the ends together neatly.
Making time for waistband: 45–75 minutes
2. Skirt Body (Main Flare Section)
The flare comes from planned increases. First, the skirt expands quickly, and next, it settles into a smooth drape once the increased section ends.
- Start the first flare round with a subtle ridge (optional but pretty):
First, chain 3. Next, work double crochet into the next stitch, crocheting in the back loop only for this round.
After that, increase regularly by placing 2 double crochets in the same stitch at set intervals. A simple,e beginner-friendly approachto increasingvery other stitch for the first flare round.
Meanwhile, keep counsteadilyteady so the increases stay evenly spaced. - Second increase round (gentler expansion):
Next, return to normal double crochet through both loops. Then, increase every third stitch to build flare without making it overly ruffled.
After that, the skirt starts to look more like a true skater shape rather than a straight tube. - Third increase round (final flare boost):
Next, work several plain stitches, and then increase periodically. A simple spacing option is:- double crochet across 9 stitches, then
- increase in the 10th stitch
Then, repeat that pattern around.
Finally, this is the last increase round, and the skirt can grow in length without widening.
- Continue without increases for the remaining length:
After that, double crochet one stitch in every stitch around for each round. Next, keep going until the desired skirt length is reached.
Making time for skirt body: 3–5.5 hours
3. Length Adjustment
- Choose the finished look first:
First, decide between mini, classic, or midi length. Next, measure from the bottom edge of the waistband down to the desired hemline. - Adjust by adding or stopping rounds:
After that, simply add more double crochet rounds for extra length, or stop earlier for a shorter skirt.
Meanwhile, try the skirt on occasionally (or measure against a favorite skirt) to avoid guesswork. - Helpful reference measurements:
- A skirt with a body length of around 28 cm (11 in) creates a cute everyday length for many sizes.
- Meanwhile, measuring from the top edge to the hem might land around 33 cm (13 in), depending on the waistband height.
Making time for length adjustment: 30–60 minutes (mostly measuring and finishing)
Additional Details / Finishing Touches
- Optional drawstring tightening:
First, crochet a chain cord approximately 91 cm (36 in) long (or longer for a bow). Next, weave it through one of the waistband rows like a shoelace.
After that, weave over a few stitches, then under a few stitches in a consistent rhythm so it looks neat.
Finally, center the drawstring at the front and keep the join seam at the back for a clean finish. - Decorative edging (optional):
Next, add a simple hem border for polish:- Simple border: one round of single crochet
- Shell edge: (skip 2, 5 double crochet in next stitch, skip 2, slip stitch in next) repeated
After that, the hem looks finished and slightly weighted, which helps the skirt hang nicely.
Making time for finishing touches: 20–45 minutes
Assembly & Final Look
- Check symmetry:
First, lay the skirt flat and make sure the waistband isn’t twisted, and the hem isn’t pulling. Next, confirm the seam is placed at the back. - Adjust waistband fit:
After that, tighten the drawstring or insert elastic if extra hold is needed. Meanwhile, the skirt should feel secure without feeling restrictive. - Final shaping tips:
Finally, smooth the skirt with your hands and lightly block if desired. A gentle block helps stitches relax and makes the flare look even.
Special Features
- Flowy skater shape: increases create a classic twirl-friendly flare
- Comfortable fit: stretchy stitches and adjustable waist options
- Handmade texture: cozy and stylish without being heavy
- Adjustable waist: drawstring or elastic finishing for flexibility
Sizing Tips
- How yarn weight affects size:
First, a thicker yarn makes a heavier skirt with more structure. Next, lighter yarn creates a more drapey skirt that flows more.
Meanwhile, a Category 4 yarn is a great balance for beginners because it’s easy to see and control. - Hook size impact:
Next, a larger hook creates looser fabric and more drape, while a smaller hook makes tighter fabric and more structure. - Adjusting for XS, S, M, L:
First, adjust by waist/hip chain length, not by guessing stitch counts. Next, keep the same increase strategy and simply scale the starting circumference.
After that, length changes are the easiest customization, just crochet more or fewer rounds. - Measuring waist and length correctly:
Finally, always measure where the skirt will actually sit. A high-waisted skirt needs a different measurement than a low-waisted fit.
Finishing Tips for (Crochet a Skater Skirt)
- First, keep stitching consistent in the waistband so it stays smooth and supportive.
- Next, weave in ends immediately, especially at the waistband join and drawstring entry points.
- After that, slip stitch joins should be snug but not tight, so the seam doesn’t pucker.
- Finally, make sure the flare rounds are evenly increased so the hem hangs evenly.
Common Mistakes to Avoid
- Incorrect waist measurement:
First, remember the waistband must also pass over the hips. Next, test the foundation chain before joining. - Uneven increases:
After that, use stitch markers to evenly space increases. Meanwhile, count sections rather than relying on eye judgment. - Skipping stitch counting:
Next, count at the end of the increase rounds to confirm nothing was missed. Small counting errors can create a lopsided flare. - Too tight or too loose waistband:
Finally, if the waistband feels tight, adjust the starting chain or switch to a slightly larger hook for the band. If it feels loose, tighten with a drawstring or add elastic.
Variations & Customization Ideas
- Color options:
First, try pastels for a soft spring look. Next, choose bold shades for statement outfits. After that, neutrals like cream, black, and tan make the skirt easy to style. - Add stripes or patterns:
Meanwhile, add stripes every few rounds for a playful look. Later, try alternating textures like a ridge around to create subtle design lines. - High-waisted version:
Next, crochet extra waistband rounds for a taller band, then add the drawstring through the upper-middle row. - Mini or midi length:
Finally, shorten for a flirty mini or extend for a midi by adding rounds after the last increase section.
Tutor Suggestions for ( Crochet a Skater Skirt)
First, focus on making the waistband comfortable, because a good fit makes the whole skirt feel wearable. Next, place stitch markers at intervals during increase roundeto keeps the flare balanced without stress. After that, try the skirt on between sections, since small adjustments are easier earlier than later. Finally, stay patient with counting—every neat round builds confidence, and the finished skirt is absolutely worth it.
Conclusion
Learning to Crochet a Skater Skirt is a fun step into wearable crochet, especially because the shape comes together with simple increases and easy repeat rounds. Next, the adjustable waistband makes it comfortable and flexible, and the flowy flare makes it stylish for everyday outfits. Finally, with a few color changes or a cute edge finish, this skirt can be customized into a signature handmade piece that feels truly special.