Free Crochet Flower Bunny Amigurumi Pattern for Spring Decor

Skill Level
Confident beginners will manage this Free Crochet Flower Bunny pattern comfortably. It relies on single crochet, increases, and invisible decreases. Safety eye placement and face embroidery add finesse, so basic sewing comfort helps.
Materials and Tools
- Plush yarn in white, pink, and yellow
- White fluffy yarn
- A small amount of black and white cotton yarn for face sculpting, muzzle, and eyebrows
- Gray plush yarn for embroidering the nose
- Hook and safety eyes sized to match the yarn (safety eyes size 16 mm, hook size 3.5 mm)
- Scissors
- Needle
- Fiber filling (stuffing)
- Stitch marker
Abbreviations
- MR – magic ring
- st/sts – stitch/stitches
- ch – chain
- sc – single crochet
- Rnd/Rnds – round/rounds
- inc – single crochet increase (2 sc in 1 st)
- dec – invisible decrease (dec 2 sts together)
- hdc – half double crochet
- BLO – back loop only
- (…)* – repeat instructions in brackets the stated number of times
- (…) – total number of stitches in the round/row
Pattern Overview
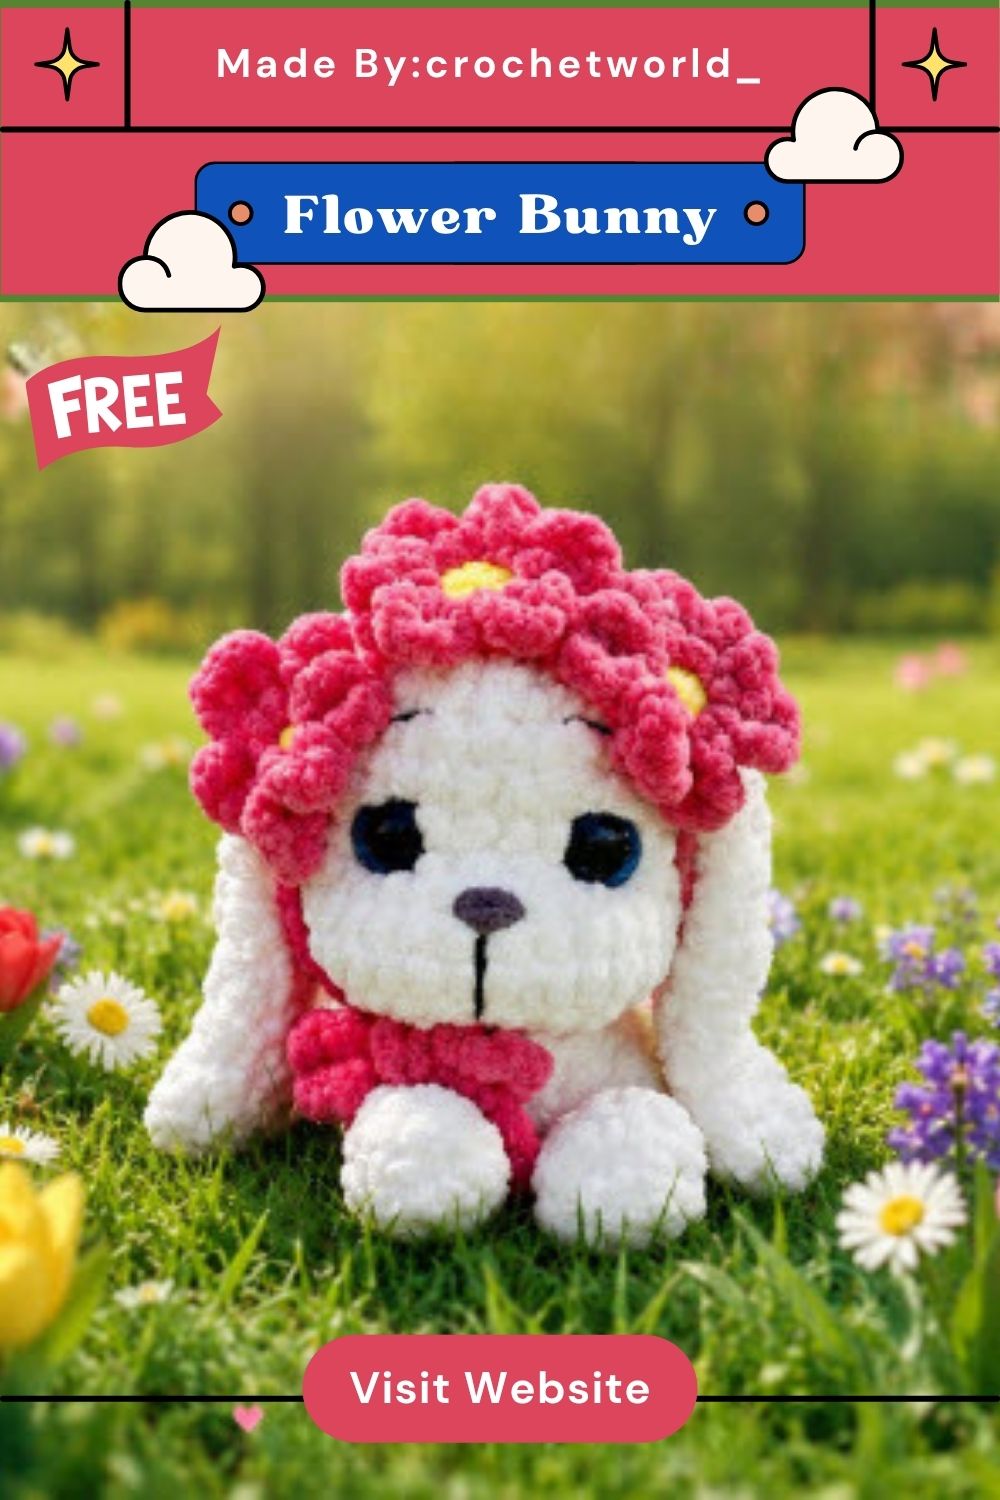
- Free Crochet Flower Bunny built from six main parts: head, ears, arms, legs, body, and tail, joined together at the end
- Worked in continuous rounds using single crochet, increases, and invisible decreases, with no slip-stitch joins between rounds
- Plush yarn used for the body and fluffy accents, while cotton yarn handles finer face details like the muzzle and eyebrows
- Finished with a hand-stitched flower band featuring three pastel flowers, the piece that gives this bunny its spring theme
- Safety eyes and light stuffing give the bunny a soft, huggable structure that holds its shape over time
- Finished size depends on yarn weight and hook, but the design suits standard 3.5 mm hooks and worsted-weight yarn
- Stitch counts stay manageable throughout, keeping the piece approachable even for a first attempt at plush-yarn amigurumi
Special Techniques
Face sculpting sets this pattern apart from a typical round-headed amigurumi. Tightening the head at two marked points, then pulling both ends together, carves in cheeks and a gentle muzzle shape before any embroidery begins. Getting this step right makes the difference between a flat, generic bunny face and one with real personality, so it deserves extra patience.
Why Beginners Will Enjoy This Pattern
Ngl, the step-by-step round counts and clear stitch guidance make this a forgiving first amigurumi animal, especially for anyone who has already tried a basic sphere or simple stuffed shape. Face sculpting adds a fun challenge without demanding advanced technique, giving new crocheters a real sense of accomplishment by the final stitch. The flower band also offers a low-pressure way to practice a new stitch combination without committing to a whole new project.
Common Mistakes
- Skipping the stitch marker on continuous rounds, which causes the piece to spiral off track and throws off later stitch counts
- Placing safety eyes before checking spacing against the picture guide, leading to an uneven or cross-eyed face
- Overstuffing the head before completing the tightening step, which flattens the sculpted cheeks and hides the muzzle shape
- Rushing the ear rows, resulting in floppy or misshapen ears once fluffy yarn gets added around the edge
- Forgetting to center the back rows on the body before attaching the arms, which throws off overall symmetry
- Pulling the flower band chain too tightly, which curls the band and makes it sit awkwardly around the neck
- Mixing up which stitches belong to the plush versus standard yarn sections, blurring the intended texture contrast
Uses and Benefits
Beyond its cuteness, this bunny serves several practical purposes around the home. Trust me, a finished piece works beautifully as a nursery accent, baby shower gift, or handmade Easter centerpiece. Crocheters selling handmade goods often find florals-and-animals combinations attract steady buyer interest online. The project doubles as practice for blending plush and cotton yarns within one single figure, sharpening tension control and color-change skills along the way. Amigurumi fundamentals get reinforced too, producing a gift-worthy result for personal collections and small handmade businesses.
Free Pattern
Head
Crochet in white. Stuff as you go.
- Rnd 1: 6 sc in MR (6)
- Rnd 2: 6 inc (12)
- Rnd 3: (1 sc, inc) x6 (18)
- Rnd 4: (2 sc, inc) x6 (24)
- Rnds 5–7: 24 sc (3 rounds) (24)
- Rnd 8: (3 sc, inc) x6 (30)
- Rnds 9–11: 30 sc (3 rounds) (30)
Insert the safety eyes between rounds 7 and 8, spaced 4 visible stitches apart.
- Rnd 12: (3 sc, dec) x6 (24)
- Rnd 13: (2 sc, dec) x6 (18)
- Rnd 14: (1 sc, dec) x6 (12)
- Rnd 15: 6 dec (6)
Tightening and Face Sculpting
Follow the numbers from the reference picture. Tighten each end of the thread well, then tighten both ends at once. Embroider the nose, muzzle, eyelids, and eyebrows following the picture guide.
Ears (make two)
Crochet in white. Chain 23, then work from the second loop from the hook.
- Row 1: 22 sc, then work on the other side of the chain: 22 sc
- Row 2: 17 sl st, 11 hdc, 17 sl st
Change to fluffy yarn and sc around the ear. Fasten off, leaving a tail for sewing.
Sew the ears between rounds 2 and 3, positioned 2 stitches behind each eye.
Arms (make two)
Crochet in white. Stuff lightly as you go, through round 3.
- Rnd 1: 6 sc in MR (6)
- Rnd 2: (1 sc, inc) x3 (9)
- Rnds 3–5: 9 sc (3 rounds) (9)
Change to white fluffy yarn.
- Rnd 6: 9 sc (9)
Fold the arm and crochet 5 sc through both layers. Fasten off and weave in the ends.
Legs (make two)
Crochet in white. Stuff lightly as you go.
- Rnd 1: 6 sc in MR (6)
- Rnd 2: 6 inc (12)
- Rnds 3–8: 12 sc (6 rounds) (12)
Fasten off and continue to the body.
Body
Crochet in white fluffy yarn. Stuff as you go.
- Rnd 1: crochet 24 sc through both legs (24)
- Rnd 2: (3 sc, inc) x6 (30)
- Rnd 3: (4 sc, inc) x6 (36)
- Rnds 4–6: 36 sc (3 rounds) (36)
- Rnd 7: (4 sc, dec) x6 (30)
- Rnd 8: 30 sc (30)
- Rnd 9: (3 sc, dec) x6 (24)
- Rnds 10–12: 24 sc (3 rounds) (24)
- Rnd 13: (2 sc, dec) x6 (18)
Connect the arms in the next round. Add or remove stitches if needed to center the back.
- Rnd 14: 4 sc, 5 sc through the left arm, 5 sc through the right arm, 4 sc (18)
- Rnd 15: (1 sc, dec) x6 (12)
- Rnd 16: 6 dec (6)
Sew the hole closed, fasten off, and weave in the ends. Sew the head to the body between rounds 11 and 14, then fasten off and weave in remaining ends.
Tail
Crochet in white fluffy yarn. Stuff as you go.
- Rnd 1: 7 sc in MR (7)
- Rnd 2: 7 inc (14)
- Rnds 3–5: 14 sc (3 rounds) (14)
- Rnd 6: 7 dec (7)
Fasten off, leaving a tail for sewing. Sew the tail between rounds 3 and 5.
Flower Band
Flowers (make three)
Start with yellow.
- Rnd 1: 6 sc in MR (6)
Change color to pink.
- Rnd 2: work in BLO — (sl st, ch 3, 1 hdc, ch 3, sl st) x6
Fasten off, leaving a tail for sewing.
Band
With pink yarn, chain 90. Sew the flowers onto the band following the reference picture
Helpful Beginner Tips
- Keep a stitch marker on the first stitch of every round to avoid losing track of round counts
- Stuff firmly but evenly, adding small amounts as each section grows rather than all at once at the end
- Test safety eye placement with removable pins before locking them in permanently
- Work the flower band loosely so the chain lies flat instead of curling once sewn on
- Weave in ends as each piece finishes rather than saving them all for the very end
- Count stitches out loud or on paper for the first few rounds until the increase pattern feels natural
- Keep a small swatch of leftover yarn nearby to test embroidery stitches before committing to the actual face
Assembly
- Sew the ears between rounds 2 and 3, positioned two stitches behind each eye for a natural angle
- Fold each arm and close with five single crochet through both layers before attaching to the body
- Crochet through both legs to begin the body, joining them into one continuous base round
- Connect the arms into the body row as instructed, adjusting stitch count if needed to keep the back centered
- Sew the tail between rounds 3 and 5 on the back of the body, checking placement against the picture first
- Attach the head to the body between rounds 11 and 14, checking the face angle before securing it permanently
- Sew the finished flowers onto the pink chain band, spacing them evenly before tying it around the neck
Where Can You Use This Case?
A finished Free Crochet Flower Bunny fits low-key almost anywhere spring décor shows up, from a nursery shelf to an Easter table runner to a handmade market booth. It photographs well for seasonal content, making it just as useful for craft sellers as it is for personal keepsakes. A single bunny can also anchor a small spring vignette alongside faux florals or pastel candles on a mantel or entryway table.
Tips and Tricks for Success
- Real talk, take the tightening and face-sculpting step slowly since it shapes the entire final expression
- Match yarn weight closely between the plush and standard sections to keep proportions consistent
- Pin pieces in place before sewing to check balance and symmetry ahead of time
- Use a fresh needle for embroidery details so the muzzle and eyebrows stay crisp and defined
- Photograph progress in natural light if selling the pattern or finished piece online
- Block the flower band lightly before attaching it so the petals sit evenly around the neck
- Keep tension consistent across all limbs so the arms and legs match in size and shape
Why This Crochet Pattern Is Trending
Cottagecore-inspired amigurumi has surged across Pinterest and craft marketplaces, and flower-crowned animals sit right at the center of that wave. No joke, floral accents transform an ordinary bunny into a seasonal statement piece that photographs beautifully for social feeds. Shoppers browsing spring décor gravitate toward soft palettes paired with delicate details.
- Floral amigurumi consistently ranks among top spring search terms on Pinterest
- Soft plush yarn textures photograph well for social media and shop listings
- Multi-yarn designs stand out from single-color amigurumi in a crowded marketplace
Conclusion
For real, this Free Crochet Flower Bunny earns its spot as a spring staple through clever construction and genuine charm. Every section, from face sculpting to the finished flower band, keeps the process engaging without overwhelming a beginner. Once the last flower gets sewn onto the band, the result stands ready for a nursery shelf, a gift box, or a handmade shop listing.