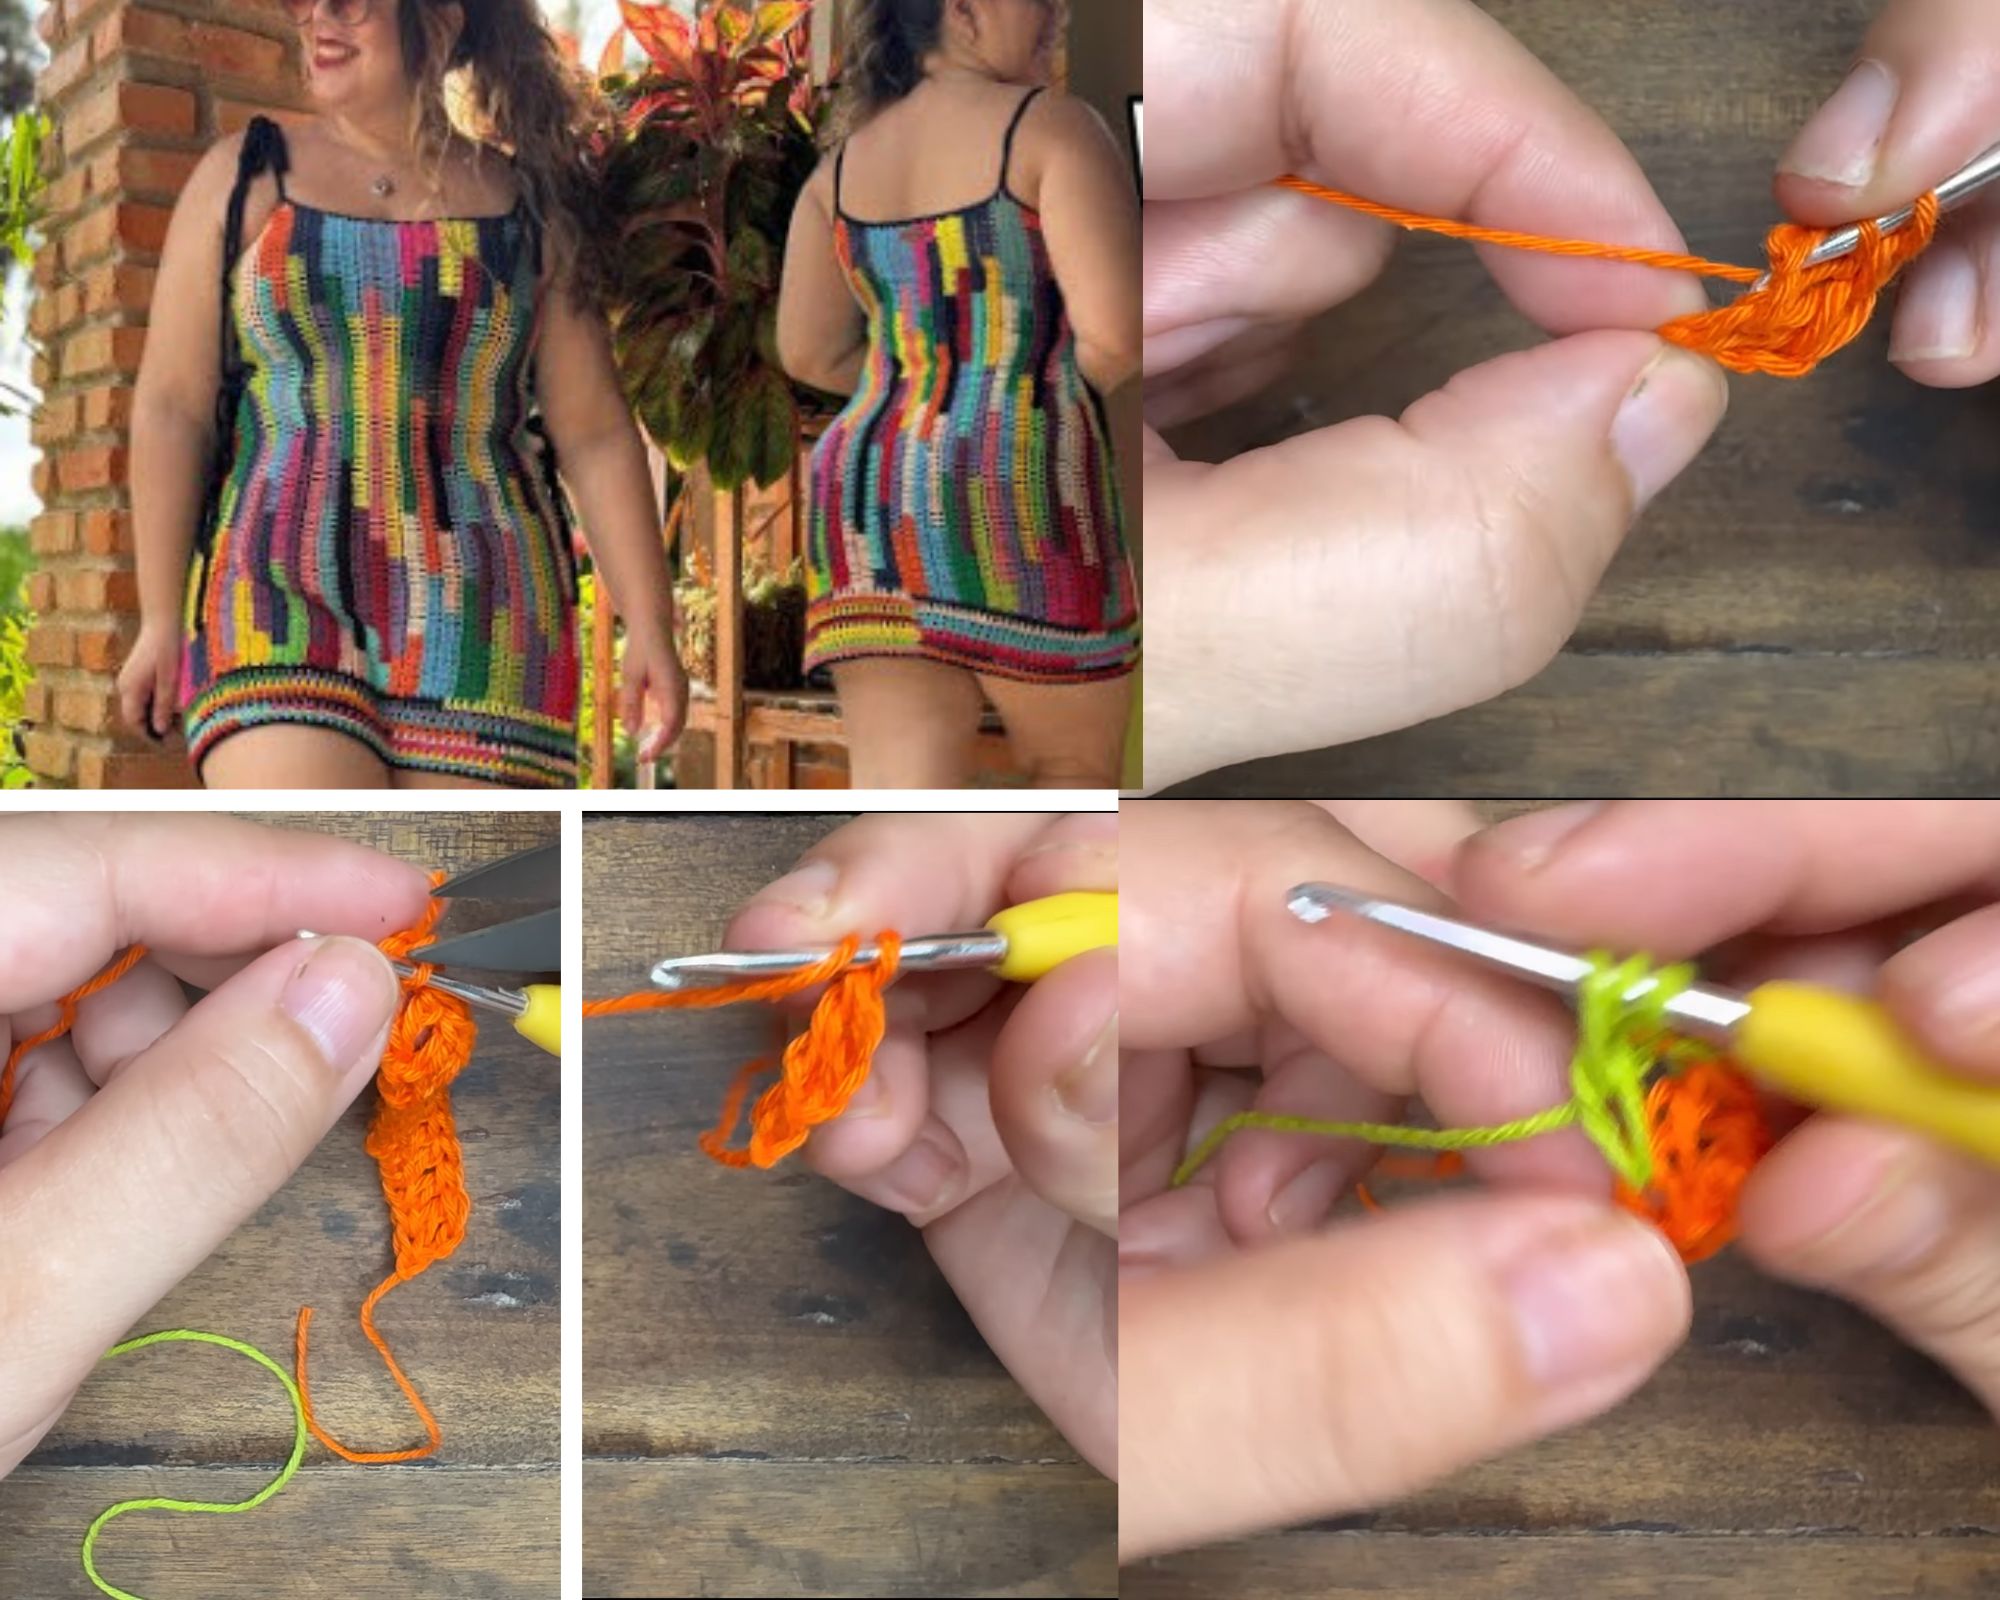
Crochet Euphoria Dress Cut Out Party Dress Pattern
Euphoria Cutout Party Dress is a chic, beginner-friendly crochet pattern for a flattering, customizable cut-out dress that turns heads at nights out, festivals, and special events. With clean lines, adjustable ties, and on-trend cut-out shaping, this approachable design delivers handmade charm with a polished, fashion-forward finish.
The Crochet Euphoria Dress Cut Out Party Dress Pattern: a flirty, modern make that’s as fun to stitch as it is to wear. Clean, repeatable sections and beginner-friendly shaping let you relax into the rhythm while customizing length, fit, and cut-out placement.
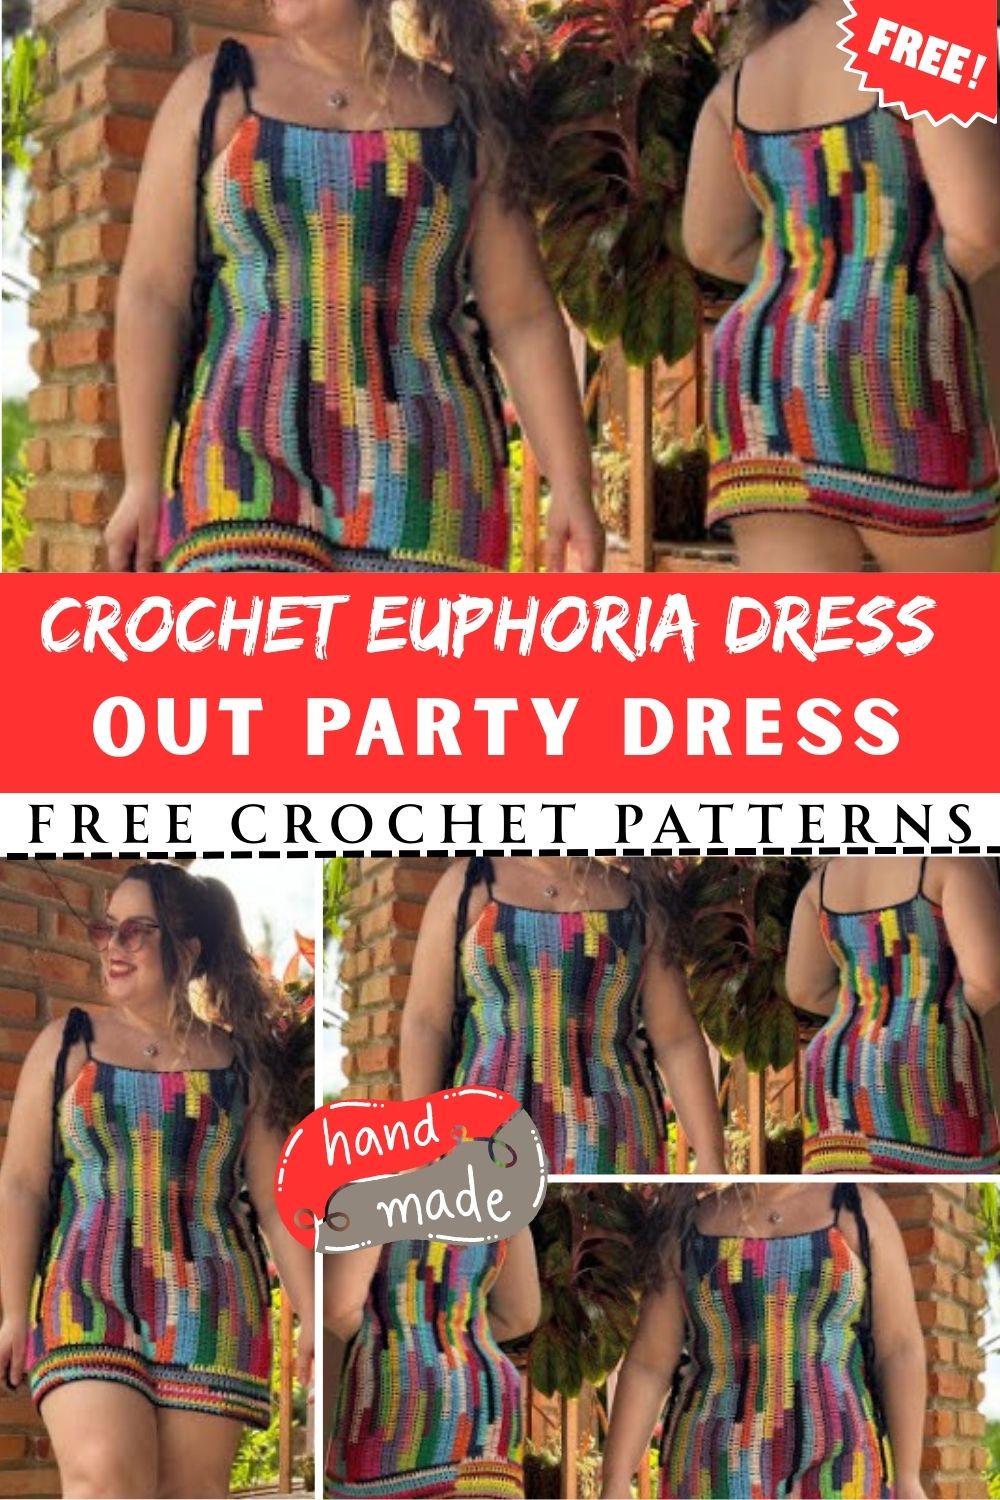
The airy fabric showcases handmade texture without bulk, delivering a flattering, dance-ready silhouette. Use it for nights out and festivals, layer over a slip for brunch or vacation photos, or crochet a thoughtful, gift-worthy dress for the style lover in your life.
Crochet Euphoria Cut Out Party Dress Pattern
Pattern Supplies
- Yarn:
- DK (Light/3) cotton or cotton-acrylic blend for the amigurumi doll:
- Skin tone: 30–40 g (approximately 60–80 m)
- Hair color: 10–15 g (approximately 20–30 m)
- Dress yarn: DK (Light/3) mercerized cotton or soft bamboo blend for drape and shine:
- Main color: 20–25 g (approximately 40–55 m)
- Accent color (for edging or ties): 5–8 g
- DK (Light/3) cotton or cotton-acrylic blend for the amigurumi doll:
- Crochet hooks:
- 2.25–2.5 mm for a firm amigurumi fabric
- 2.75–3.0 mm for the dress, depending on desired drape
- Safety eyes: 8 mm (6 mm for a petite look); washers included
- Polyester fiberfill stuffing: approximately 25–35 g
- Stitch markers: at least 2 locking markers for rounds and feature placement
- Tapestry needle: size 16–18, blunt tip for sewing parts and weaving ends
- Embroidery thread or fine yarn: black/brown for lashes and mouth; pink for blush (15–30 cm of each)
- Small buttons or beads (optional): 2–4 pieces for dress accents
- Keychain ring or lobster clasp (optional): 25–30 mm ring with 3–4 cm chain
- Scissors: sharp tips for trimming ends
- Optional: tiny pouch of plastic pellets (10–12 g) secured in nylon for a weighted base
To begin, gather every item before the first stitch so the flow remains smooth. Additionally, choose non-squeaky cotton for the dress to emphasize glossy stitch definition. Finally, keep markers handy; consistent placement ensures even shaping and excellent readability throughout the pattern.
Skill Level
Easy/Beginner-Friendly. Because the doll uses single crochet, simple increases, and gentle decreases, the build feels approachable. Moreover, the “Euphoria” cut-out party dress relies on straightforward chain spaces, tidy decreases, and basic straps. Consequently, the entire project suits new amigurumi makers while still delighting experienced crocheters.
Making Time (Overview)
Altogether, expect approximately 5–7 hours from start to finish, depending on pace and yarn choice.
- Body (head/torso shaping): 2–2.5 hours
- Arms: 25–35 minutes
- Legs: 35–45 minutes
- Dress and accessories: 1.5–2.5 hours
- Face, assembly, and finishing: 30–45 minutes
To streamline progress, read the steps first. Then, set a gentle timer for each section; as a result, the workflow stays relaxed and predictable.
Step-by-Step Instructions
Before starting, work the amigurumi doll in continuous rounds unless otherwise noted. Furthermore, place a stitch marker in the first stitch of each round and move it up consistently. In addition, keep the amigurumi tension firm so stuffing stays hidden; however, relax slightly for the dress to create a soft, party-ready drape.
Body (3 Clear Steps)
Estimated making time: 2–2.5 hours
- Shape the head and gentle cheeks
- First, begin with a magic ring, 6 single crochets (sc) into the ring. Tighten the ring securely.
- Next, increase to form a smooth sphere:
- R2: 2 sc in each stitch around (12)
- R3: (1 sc, inc) around (18)
- R4: (2 sc, inc) around (24)
- R5: (3 sc, inc) around (30)
- R6: (4 sc, inc) around (36)
- R7: (5 sc, inc) around (42)
- R8: (6 sc, inc) around (48)
- Then, work even for soft fullness:
- R9–R16: sc around (48)
- Meanwhile, add safety eyes between R13–R14, spaced 7–8 stitches apart for a sweet, centered look. Afterwards, lightly stuff the head, adding small tufts and shaping with fingertips for rounded cheeks.
- Taper the face and define the neck
- Next, decrease gradually:
- R17: (6 sc, dec) around (42)
- R18: (5 sc, dec) around (36)
- R19: (4 sc, dec) around (30)
- After that, begin the neck:
- R20: (3 sc, dec) around (24)
- R21: (2 sc, dec) around (18)
- Before continuing, stuff the head firmly while keeping the neck slightly softer. Consequently, the head holds its shape while the neck remains flexible and comfortable.
- Build the torso and hips.
- Then, expand for the upper torso:
- R22: (2 sc, inc) around (24)
- R23: (3 sc, inc) around (30)
- R24: sc around (30)
- Next, shape a gentle waist:
- R25: (3 sc, dec) around (24)
- R26–R27: sc around (24)
- Finally, widen for hips:
- R28: (3 sc, inc) around (30)
- R29: (4 sc, inc) around (36)
- R30–R31: sc around (36)
- R32: (4 sc, dec) around (30)
- R33: (3 sc, dec) around (24)
- R34: (2 sc, dec) around (18)
- R35: (1 sc, dec) around (12)
- R36: dec around (6), fasten off, and close neatly.
- As you go, stuff gradually. Meanwhile, if using a small pellet pouch for stability, nestle it at the base and surround it with fiberfill. Accordingly, the doll stands or sits with confidence.
Additional Parts
Arms (make 2)
Estimated making time: 25–35 minutes
- To start, make a magic ring, place 6 sc into the ring, and tighten.
- Next, R2: (1 sc, inc) around (9).
- Then, R3–R7: sc around (9) for soft, rounded arms about 1.5–2 cm long.
- Afterwards, stuff very lightly, flatten the opening, and whipstitch closed. Leave a long tail for sewing.
- Finally, angle both arms slightly inward to suggest a relaxed, party-ready pose.
Legs (make 2)
Estimated making time: 35–45 minutes
- First, begin with a magic ring, 6 sc intothe ring.
- Next, R2: (1 sc, inc) around (9).
- Then, R3: (2 sc, inc) around (12).
- Afterwards, R4–R6: sc around (12) to form a small shoe/foot silhouette.
- Then, R7: (2 sc, dec) around (9); lightly stuff.
- Subsequently, R8: sc around (9), fasten off, leaving a tail to sew.
- Finally, position both legs evenly at the base so the doll stands or sits without leaning. As a result, balance appears natural from every angle.
Hair Cap (optional, recommended)
Estimated making time: 20–30 minutes
- To begin, with hair color, repeat the head’s first five rounds (up to 30 sts).
- Next, work even for 2–3 rounds to match the curve of the head.
- Then, fasten off, pin the cap to the head, and sew around the edge.
- Finally, add bangs or a sleek bun: embroider strands across the forehead, then wind a small coil at the back and stitch down securely. Consequently, the hairstyle looks polished and photo-ready.
Accessories / Details (Euphoria Cut Out Party Dress)
Estimated making time: 1.5–2.5 hours
This dress brings a chic “Euphoria” vibe with tasteful cutouts, a fitted shape, and delicate straps. Because sizing can vary slightly with yarn and tension, measure the doll as you work. Therefore, follow the stitch counts while also trying the dress on for a precise fit.
Foundation and Fit
- First, measure around the doll’s waist at the narrowest point. For the body above, the waist round measures approximately 24 stitches.
- Next, create a light negative ease: plan for a dress circumference 2–4 stitches smaller than the waist measure, so it stays snug. Consequently, the garment hugs the torso without slipping.
Skirt Tube (worked bottom-up)
- With dress yarn and a 2.75–3.0 mm hook, chain 30, join with a slip stitch to form a ring (avoid twisting). This creates a slightly flared hem that tapers up to the waist.
- R1: ch 1, sc in each chain around (30), join.
- R2–R4: ch 1, sc around (30), join.
- R5: ch 1, (3 sc, dec) around (24), join. This gentle decrease shapes from the skirt to the waist.
- R6: ch 1, sc around (24), join.
Side Cutouts at the Waist
6) Mark the first and 13th stitches to divide front and back evenly (12 sts each).
- R7: ch 1, sc 4, ch 3, skip 3 (first side cutout), sc 8 across remaining front, ch 3, skip 3 (second side cutout), sc 4 to end (24 including chain spaces), join.
- R8: ch 1, sc 4, work 3 sc into the ch-3 space, sc 8, work 3 sc into the next ch-3 space, sc 4, join (24). Accordingly, the side windows remain open while the edges stay tidy. If a larger window is preferred, replace ch-3 with ch-4 in R7 and work 4 sc into each space on R8.
Bodice and Front Keyhole (subtle)
9) R9: ch 1, sc around (24), join.
- R10: place markers at center front: count 12 stitches from the join, mark stitch 12 (center front). To form a small keyhole, work: ch 1, sc to 2 sts before the center front marker, ch 2, skip 2 (keyhole), sc to end, join (24).
- R11: ch 1, sc to keyhole, work 2 sc into ch-2 space, sc to end, join (24).
- R12 (gentle shaping): ch 1, (2 sc, dec) around (18), join. Consequently, the bodice tapers elegantly, creating a sweetheart hint when paired with straps.
Neckline and Straps
13) R13: ch 1, sc around (18), join and fasten off.
- For straps, attach yarn at the top-left front, ch 12–16 (based on preferred look), skip across to the back, slip stitch to anchor; repeat on the right side. Alternatively, create halter ties by attaching at the center front, chaining 16–20, and tying behind the neck.
- Edge finish (optional): with accent color, surface slip stitch around the neckline and skirt hem for a polished outline. As a result, the dress looks boutique-finished and extra photogenic.
Corset-Style Side Lacing (optional)
- With accent yarn, chain two 10–12 cm cords. Next, thread each cord through the side cutout edges like tiny laces, then tie small bows. In turn, this detail instantly elevates the party look.
Fitting Check
- Slide the dress on from the bottom. Because the bodice has negative ease, it should hug the torso without stretching stitches too far. If it feels loose, add a round of subtle decreases at the back. Conversely, if it feels tight, steam-block lightly (avoid direct heat on safety eyes). Therefore, the final fit appears sleek and secure.
Face & Assembly
- Arms: First, pin both arms slightly below the mid-torso, angled to frame the dress. Next, sew with small, even stitches, entering and exiting on the same row to avoid visible slants. Consequently, the seam line stays discreet.
- Legs: Then, attach low at the base so the doll sits or stands evenly. Meanwhile, check the balance from the front and side before securing knots. As a result, posture looks natural.
- Eyes: Next, place safety eyes between R13–R14 of the head, spaced 7–8 stitches apart. Because expression sets the mood, preview with pins until the face feels friendly and confident.
- Nose and mouth: Afterwards, embroider a tiny nose centered one round below the eyes. Then, add a short vertical stitch and a small curved smile. Keep tension gentle to prevent puckering.
- Blush and lashes: Subsequently, add two soft blush stitches in pink, then sew minimal lashes for a party-ready sparkle.
- Hair: Finally, secure a bun or ponytail firmly with several passes. To finish, add a tiny bow or bead for extra charm. Accordingly, the overall look reads polished and playful.
Beginner-friendly tip: First, pin everything. Then, adjust angles gradually until the look aligns with the dress’s sleek silhouette. Finally, sew slowly and secure knots inside. Consequently, the finish appears clean and intentional.
Special Features
- Notably, the statement cutouts—small side windows and a petite front keyhole—create an unmistakable party vibe while staying beginner-friendly.
- Moreover, gentle decreases sculpt a snug, flattering fit so the dress looks tailored and camera-ready.
- In addition, minimal sewing keeps the process relaxing; the dress slides on and off without snaps or complex closures.
- Furthermore, mercerized cotton or bamboo blend adds a soft sheen that elevates the design for confident, party-ready energy.
- Above all, the amigurumi focus ensures soft features and rounded shaping, keeping the “Euphoria” style playful and sweet.
Sizing Tips for (Euphoria Cutout Party Dress)
- Yarn and hook choices:
- For a petite doll (10–12 cm tall), use sport-weight (Fine/2) yarn with a 2.0–2.25 mm hook.
- For a standard doll (12–15 cm tall), use DK (Light/3) with a 2.25–2.5 mm hook.
- For a larger doll (16–20 cm tall), use worsted (Medium/4) with a 2.75–3.25 mm hook and adjust dress counts proportionally.
- Dress scaling:
- If the torso round measures 24 sts, the counts above fit well.
- If the torso round measures 30 sts, add 1 extra sc between decreases in R5 and R12.
- If the torso round measures 18 sts, remove 1 sc from each repeat and reduce the chain spaces by 1.
- Additionally, aim for a dress that measures 1–2 cm less than the torso circumference (negative ease) so it stays fitted without slipping.
- Finally, adjust the strap length by 2–4 chains at a time until the neckline sits exactly where desired. Therefore, the bodice remains smooth and balanced.
Finishing Tips for (Euphoria Cutout Party Dress)
- To achieve sleek shaping, use the invisible decrease on the doll’s head and torso; consequently, gaps disappear and stuffing stays hidden.
- Furthermore, for clean color changes, finish the last pull-through of the previous stitch with the new shade. As a result, the transition looks crisp.
- In addition, add stuffing in small tufts and press gently with fingertips; meanwhile, keep the neck slightly softer so the head sits naturally.
- Similarly, if the seam travels, rotate the starting point at the back by adding or removing one stitch in a round, then correct on the next round. Accordingly, the seam realigns.
- Lastly, edge polish matters: a surface slip stitch or crab stitch along the hem produces a boutique finish. For shaping, very light steam from a distance relaxes fibers; however, avoid direct heat on the safety eyes.
Common Mistakes to Avoid for (Euphoria Cutout Party Dress)
- Overstuffing the torso: Too much fiberfill stretches stitches and distorts dress fit. Instead, add slowly, check often, and shape with fingertips.
- Skipping the marker: Losing the first-stitch marker causes lopsided shaping. Therefore, move the marker up after every round.
- Making cutouts too large: Wide chain spaces can sag. Consequently, start small, try on, and adjust by one chain at a time.
- Tight straps: Short straps pull the neckline out of shape. Rather, lengthen by 2 chains until the fit looks relaxed, not strained.
- Uneven leg placement: Misaligned legs make the doll lean. Hence, pin both, compare from several angles, and sew symmetrically.
- Rushing facial embroidery: Fast stitches tilt the smile or eyes. Accordingly, place guide pins first, then sew slowly for a soft, centered expression.
Variations & Customization Ideas for (Euphoria Cutout Party Dress)
- Color stories:
- For a classic take, choose black with gold edging for a sleek, after-dark look.
- Alternatively, try pastel lavender with pearl beads for soft glamour.
- For bold “Euphoria” energy, select neon pink or electric blue with contrast straps.
- Hem options: For a flirty finish, add a tiny ruffle by working (sc, ch 2) around the hem; otherwise, keep it chic with a simple single-crochet edge.
- Straps that transform: Consider cross-back straps, a halter tie, or off-shoulder loops anchored by tiny buttons. Consequently, the neckline shifts style instantly.
- Side-lace drama: Replace chain cords with thin satin ribbon; then thread through the side cutouts and tie delicate bows.
- Sparkle factor: Hold a strand of metallic sewing thread with the dress yarn for subtle shimmer without scratchiness.
- Amigurumi themes:
- Festival-ready: Add micro tassels at the hem and a flower crown headband.
- City night: Pair a tiny clutch with a minimalist ponytail.
- Birthday glam: Choose confetti-speckled yarn and a heart charm at the neckline.
- Matching accessories: Meanwhile, crochet a slim scarf, a mini shrug, or a fur-look stole using brushed yarn for cozy contrast. As a result, the outfit feels complete.
Tutor Suggestions for (Euphoria Cutout Party Dress)
- First, read through the full pattern to visualize the flow. Consequently, confidence rises and frogging decreases.
- Next, practice the magic ring with scrap yarn. As a result, centers close neatly, and the head looks smooth.
- Meanwhile, count stitches after every increase or decrease round. A 20-second check saves a 20-minute fix later.
- Later, testthe dress fit after each shaping round. Therefore, small tweaks early prevent big adjustments at the end.
- Additionally, use bright, even lighting when placing eyes and embroidering the mouth. Immediately, the expression improves.
- When sewing limbs, take short, consistent stitches and secure knots inside; then weave ends in different directions to lock.
- If the dress rides up, add a discreet loop at the back of the bodice and anchor it to a tiny back stitch on the torso. Accordingly, the hem stays level.
- Finally, pause after assembly to palm-roll the doll gently. This evens out stuffing and coaxes a smooth, photo-ready silhouette.
Why This Amigurumi Project Feels So Rewarding
From the very first round to the final bow, progress flows steadily and joyfully. First, the amigurumi base grows in soothing spirals, which calms the mind. Next, the dress introduces playful cutouts and subtle shaping, which keeps interest high without adding stress. Meanwhile, routine try-ons confirm the fit and highlight the silhouette. Finally, the edging and straps elevate everything, so the finished doll reads confident, glam, and wonderfully party-ready. Consequently, the journey feels both relaxing and exciting, and the result looks polished and giftable.
Making Time Recap for (Euphoria Cutout Party Dress)
- Total: Approximately 5–7 hours
- Body (head/torso): 2–2.5 hours
- Arms: 25–35 minutes
- Legs: 35–45 minutes
- Dress and accessories: 1.5–2.5 hours
- Face and assembly: 30–45 minutes
In summary, steady counting, careful pinning, and gentle shaping produce consistent results on the very first attempt.
Final Encouragement for (Euphoria Cutout Party Dress)
To wrap up, start with the cozy amigurumi base, continue with the sleek Euphoria dress, and finish with expressive facial details and a glossy hem. With patient counting, well-placed transitions between steps, and mindful try-ons, this Crochet Euphoria Dress Cut Out Party Dress Pattern becomes a glamorous, gift-ready amigurumi. Ultimately, the combination of snug tailoring, delicate cutouts, and soft features delivers a modern keepsake that shines in any handmade collection.