Awesome Crochet Chubby Otter Beginner Amigurumi Project Step-by-Step
Ready to crochet something irresistibly cute? This chubby otter crochet tutorial will guide you through making a tiny, round amigurumi otter plush with simple stitches and beginner-friendly shaping. If you’re looking for an easy crochet animal or a fun beginner crochet pattern, this little otter is the perfect project: quick, squishy, and giftable.
Amigurumi crochet is the art of crocheting small stuffed shapes, usually animals, dolls, and cute characters, using tight stitches and simple shaping. Most amigurumi is worked in continuous rounds, which makes it ideal for beginners who want to practice consistency and learn how 3D crochet works.
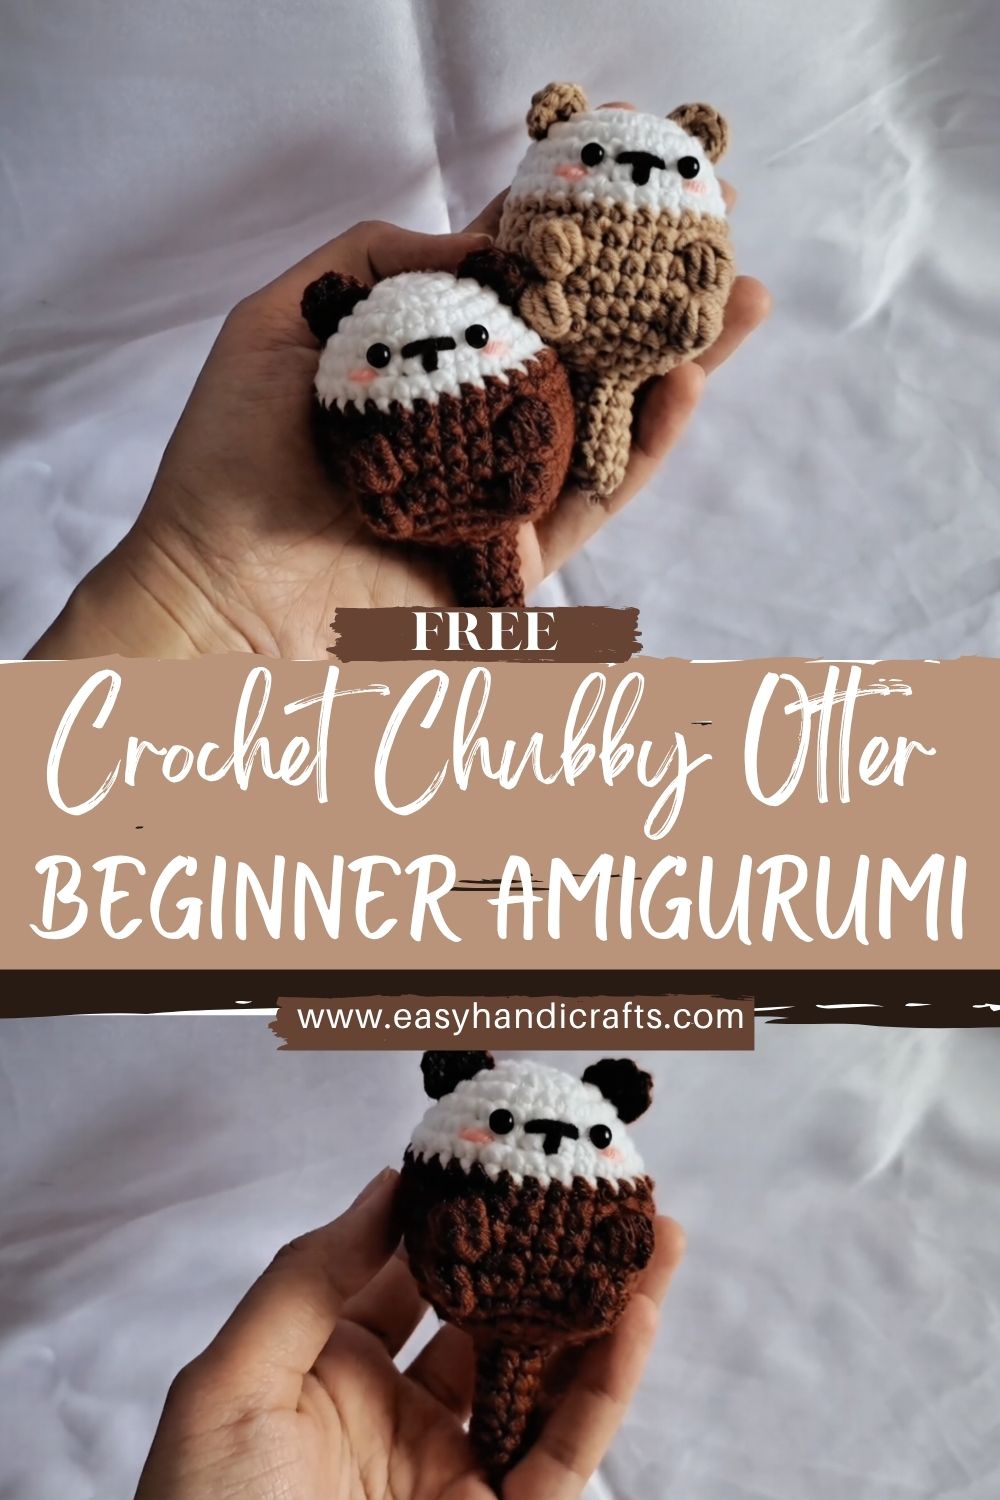
This pattern is inspired by a beginner-friendly YouTube video tutorial that shows the whole process step-by-step using basic stitches, mainly single crochet, plus an optibobble-stitch for extra texture (totally optional).
Best of all, you can turn this amigurumi into:
- A keychain/bag charm
- A sweet, handmade gift
- A cute desk buddy
Materials Required
Here’s a complete list of supplies for this beginner crochet plush:
Yarn
- Brown yarn (main body)
- White yarn (face/belly patch)
- Black yarn (nose/mouth embroidery)
- Pink yarn (optional blush)
Tools
- Crochet hook: around 3.0 mm
- Safety eyes: 5 mm–6 mm (or embroider eyes for baby-safe option)
- Fiberfill stuffing
- Stitch marker
- Yarn needle
- Scissors
Optional: keychain hardware (jump ring + keychain clasp) if making a charm.
Crochet Basics (Beginner Guide)
You only need a few basics for most otter amigurumi patterns—one reason they’re so beginner-friendly:
- Magic Ring (MR): creates a tight centre to start your rounds
- Single Crochet (SC): the main stitch used to make dense fabric
- Increase (INC): 2 SC in the same stitch (adds stitches, makes your circle grow)
- Decrease (DEC): combines 2 stitches into 1 (shapes pieces smaller)
Tip: Use an invisible decrease for cleaner results. - Working in rounds: you keep crocheting in a spiral without joining each round
If you can do SC, INC, and DEC, you can make this chubby otter.
Step-by-Step Crochet Pattern (Very Detailed)
Pattern Notes (Read First)
- Terms are in US crochet terms
- Work in continuous rounds unless stated
- Use a stitch marker to track the first stitch of each round
- Numbers in parentheses are stitch counts
- This creates a small plush (great for desk decor or a keychain)
Step 1: Head & Body (One Piece)
Goal: Make a round, chubby head-body shape (classic beginner amigurumi build).
Use brown yarn.
Round 1: MR, 6 SC into ring (6)
Round 2: INC in each stitch around (12)
Round 3: (SC, INC) repeat around (18)
Round 4: (2 SC, INC) repeat around (24)
Round 5: (3 SC, INC) repeat around (30)
Round 6: (4 SC, INC) repeat around (36)
Now you have a wide circle that will form the chubby body.
Rounds 7–12: SC in each stitch around (36 each round)
Optional texture (bobble belly idea):
On Round 9 or 10, you can replace a small section of front stitches with bobble stitches to create a fluffy belly texture. If you’re brand new, skip this—your otter will still be adorable.
Round 13: (4 SC, DEC) repeat around (30)
Round 14: (3 SC, DEC) repeat around (24)
Round 15: (2 SC, DEC) repeat around (18)
Add Safety Eyes (before it gets too close)
Place eyes between Rounds 9–10, about 6–7 stitches apart (adjust to your preferred expression).
Stuffing
Start stuffing firmly now. The “chubby” look comes from good shaping, not overstuffing.
- Add stuffing in small pieces
- Push stuffing into the sides to keep a round shape
Round 16: (SC, DEC) repeat around (12)
Add a bit more stuffing and shape.
Round 17: DEC around (6)
Fasten off. Close the hole by weaving the yarn tail through the front loops of the remaining stitches, then pull tight. Weave in the end.
Step 2: Tail
Goal: A flat-ish, rounded tail that attaches to the back.
Use brown yarn.
Round 1: MR, 6 SC (6)
Round 2: (SC, INC) repeat around (9)
Round 3: (2 SC, INC) repeat around (12)
Rounds 4–5: SC around (12 each round)
Lightly stuff the tail (just a pinch), or leave it unstuffed for a flatter, cuter tail.
Fasten off, leave a long tail for sewing.
Attach the tail to the lower back of the body.
Step 3: Ears (Make 2)
Goal: Two tiny, rounded ears.
Use brown yarn.
Round 1: MR, 6 SC (6)
Round 2: INC around (12)
Round 3: SC around (12)
Fasten off, leave a tail.
Lightly flatten each ear and sew to the top sides of the head, a little behind the eyes.
Step 4: Arms & Legs (Chubby Proportions)
Goal: Small limbs so the body looks extra round.
Arms (Make 2)
Use brown yarn.
Round 1: MR, 6 SC (6)
Rounds 2–4: SC around (6 each round)
Lightly stuff (or leave unstuffed for a softer look).
Fasten off, leave a tail.
Attach arms to the sides, slightly toward the front.
Legs (Make 2)
Use brown yarn.
Round 1: MR, 6 SC (6)
Round 2: (SC, INC) repeat around (9)
Rounds 3–4: SC around (9 each round)
Lightly stuff. Flatten the top opening and sew to the bottom-front area so the otter can “sit.”
Proportion tip: Smaller legs + a wider body = the cutest chubby effect.
Step 5: Face Details
Eyes
- Insert 5–6 mm safety eyes between Rounds 9–10 (as noted earlier)
- Secure the backs carefully
Nose + Mouth (Embroidery)
Use black yarn (or embroidery floss).
- Make a small horizontal stitch (or tiny triangle) for the nose
- Stitch a short line down from the nose
- Add a small curved smile (simple “u” shape)
Optional Blush
Use pink yarn to add two tiny blush marks under the eyes:
- Make a few small straight stitches
- Or lightly brush on blush/pastel chalk (if for decor only)
Step 6: Belly Patch
Goal: Add the signature otter belly.
Use white yarn.
Option A (Crocheted Oval Belly Patch)
Chain 6.
Work around the chain:
- SC in 2nd chain from hook, SC in next 3 chains
- 3 SC in the last chain
- Turn to the other side of the chain: SC in the next 3 chains
- 2 SC in the last chain (the first chain end)
Fasten off, leave a tail. Sew the oval to the front of the body.
Option B (Beginner-Easy)
Cut a simple oval shape with stitching (embroider outline + fill) using white yarn. This is faster and still looks clean.
Step 7: Final Assembly
Attach all parts securely:
- Sew ears on top
- Sew arms on sides
- Sew legs to the bottom/front
- Sew the tail to the back
- Sew the belly patch centred on the front
Final shaping checklist
- Are both eyes even?
- Is the belly centred?
- Are the arms symmetrical?
- Does it sit nicely?
Weave in all ends and give your otter a gentle squeeze to shape it extra round.
Design Tips & Customization
Make your chubby otter unique:
- Use different shades: light brown, dark brown, or even grey
- Make it a keychain: add a small loop on top (chain 10–15, slip stitch to secure, attach hardware)
- Add accessories:
- tiny fish (mini amigurumi)
- a scarf
- a little heart
- Experiment with yarn types:
- smooth cotton for crisp stitches
- plush/velvet yarn for extra cuddliness (harder for beginners but super cute)
Uses of Crochet Otter
This beginner-friendly amigurumi otter works great as:
- A gift for kids, friends, or animal lovers
- Cute desk decor (study buddy, work buddy)
- A keychain or bag charm
- A potential handmade product to sell (if you write your own listing photos/descriptions and follow pattern rules)
Pro Tips for Beginners
- Use a stitch marker every round (this prevents the #1 beginner mistake: losing your place)
- Keep stitches tight and even so stuffing doesn’t show through
- Don’t overstuff it, as it can stretch stitches and make bumps
- Count your stitches at the end of each round
- If you get confused, watch the YouTube tutorial slowly and pause after each round
- Try using an invisible decrease for a smoother finish
Conclusion
This Chubby Otter Crochet Tutorial (Beginner-Friendly Amigurumi Project) is a fun, easy way to practice the core amigurumi skills: magic ring, single crochet, increasing, decreasing, and simple assembly. The result is a small, cuddly otter plushie with a trendy, chubby shape that you can customise as a keychain, a gift, or a cute room decoration. Try it once in classic brown, then make a whole otter family in different colours and expressions!