Soft Crochet Bunny Plushies You’ll Instantly Love
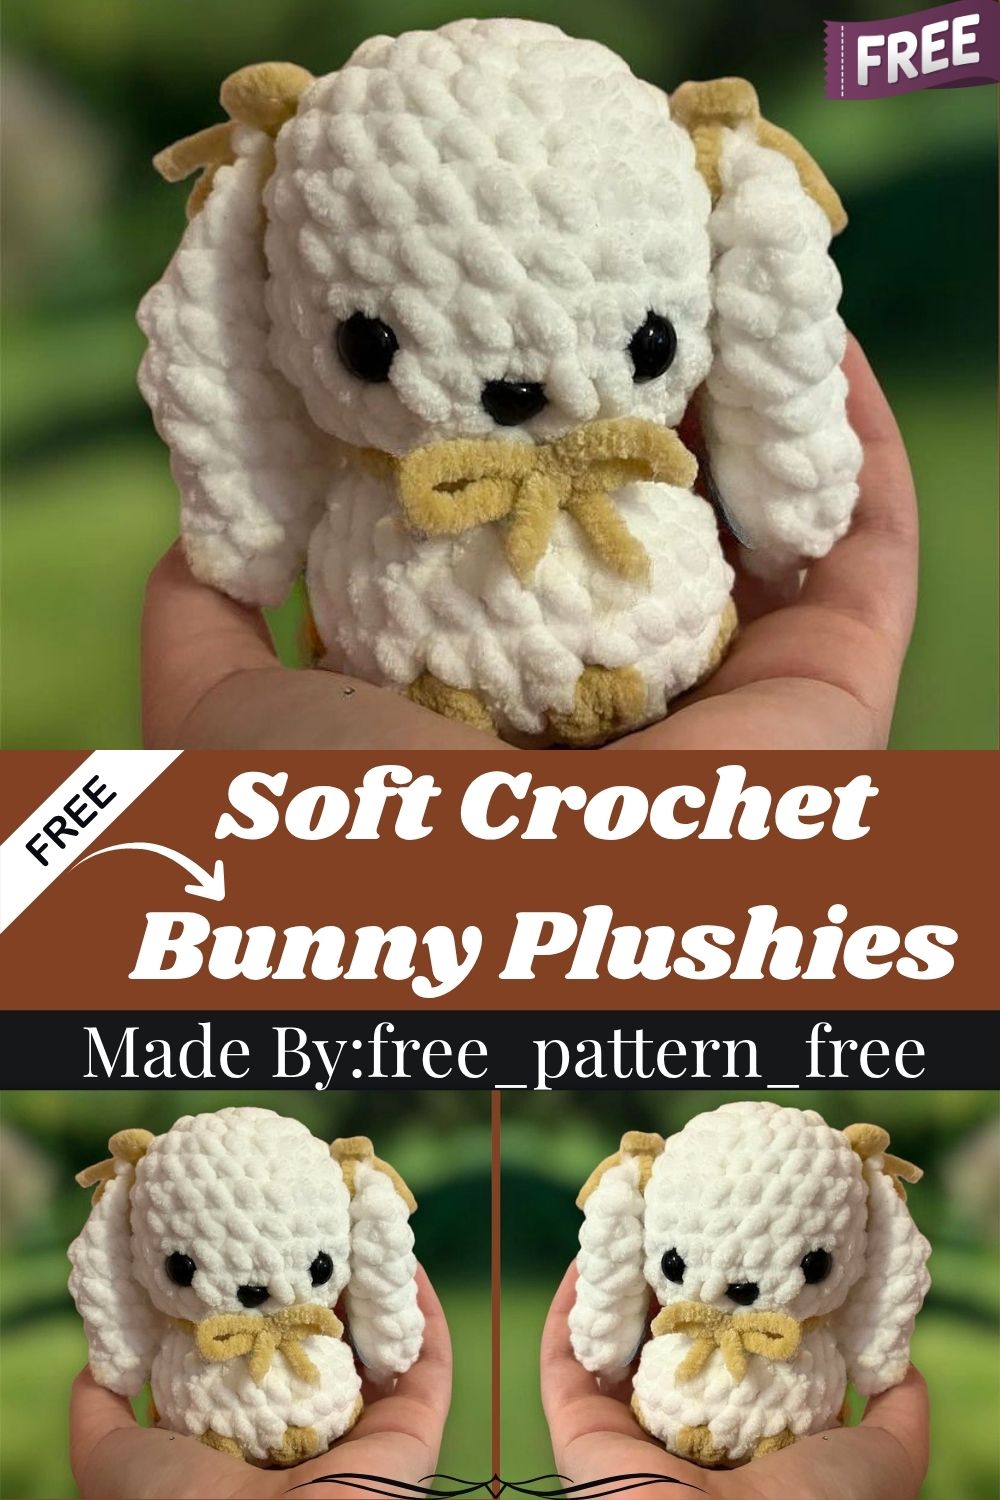
Chunky yarn turns this bunny plushie into an instant favorite, soft, round, and impossible to put down. Trust me, thick yarn works up fast, so a finished plush appears within a single sitting. Grab a 4mm hook and let’s build something genuinely huggable.
Bunny plushies made from chunky yarn feel different from thinner amigurumi projects: plumper, quicker, and far more forgiving for shaky beginner stitches. Honestly, the bobble stitch detail on the body gives this pattern a textured, professional finish without extra difficulty. Safety eyes and a safety nose add expression instantly, while back-loop and front-loop techniques shape the body’s transition smoothly. Every round builds toward a plush that feels premium despite a beginner-friendly stitch count.
Skill Level
This pattern fits beginners who already know single crochet, increases, and decreases. Ngl, bobble stitches and loop-only rounds add a small challenge, though both stay simple once practiced once or twice.
Pattern Overview
- Single-piece head and body worked in one continuous shape
- Chunky yarn creates a plump, soft finish without heavy stuffing
- Textured bobble stitch detail across the body for visual interest
- Small rounded ears left unstuffed for a floppy, realistic look
- Simple chain-and-slip-stitch tail attached directly between the legs
- Safety eyes and a safety nose bring the face together quickly
Abbreviations
- MR – magic ring
- sc – single crochet
- inc – increase
- bbl – bobble stitch
- dec – decrease (invisible decrease)
- BLO – back loop only
- FLO – front loop only
- Around – work into all stitches
Materials Needed
- Crochet hook, 4mm
- Chunky yarn in a color of choice
- Stitch marker
- Scissors
- Large-eye needle for chunky yarn
- Safety eyes, 10mm
- Safety nose, 8mm
Special Techniques
- Bobble stitch texture: raised bobble stitches across round 16 give the body a puffed, decorative pattern without extra rounds.
- Front loop only increase: switching to FLO on round 12 creates a visible seam line, separating the head shape from the lower body.
- Slip-stitch tail attachment: the tail connects directly through the body using a slipknot and chain, skipping a separate sewing step entirely.
- Placement-based eye spacing: eyes and nose position relative to leg placement, keeping proportions balanced no matter the final size.
Full Pattern Instructions
Head and Body
- 6sc in MR (6)
- inc all stitches (12)
- (1sc, inc) x6 (18)
- (2sc, inc) x6 (24)
- sc around (24)
- sc around (24)
- sc around (24)
- (3sc, inc) x6 (30)
- sc around (30)
- (1sc, dec) x10 (20)
- dec around (10)
- FLO: inc all stitches (20)
- (3sc, inc) x5 (25)
- sc around (25)
- sc around (25)
- 6sc, bbl, 4sc, bbl, 1sc, bbl, 4sc, bbl, 6sc (25)
Insert safety eyes between rounds 9–10, positioned according to leg placement. Insert the safety nose one round below, centered between the eyes. Adjust the eye height slightly higher or lower depending on personal preference. Stuff the piece firmly at this stage.
- dec 12 stitches, 1sc at the end (13)
- dec 6 stitches, 1sc at the end (7)
- Sew closed and secure the hole
Ears (make 2)
- 4sc in MR (4)
- (sc, inc) x2 (6)
- (2sc, inc) x2 (8)
- (3sc, inc) x2 (10)
- (4sc, inc) x2 (12)
- sc around (12)
- sc around (12)
- (4sc, dec) x2 (10)
- (3sc, dec) x2 (8)
- (2sc, dec) x2 (6)
Do not stuff the ears. Sew them onto the head at round 5 for correct positioning.
Tail
Make a slipknot on the hook and insert it between the two bottom legs with a slip stitch. Chain 6, then single crochet 5 stitches starting from the second chain from the hook. Slip stitch back into the body to secure.
Assembly
- Sew both ears onto round 5 of the head
- Attach the tail between the bottom legs using the chain-and-slip-stitch method
- Insert safety eyes between rounds 9–10, spaced according to leg alignment
- Insert the safety nose one round below the eyes, centered
- Add bows, ribbons, or any small accessories for a finished look
- Stuff firmly before closing the final rounds
Common Mistakes
- Forgetting to switch to FLO on round 12, which skips the visible seam detail
- Placing the safety nose too high, crowding it against the eyes
- Understuffing the body before closing round 18, leaving a soft dent
- Skipping stitch markers, causing confusion between head and body sections
- Attaching ears without checking symmetry, leading to a lopsided face
Uses & Benefits
Chunky yarn bunnies suit more than nursery shelves, working well across several practical settings. Real talk, thicker yarn finishes projects faster, making this pattern ideal for last-minute gifts. Parents like the soft, oversized feel compared to thinner amigurumi toys, especially with safety eyes properly secured. Sellers on handmade marketplaces find chunky bunnies photograph beautifully and stand out in busy shops. The finished plush also works as a cozy prop for spring photoshoots, Easter displays, or seasonal home decor.
Helpful Beginner Tips
- Count stitches carefully after every FLO or BLO round to avoid drifting numbers
- Practice the bobble stitch on a scrap piece before working round 16
- Use a stitch marker on round one to track where new rounds begin
- Keep stuffing dense before closing rounds 17 through 19 for a firm shape
- Test eye and nose placement with pins before securing them permanently
Where Can You Use This Pattern?
- Easter baskets or spring-themed gift sets for children
- Nursery decor paired with matching chunky yarn accessories
- Handmade shop listings, since chunky yarn photographs with strong texture
- Birthday or baby shower presents needing a quick turnaround
- Seasonal home displays during spring and early summer months
Why Beginners Will Enjoy This Pattern
Low-key, chunky yarn forgives small tension mistakes better than thinner weights, making this bunny approachable for first-timers. Each round moves quickly, so progress feels visible within minutes rather than hours. The bobble stitch section introduces a new skill without overwhelming complexity, keeping motivation high throughout the project. A shorter overall stitch count also means less room for major errors to accumulate.
Tips and Tricks for Success
- Switch loop techniques carefully, since FLO rounds change the piece’s silhouette
- Use a slightly firmer hook grip when working bobble stitches for consistency
- Weigh the two ears together to confirm they match before sewing
- Keep extra chunky yarn scraps handy for quick tail or bow repairs
- Photograph each stage to compare shaping against the intended pattern look
Why This Crochet Pattern Is Trending
Chunky yarn amigurumi keeps gaining traction because it delivers a plush, oversized look without the long crochet time thinner yarns demand. For real, crafters appreciate finishing an entire bunny in one sitting instead of spreading it across several days.
- Chunky yarn textures photograph exceptionally well for social media and shop listings
- Quick project timelines suit crafters balancing multiple orders or projects at once
- Bobble stitch detailing adds a trendy, textured look without added pattern complexity
Conclusion
Making this chunky yarn bunny plushie delivers a soft, textured keepsake with minimal time investment. No joke, the combination of quick rounds and simple bobble detailing makes it a satisfying beginner project. Whether gifted, sold, or displayed at home, this bunny brings genuine handmade charm to any space.