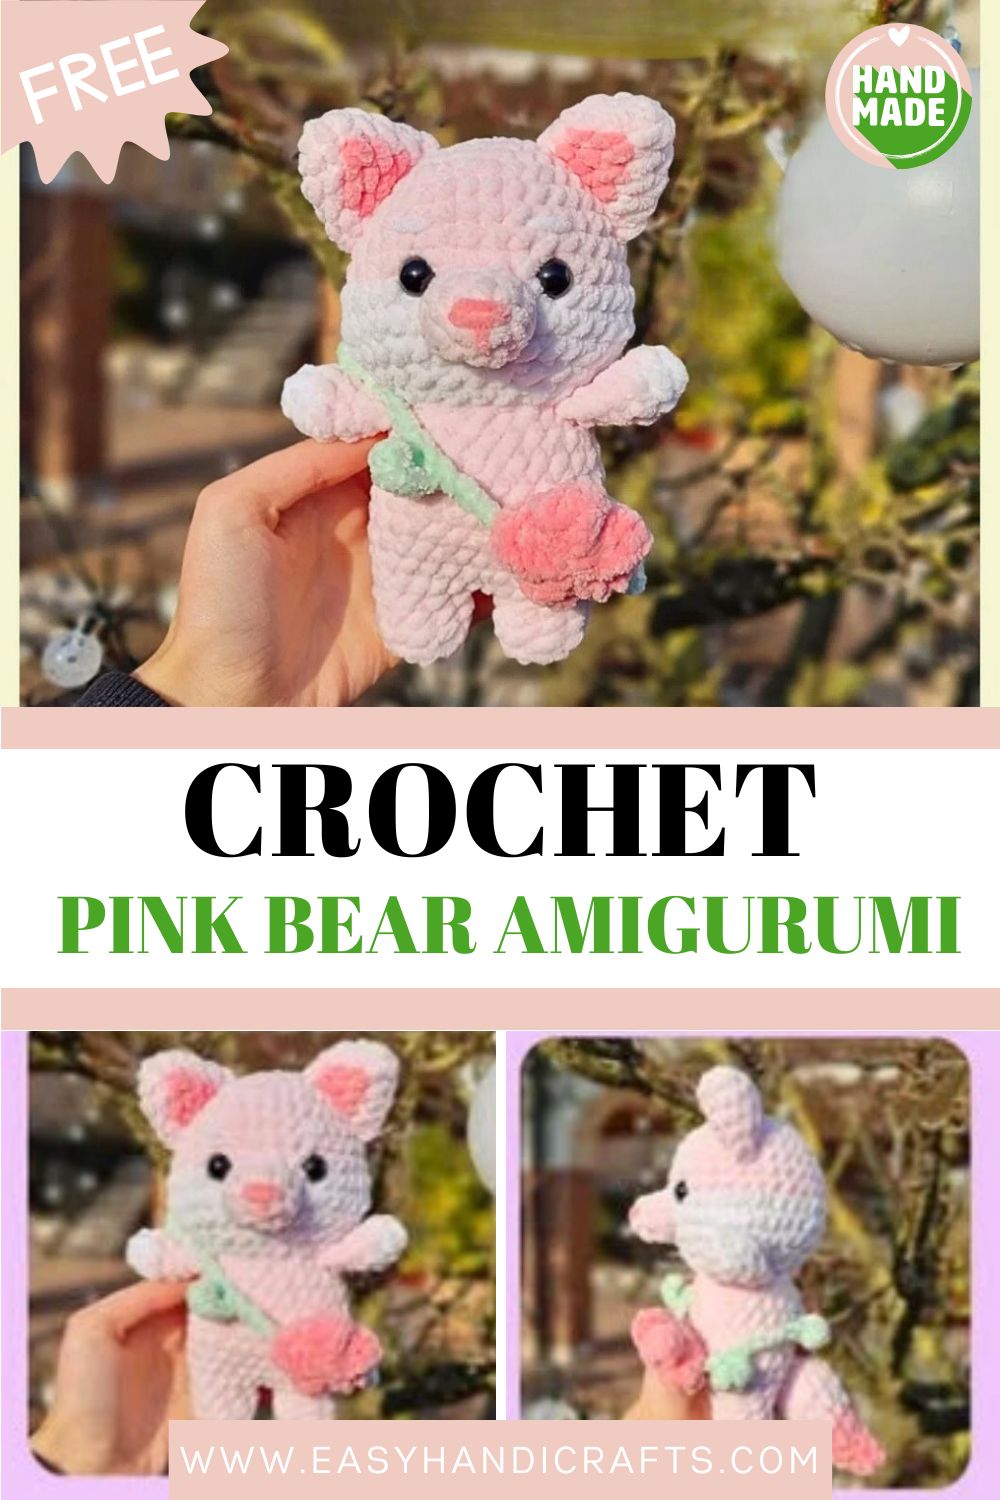
Free Crochet Pink Bear Amigurumi Toy Pattern for Beginners
Create the sweetest little Free Crochet Pink Bear you will ever stitch. Soft chenille, a chubby, rounded face, tiny peach ears, and a cute flower bag make this beginner amigurumi an instant favorite for gifting or keeping.
If you have been searching for a beginner-friendly Free Crochet Pink Bear amigurumi that still looks polished when finished, this pink bear is it. Worked in soft chenille yarn, it comes together piece by piece without any scary techniques. The flower bag and tiny leaf detail give it a charming, handmade finish that feels far more advanced than it really is.
Pattern Overview
Here is a quick look at what you will be making before you grab your hook:
- Head: A rounded pink head with a white color-change band and stuffed cheeks for that soft, chubby look.
- Body: Works with attached legs, allowing your bear to stand up nicely and stay sturdy once stuffed.
- Arms (x2): Small two-tone arms in white and pink, folded and closed flat, no stuffing needed.
- Ears (x2): Pretty pink ears with a peach center detail worked in through color changes.
- Snout, Tail, Leaves, and Flower Bag: The little extras that turn a plain bear into something special and full of personality.
Materials
- Hook: 5mm (for the body) and 3.5mm (for the leaves)
- Pink chenille, size 4 medium
- Peach chenille, size 4 medium
- White chenille, size 4 medium
- Green velvet, size 3 light
- 12mm safety eyes
- Stuffing
- Tapestry needle
- Stitch markers
- Scissors
Abbreviations
- R: round
- st: stitch
- mr: magic ring
- ch: chain
- sc: single crochet
- hdc: half double crochet
- dc: double crochet
- sl st: slip stitch
- inc: increase
- dec: decrease
- FO: fasten off
Special Techniques
A couple of techniques in this Free Crochet Pink Bear pattern are worth practicing before you dive in. The first is color changing mid-round, which appears in the head, ears, and tail. The trick is to complete the last stitch of the old color by pulling the new color through the final loop, so the switch stays clean and invisible from the outside. The second is the invisible join used to finish the head and body, which gives you a smooth, seamless edge instead of a lumpy bump. You will also work the legs separately and then join them with two chains in between, a small move that builds a stable standing base. None of these are difficult, they just reward a slow, steady pace.
Pattern
Head
Use pink yarn R1: 8sc in a mr (8) R2: 8inc (16) R3: (sc, inc)x8 (24) R4: (3sc, inc)x6 (30) R5: (2sc, inc, 2sc)x6 (36) R6-9: 36sc (36) – 4 rounds R10: change color to white and make 9sc, 3inc, 12sc, 3inc, 9sc (42) R11: (5sc, dec)x6 (36) R12: (4sc, dec)x6 (30) R13: (3sc, dec)x6 (24) R14: (4sc, dec)x4 (20) Cut yarn, FO with invisible join. Insert safety eyes on R9-10, 4 visible sts apart. Add fiber fill, stuff a lot to get a rounded face and pay attention to filling the cheeks.
Body
Use pink yarn R1: 5sc in a mr (5) R2: 5inc (10) R3: BLO 10sc (10) R4: 10sc (10) Cut yarn and FO with an invisible join. Make another leg but this time don’t cut yarn and ch2. R5: Insert the hook in any of the first leg sts and make 10sc, 2sc in the 2ch, 10sc, 2sc in the 2ch (24) R6: 2sc, inc, (5sc, inc)x3, 3sc (28) R7-12: 28sc (28) – 6 rounds R13: (5sc, dec)x4 (24) Start stuffing as you go, when you stuff the feet remember to keep them flat. R14: (4sc, dec)x4 (20) Finish stuffing. Cut yarn leaving a long tail for sewing.
Arms (x2)
Start with white yarn R1: 4sc in a mr (4) R2: 4inc (8) Change color to pink yarn R3-5: 8sc (8) – 3 rounds R6: fold the arm and close it making 3sc (3), don’t stuff the arm Cut yarn leaving a long tail.
Ears (x2)
Start pink yarn R1: 5sc in a mr (5) R2: sc, 4inc (9) R3: sc, change color to peach, inc, change color to pink, sc, inc, 4sc, inc (12) R4: sc, change color to peach, 3sc, change color to pink, sc (12) R5: sc, change color to peach, sc, inc, sc, change color to pink, sc, inc, 5sc, inc (15) Cut yarn leaving a long tail for sewing.
Snout
Use pink yarn R1: 5sc in a mr (5) R2: 5inc (10) R3: sc, inc, 8sc (11) Cut yarn leaving a long tail for sewing.
Tail
Start with peach yarn R1: 7sc in a mr (7) R2: 7sc (7) R3: dec, sc, 3inc, sc (9) R4: 9sc (9) R5: dec, sc, 5inc, sc (13) Change color to pink R6: 13sc (13) R7: dec, 2sc, 5inc, 2sc, dec (16) R8: 16sc (16) R9: (2sc, dec)x4 (12) R10: (sc, dec)x4 (8) FO and leave a long tail for sewing, add stuffing.
Leaves
Use a 3.5mm hook and green yarn. Slip knot, ch4, starting from the 2nd ch from the hook make sc, hdc, dc, hdc, sc. (ch12, starting from the 2nd ch from the hook make sc, hdc, dc, hdc, sc) x3
Flower bag
Use peach yarn, make 2. R1: 6sc in a mr (6) R2: (sl st, ch2, dc, hdc) in the same st x5 (5 petals) FO and leave one of the flowers with a long tail for sewing.
Skill Level
This pattern is rated beginner-friendly. If you can work a magic ring, single crochet, increase, and decrease, you already have every skill needed to finish this little pink bear with confidence.
Common Mistakes and How to Avoid Them
A few small slip-ups can throw off the whole look, so keep these in mind as you stitch:
- Losing your stitch count: Drop a stitch marker at the start of every round and count again at the end. Guessing your way through chenille is how counts go wrong fast.
- Understuffing the head: Pack the stuffing in firmly, especially around the cheeks. A lightly stuffed head flattens out and loses that round, chubby charm.
- Messy color changes: Always complete the last loop of the old color with the new one. Skipping this leaves a visible blip on the front of your work.
- Uneven leg join: When you connect the two legs with the chain, make sure both legs face the same direction so the body sits straight and stands well.
- Sewing in a rush: Pin every piece first and step back to check symmetry before you commit. Crooked ears or a tilted snout show instantly on a small project.
Assembly
Once all your pieces are crocheted and stuffed, it is time to bring your bear to life. Take your time here, since neat sewing is what makes the finish look professional:
- Sew the head to the body.
- Sew the ears between R3-7 on the head.
- Sew the arms between R13-14 on the body.
- Sew the snout between R9-11 on the head.
- Sew the tail on R7-8 of the body.
- Sew the two flowers together, add a little stuffing inside, then complete the bag by attaching the leaf string.
- Embroider the details: the nose and eyebrows go on R7-8, about 2 stitches wide, just above the eyes.
Important Remarks
Before you start, here are a few notes that will save you trouble and keep things respectful:
- This pattern is written in US terminology and worked in continuous rounds, so keep that marker moving.
- Chenille yarn can split easily, so work slowly and use a blunt tapestry needle for sewing.
- This pattern is for personal use only. Please do not copy, redistribute, sell, or claim this pattern as your own.
- You are welcome to sell the finished physical items you make from it.
Conclusion
And there you have your finished pink bear, complete with a tiny flower bag and a sweet little face full of character. This is one of those Free Crochet Pink Bear patterns that feels rewarding from the very first round to the final stitch. Whether you keep it on your shelf or gift it to someone special, this soft chenille bear is sure to bring a smile.