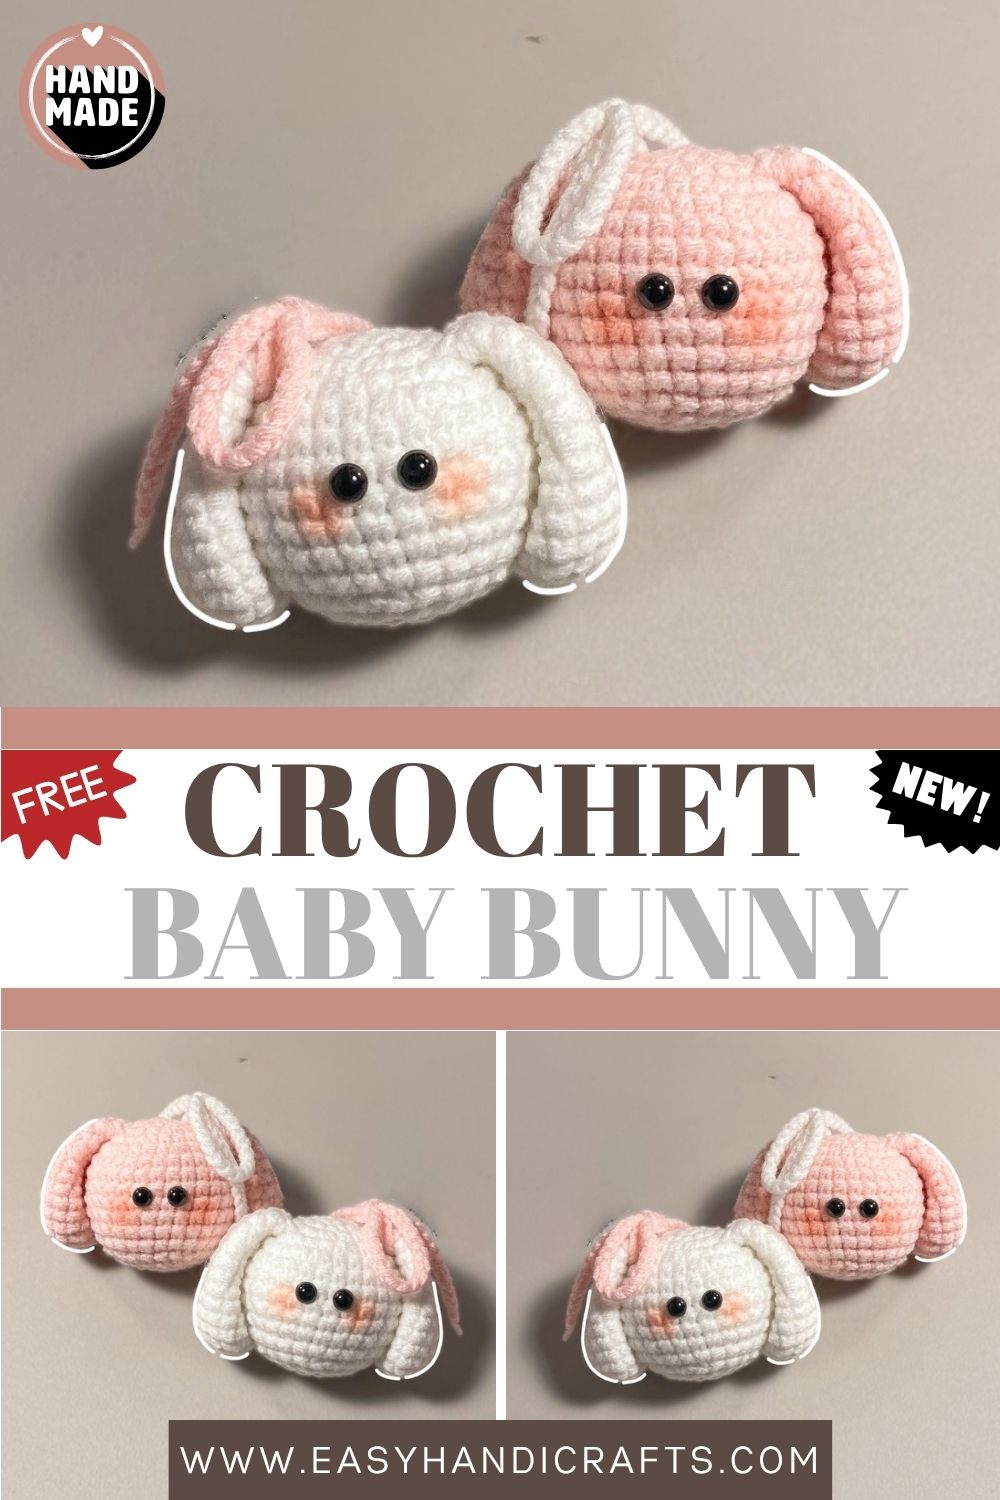
Cute Crochet Baby Bunny Amigurumi | Kawaii Handmade Plushie Gift
This crochet baby bunny is soft, sweet, and absolutely adorable. It is the perfect kawaii plushie for gifting or keeping!
If you are searching for a crochet project that is both heartwarming and rewarding, then this baby bunny amigurumi is exactly what you need. This little bunny is designed to be irresistibly cute with soft, floppy ears, rosy cheeks, and a tiny bow tied around one ear. Furthermore, the simple construction makes it accessible for beginners while still being enjoyable for experienced crafters. Whether you want to make it as a gift for a newborn, a child, or simply a fellow crochet lover, this bunny will melt hearts instantly. In addition, it works up quickly with basic stitches. Overall, this is one kawaii project you will absolutely love making.
Tools and Materials
- Milk cotton yarn in any color (4-ply)
- 2mm crochet hook
- 6mm safety eyes
- Yarn needle
- Scissors
- Fiberfill for stuffing
- Blusher for cheeks
Abbreviations
- R – Round
- ST – Stitch
- CH – Chain
- SC – Single crochet
- INC – Increase
- DEC – Invisible decrease
- SLST – Slip stitch
Skill Level
This pattern is perfect for beginners with basic crochet knowledge. If you can work in the round and use increases and decreases, you are completely ready. Additionally, the assembly is simple.
Head Pattern
R1: 6 sc in MR (6) R2: 6 inc (12) R3: (1 inc, 1 sc) x6 (18) R4: (2 sc, 1 inc) x6 (24) R5: (1 sc, 1 inc, 2 sc) x6 (30) R6–R12: sc all around (30) R13: (3 sc, 1 dec) x6 (24)
Place safety eyes between R8 and R9, then begin stuffing.
R14: (2 sc, 1 dec) x6 (18) R15: (1 sc, 1 dec) x6 (12) R16: 6 dec (6)
Fasten off, add more stuffing, and close the hole neatly.
Ears Pattern (Make Two)
R1: 6 sc in MR (6) R2: 6 inc (12) R3: (1 inc, 1 sc) x6 (18) R4–R6: sc all around (18) R7: (4 sc, 1 dec) x3 (15) R8–R9: sc all around (15) R10: (3 sc, 1 dec) x3 (12) R11–R12: sc all around (12) R13: (1 sc, 1 dec) x4 (8) R14: sc all around (8)
Fasten off and leave a long tail for sewing.
Assembly
First, sew the ears onto the top of the head between R3 and R4. Then, if you want the ears to stay firmly in place, sew the bottom part of each ear down to the head as well. Next, make the bow by chaining 90. Then tie it around the left ear in a neat bow. Finally, apply a small amount of blusher to each cheek. This adds the sweetest rosy finishing touch. Your amigurumi bunny is now complete and ready to bring extra cuteness into someone’s day!
Customization and Variations
There are so many fun ways to personalize this little bunny. Here are some creative ideas:
- Color options: Use pastel pink, lavender, or mint yarn for a dreamy kawaii look. Furthermore, white yarn gives a classic and clean finish.
- Bigger bunny: Use thicker yarn and a larger hook. As a result, you get a bigger plushie perfect for babies and toddlers.
- Different bow: Replace the yarn bow with a small ribbon or fabric bow. Additionally, you can add a tiny button or bead to the center.
- Add a body: Extend the pattern by adding a simple body, arms, and legs. This turns your bunny head into a full amigurumi character.
- No blush: Skip the blusher for a more neutral and minimalist look. Moreover, you can use pink yarn instead to embroider rosy cheeks permanently.
- Matching set: Make a mama bunny and a baby bunny in different sizes. Then gift them together as a sweet, matching pair.
Common Mistakes to Avoid
This is a beginner-friendly pattern. However, a few mistakes can affect the final result:
- Loose magic ring: Always pull the ring tail firmly after R1. Otherwise, you will have an unwanted gap at the top of the head.
- Wrong eye placement: Always insert safety eyes before closing the head. After stuffing and closing, it becomes impossible to add them correctly.
- Uneven stuffing: Add stuffing gradually as you decrease. This way, the head stays perfectly round and smooth throughout.
- Ear positioning: Pin the ears in place before sewing. Then step back and check symmetry from the front before stitching permanently.
- Loose yarn tails: Always weave tails through multiple stitches in different directions. Otherwise, they will unravel with handling over time.
- Stitch count errors: Count stitches after every round. Even one missed stitch will make the shape uneven and lopsided.
Finishing Tips
- First, weave in all yarn tails securely with your yarn needle. This keeps the bunny neat and long-lasting.
- Next, block the head and ears lightly with a damp cloth. As a result, the stitches even out and the shape looks more polished.
- Also, check that the eyes are firmly locked in place before gifting. Loose safety eyes can be a hazard for young children.
- Additionally, apply blusher gently using a dry brush in small circular motions. This gives the most natural and adorable finish.
- When tying the bow, make sure both loops are equal in size. Furthermore, secure it with a few hidden stitches so it stays in place.
- Finally, give the finished bunny a gentle squeeze to check the stuffing. If it feels too soft, open a small gap and add more fiberfill before closing.
Gifting Ideas
This kawaii bunny makes a truly special handmade gift. Here are some wonderful ways to use it:
- Newborn gift: A soft, handmade bunny is a timeless and heartfelt present for a new baby. Moreover, it becomes a cherished keepsake.
- Easter basket: Tuck this bunny into an Easter basket instead of store-bought toys. It adds a personal and handcrafted touch.
- Birthday gift for kids: Children love soft plushies they can cuddle. Additionally, a handmade toy feels far more special than anything from a shop.
- Valentine’s Day gift: Make the bunny in red or pink yarn. Then pair it with chocolates for the sweetest Valentine’s surprise.
- Baby shower gift: This bunny works beautifully as a baby shower present. Furthermore, it can be made in gender-neutral colors like yellow or mint.
- Market stall item: These bunnies sell wonderfully at craft markets. Moreover, they are quick to make in batches for seasonal events.
Conclusion
This crochet baby bunny amigurumi is one of those projects that brings pure joy from the very first stitch. Furthermore, its simple construction, adorable design, and endless customization options make it a pattern worth returning to again and again. Whether you are making it for a newborn, a child, or a fellow crafter, this little bunny is guaranteed to be loved. Additionally, the quick assembly means you can finish it in a single sitting. So pick up your hook, choose your favorite color, and start crocheting today. After all, the world always needs a little more handmade cuteness. Happy crocheting!