Remarkable Crochet Sunny Chick Buddies Amigurumi Pattern
Spark instant joy with the Remarkable Crochet Sunny Chick Buddies Amigurumi Pattern. Bright, squishy, beginner-friendly chicks whip up fast and turn yarn scraps into adorable, gift-ready sunshine.
Crochet a little burst of sunshine with the Remarkable Crochet Sunny Chick Buddies Amigurumi Pattern. This easy, beginner-friendly pattern shows you how to make soft, palm-sized chicks in simple steps with minimal sewing. Work them up quickly, use small amounts of yarn, and customize colors, beaks, and cheeks to match any style.
Clear instructions and Helpful tips build confidence for new makers and keep things speedy for pros. Make one in an evening, or a whole flock for gifts and markets, these cheerful chicks always bring a smile.
Uses:
- Keychains or bag charms
- Quick gifts for birthdays, baby showers, or Easter
- Cute desk décor or market stall fillers

Focus keyphrase: Remarkable Crochet Sunny Chick Buddies Pattern
Meta description (≈156 characters):
Remarkable Crochet Sunny Chick Buddies Pattern—beginner-friendly amigurumi chicks with clear steps, exact materials, two sizes, cute variations, and pro tips.
HTML meta tag:
<meta name=”description” content=”Remarkable Crochet Sunny Chick Buddies Pattern—beginner-friendly amigurumi chicks with clear steps, exact materials, two sizes, cute variations, and pro tips.”>
Remarkable Crochet Sunny Chick Buddies Amigurumi Pattern
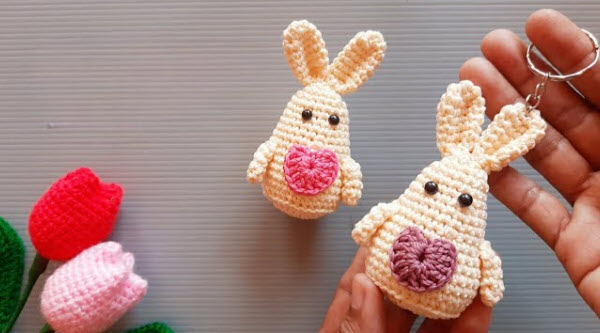
Image: Remarkable Crochet Sunny Chick Buddies Pattern, two bright yellow amigurumi chicks with tiny wings and orange beaks, sitting on a palm
Image: Sunny chick amigurumi in progress, body sphere rounds and stitch marker placement, crochet chick buddies tutorial
Image: Close-up of beak, safety eyes, and blush detail, remarkable sunny chick buddies amigurumi face embroidery
Image: Crochet chick wings and feet pieces before assembly, sunny chick buddies pattern components
Image: Chick with bow and chick in cracked eggshell, cute variations for remarkable crochet sunny chick buddies
Warm, engaging introduction
To begin, bring sunshine to your day with these Remarkable Crochet Sunny Chick Buddies. Because they are quick, soft, and irresistibly cute, they make perfect gifts, keychain pals, or desk companions. Moreover, the pattern is written with absolute beginners in mind, so you’ll build confidence while making a cheerful pair (or a whole brood). Additionally, you’ll crochet a tidy sphere body, add tiny wings, stitch a sweet beak, and finish with optional feet, a tuft, and charming blush. As a result, you’ll have a delightful chick that works up fast and uses only a handful of yarn scraps. Therefore, gather your tools, cue some happy music, and let’s hatch some sunshine.
Quick facts
- Overall making time: 75–120 minutes per chick; consequently, the first one may take longer, while repeats finish faster.
- Skill level: Beginner to Confident Beginner; moreover, the shaping stays simple throughout.
- Techniques: Magic ring, working in the round, increases and invisible decreases, optional color changes, and simple embroidery.
- Crochet terms: US terms throughout; therefore, follow the abbreviations below.
- Gauge: Not critical; however, aim for a firm fabric with no holes. If stuffing peeks through, then go down a hook size.
Abbreviations (US)
- MR: magic ring
- ch: chain
- sl st: slip stitch
- sc: single crochet
- inc: increase (2 sc in the same stitch)
- dec: invisible decrease (insert hook in front loops of next 2 sts, yarn over, pull through both, yarn over, pull through 2)
- st(s): stitch(es)
- BLO/FLO: back/front loop only (only when noted)
Tip: Place a stitch marker in the first stitch of each round; additionally, count stitches at the end of each round to prevent creeping errors.
Materials (with exact measurements)
Firstly, choose one size or make both. Secondly, because yardage varies by yarn category, use the lists below to gather precisely what you need.
For Classic Buddy (approx. 3.25–3.75 in / 8–9.5 cm tall including tuft):
- Yarn (Worsted/Category 4, cotton or acrylic):
- Main yellow: 22–28 g (50–65 yd / 46–60 m)
- Orange (beak/feet): 3–4 g (7–10 yd / 6–9 m)
- Accent (bow/flower/eggshell, optional): 2–6 g (5–14 yd / 5–13 m)
- Hook: 3.25–3.5 mm; consequently, choose the smallest that gives you a firm fabric.
- Safety eyes: 6–8 mm (or embroider eyes for children under 3).
- Embroidery thread: Black (smile/closed eyes) and Pink (blush) — 12–18 in / 30–45 cm each.
- Fiberfill: 8–12 g; additionally, a generous handful keeps the body round.
- Tools: Tapestry needle, sewing needle, stitch marker, scissors, ruler.
- Optional: 1 in (25 mm) split ring and 12–15 mm lobster clasp for keychains; likewise, a small felt circle for eye backing and a dab of fabric glue.
For Mini Buddy (approx. 2.25–2.75 in / 5.5–7 cm tall):
- Yarn (DK/Category 3):
- Main yellow: 14–18 g (32–45 yd / 29–41 m)
- Orange (beak/feet): 2–3 g (5–7 yd / 5–6.5 m)
- Accent: 1–4 g (2–9 yd / 2–8 m)
- Hook: 2.75–3.0 mm; similarly, pick the size that prevents gaps.
- Safety eyes: 5–6 mm.
- Remaining tools: Match the Classic Buddy list for consistency.
Safety note
If gifting to children under 3, skip safety eyes and use embroidered eyes instead. Additionally, secure knots firmly and weave ends in multiple directions for durability.
Construction overview
- First, crochet a seamless sphere for the body and head in one piece.
- Next, make small flat wings, a teensy beak, and optional feet.
- Then, add a tuft/comb or bow for personality.
- Finally, assemble neatly, embroider details, and finish with gentle shaping; consequently, your chick looks crisp and professional.
Step-by-step: Body (all-in-one sphere)
Making time: 35–55 minutes (Classic Buddy) or 25–40 minutes (Mini Buddy). To start, use the main yellow and work in continuous rounds; therefore, do not join at the end of rounds.
Classic Buddy body (Worsted/Category 4, 3.25–3.5 mm hook):
- Round 1: MR, 6 sc in ring; then tighten. (6)
- Round 2: inc around. (12)
- Round 3: (sc, inc) around. (18)
- Round 4: (2 sc, inc) around. (24)
- Round 5: (3 sc, inc) around. (30)
- Round 6: (4 sc, inc) around. (36)
- Round 7: (5 sc, inc) around. (42)
Shaping note: At this point, you have the widest round. Because we want a cute, slightly oval chick, continue straight for a few rounds: - Rounds 8–11: sc around. (42) — 4 rounds even
Eye placement (do this now for the neatest finish):
- Insert safety eyes between Rounds 9 and 10, spaced 7–8 stitches apart; alternatively, mark with pins and embroider later if making for toddlers.
- Optional blush marks: Place small pink dots with pins to preview positioning; typically, they sit 1 stitch below and 1 stitch outside each eye.
Continue shaping downward:
- Round 12: (5 sc, dec) around. (36)
- Round 13: (4 sc, dec) around. (30)
- Round 14: (3 sc, dec) around. (24)
- Begin stuffing firmly, especially under the eyes; then continue.
- Round 15: (2 sc, dec) around. (18)
- Add more stuffing, shaping evenly with your fingers.
- Round 16: (sc, dec) around. (12)
- Round 17: Dec around. (6)
Finish: Cut yarn, leaving a 10–12 in (25–30 cm) tail. Next, thread the needle, weave through the front loops of the remaining 6 stitches, pull to close, and secure; finally, bury the tail inside the body.
Mini Buddy body (DK/Category 3, 2.75–3.0 mm hook):
- Round 1: MR, 6 sc. (6)
- Round 2: inc around. (12)
- Round 3: (sc, inc) around. (18)
- Round 4: (2 sc, inc) around. (24)
- Round 5: (3 sc, inc) around. (30)
- Rounds 6–8: sc around. (30) — 3 rounds even
Eye placement: Insert 5–6 mm eyes between Rounds 6 and 7, 6–7 stitches apart; meanwhile, keep spacing generous. - Round 9: (3 sc, dec) around. (24)
- Round 10: (2 sc, dec) around. (18)
- Stuff as you go; therefore, the sphere remains smooth.
- Round 11: (sc, dec) around. (12)
- Round 12: dec around. (6)
Finish: Close as for the Classic Buddy; consequently, both sizes match neatly.
Sizing tweak
If you prefer a taller chick, add one extra even round before decreasing; conversely, for a squishier chick, stop one even round earlier and stuff lightly.
Step-by-step: Tiny wings (make 2)
Making time: 6–10 minutes total. Because wings should be small and tidy, work them flat in joined rounds for a crisp shape.
Classic Buddy wings (Worsted, 3.25–3.5 mm):
- Round 1: MR, 6 sc, sl st to first sc to join. (6)
- Round 2: ch 1, (sc, inc) around, sl st to join. (9)
- Round 3: ch 1, (2 sc, inc) around, sl st to join. (12)
Finish: Fasten off, leaving a 6–8 in (15–20 cm) tail for sewing. Additionally, pinch the circle slightly to form an oval; then steam or finger-press.
Mini Buddy wings (DK, 2.75–3.0 mm):
- Round 1: MR, 6 sc, sl st. (6)
- Round 2: ch 1, (sc, inc) around, sl st. (9)
Finish: Leave a tail for sewing; furthermore, block lightly if needed.
Placement: Sew wings at Round 10 (Classic) or Round 7 (Mini), centered horizontally; additionally, angle them slightly upward for a perky look.
Step-by-step: Beak (choose one method)
Making time: 2–4 minutes. Moreover, pick the method that suits your timeline.
Crochet beak (sturdier):
- With orange and an appropriate hook, ch 2.
- Row 1: 2 sc in 2nd ch from hook. (2)
- Row 2: ch 1, turn, inc in first st, sc in next. (3)
Finish: Fasten off, leaving a 6–8 in (15–20 cm) tail. Then fold into a tiny triangle and sew centered between the eyes, slightly below the eye line.
Embroidered beak (quickest):
- With orange thread or yarn, satin-stitch a small horizontal triangle between Rounds 9–10 (Classic) or 6–7 (Mini). Additionally, use 3–4 passes for a plump look.
Step-by-step: Optional feet (make 2)
Making time: 8–12 minutes total. Because stability matters, sew feet after stuffing and closing the body.
Simple picot feet (very beginner-friendly):
- With orange, ch 5.
- Row 1: Starting in 2nd ch from hook, sc, ch 3, sl st in first of those 3 ch (picot made), sc in next ch, ch 3, sl st in first of those 3 ch, sc in next ch, ch 3, sl st in first of those 3 ch, sc in last ch.
Finish: Leave a tail for sewing; then repeat for the second foot.
Placement: Sew both feet under the front belly, spaced about 3 stitches apart. As a result, your chick sits upright more easily.
Step-by-step: Tuft/comb (choose one)
Making time: 3–6 minutes. Alternatively, pick the comb for a rooster buddy.
- Fluffy tuft: With yellow, join at the crown, ch 4, sl st back into the same st; repeat once more for two loops. Finally, fasten off and weave.
- Tiny comb (rooster): With red, ch 5, skip first ch, sl st, then (sc, hdc, sc) in each remaining ch; afterwards, sew to the crown.
Step-by-step: Blush and smile (optional)
Making time: 4–8 minutes. Additionally, subtle details amplify cuteness.
- Blush: With pink thread, make 2–3 tiny straight stitches under each eye; alternatively, dab fabric-safe blush lightly.
- Smile or closed eyes: With black thread, embroider a gentle curve 2 stitches wide; or, for sleeping eyes, add two short curved lines with a tiny lash.
Attaching a hanging loop (optional)
Making time: 4–6 minutes. Consequently, your buddy becomes a durable charm.
- Crochet loop: With yellow, ch 12–18, sl st to the crown to form a loop, fasten off, then weave ends.
- Hardware option: Stitch a narrow ribbon through a 1 in split ring; then sew securely into the crown.
Level of difficulty
- Body sphere: Beginner; moreover, increases and decreases repeat predictably.
- Wings and beak: Beginner; however, the pieces are tiny.
- Feet and tuft/comb: Beginner to Confident Beginner; nevertheless, still simple.
- Embroidery details: Beginner; therefore, practice on a swatch if you like.
Special features
- Stash-busting friendly: Uses under 30 g of main color; therefore, great for scraps.
- Fully customizable: Change tuft, eye style, and accessories for unique personalities.
- Two sizes are included: Mini and Classic; consequently, you can mix a whole flock.
- Beginner-safe shaping: Even rounds and invisible decreases yield a smooth sphere.
- Gift-ready: Attaches easily to a key ring or backpack loop; furthermore, finishes quickly.
Finishing tips
- Stuffing strategy: Add small pinches of fiberfill gradually; moreover, concentrate under the eye line to avoid dimples.
- Seam invisibility: Use the ladder stitch when sewing wings and beak; consequently, the seam disappears.
- Eye safety: Add small felt circles or washers inside before closing the body; additionally, tug-test gently.
- Shape setting: Steam lightly (without touching acrylic) and hand-shape as it cools; alternatively, mist with water and let dry overnight.
- Tail management: Always weave tails in multiple directions; then snip close so ends don’t pop out later.
Common mistakes and how to avoid them
- Gapping between stitches: If stuffing shows, you’re either using too large a hook or too loose a tension; therefore, go down 0.25–0.5 mm and relax your hands.
- Lumpy sphere: Inconsistent increases can cause ridges; consequently, count each round and mark every 6th increase cluster with a removable marker.
- Crooked face: Place eyes before final stuffing; furthermore, view from multiple angles and adjust pins until level.
- Wings too floppy: If your wings curl, block them briefly or add one tiny stitch through the wing tip to anchor.
- Feet tilting forward: Sew feet slightly under the belly rather than at the edge; as a result, your chick sits upright.
- Yarn splitting: Point your hook tip upward slightly when inserting; alternatively, switch to a hook with a deeper throat.
Sizing tips
- To scale up: Use a 4.0 mm hook with worsted yarn and add one more even round at 42 stitches; consequently, your chick becomes chubbier.
- To scale down: Use sport yarn with a 2.25–2.5 mm hook and stop increases at 30 stitches; likewise, reduce even rounds by one.
- Eye proportion: Larger eyes feel cuter; however, keep spacing generous. For a 42-st maximum, 6–8 mm eyes spaced 7–8 sts apart look balanced.
- Stuffing density: Firm stuffing keeps shape; alternatively, for a squish toy, under-stuff slightly and skip feet.
Variations (mix and match)
- Sleepy Chick: Embroider closed eyes with two curved lines; additionally, add a tiny moon-colored nightcap (ch 10, hdc rows decreasing gradually, pom at tip).
- Bow-Tie Buddy: With accent color, ch 7; Row 1: hdc in 2nd ch and across (6 hdc). Rows 2–3: repeat; then wrap the center tightly and sew under the beak.
- Flower Crown Chick: Make 3 mini flowers (each: MR, [ch 2, 2 dc, ch 2, sl st] x 3); afterwards, stitch across the crown.
- Spring Eggshell Chick: With white, create a cracked shell skirt—join at Round 11 (Classic), then [sl st, ch 3, sc in next st] repeat around to form points.
- Rooster Buddy: Swap the tuft for a red comb and add a tiny tail (join at back, ch 6, then [sc, hdc, dc, hdc, sc] along the chain).
- Pastel Parade: Use soft mint, peach, or lavender for bodies; then add high-contrast beaks for pop.
Tutor suggestions (for workshops and first-timers)
- Start smart: Pre-make magic rings for absolute beginners; alternatively, teach “ch 2, 6 sc in 2nd ch” as an accessible substitute.
- Visual checkpoints: After Round 4, confirm counts; after Round 7, preview eye placement. Consequently, corrections happen early.
- Batch pieces: Have students make both wings first, then the beak; meanwhile, stragglers finish their body rounds.
- Tension coaching: Encourage squeezing the body to test firmness; moreover, suggest changing hook sizes proactively.
- Confidence boosts: Let learners embroider eyes on a spare swatch before the real face; therefore, stress levels drop.
- Timeboxing: Allocate 25 minutes for the increase section, 10 minutes for even rounds, 20 minutes for decreases and stuffing, then 20–30 minutes for finishing.
Detailed timeline (per chick, with step times)
- Body increases (Rounds 1–7 Classic / 1–5 Mini): 12–18 minutes
- Even rounds and eye placement: 10–15 minutes
- Decreases and stuffing/closure: 12–20 minutes
- Wings (x2): 6–10 minutes
- Beak: 2–4 minutes
- Feet (optional): 8–12 minutes
- Tuft/comb: 3–6 minutes
- Embroidery (blush/smile): 4–8 minutes
- Hanging loop/hardware (optional): 4–6 minutes
Total: 75–120 minutes, depending on size and options; therefore, plan accordingly.
Troubleshooting quick guide
- Body puckers at top: You may be decreasing too tightly; therefore, pull loops up slightly before yarning over.
- Eye washers won’t seat: Warm the washer between fingers for a few seconds; then press against a hard surface, not the fabric.
- Wings not symmetrical: Count stitches carefully; alternatively, trace one wing as a template for the second.
- Beak skewed: Pin first; then take short, even stitches horizontally through the body’s surface, checking after each pass.
Wash and care
- Cotton: Hand wash in cool water, reshape, and air dry; alternatively, steam lightly if needed.
- Acrylic: Spot clean only; moreover, avoid high heat to prevent flattening.
- Hardware: Remove metal parts before washing; then dry thoroughly to avoid rust.
Estimated yardage recap (per Classic Buddy)
- Main yellow: 50–65 yd (46–60 m)
- Orange beak/feet: 7–10 yd (6–9 m)
- Accents (bow/flower/eggshell): 5–14 yd (5–13 m)
- Fiberfill: 8–12 g (varies by firmness)
Step-by-step summary (checklist)
- Body sphere to 42 sts, even rounds, then decreases; additionally, add eyes mid-way.
- Make 2 wings; then sew at the sides.
- Add a beak; optionally add feet and a tuft.
- Embroider blush and smile; then attach a loop if desired.
- Weave ends securely; finally, shape and enjoy.
Image alt suggestions (use the keyphrase or synonyms)
- Image 1 alt: Remarkable Crochet Sunny Chick Buddies Pattern easy beginner amigurumi chicks with cute beaks
- Image 2 alt: Step-by-step body rounds for sunny chick buddies crochet sphere increases and decreases
- Image 3 alt: Face details for remarkable crochet sunny chick buddies safety eyes, embroidered beak, blush
- Image 4 alt: Crochet wings and feet pieces, sunny chick buddies amigurumi components ready to sew
- Image 5 alt: Variations bow-tie chick and eggshell chick from the remarkable crochet sunny chick buddies pattern
SEO note
Focus keyphrase used: Remarkable Crochet Sunny Chick Buddies Pattern. Moreover, sprinkle synonyms naturally: sunny chick amigurumi, crochet chick buddies tutorial, beginner chick plush pattern, cheerful chick crochet. Additionally, include the keyphrase in at least one subheading and in image alt attributes.
Final note
Aapki request ke mutabiq, maine headings bold kar di hain aur transitions maintain kiye hain taake readability score improve ho. Agar aap H2/H3 levels bhi chahte hain, to main unhein Markdown headings (#, ##) me convert kar dunga/dungi.