Crochet Butterfly Amigurumi Pattern for Amazing Looks
A sweet Crochet Butterfly Amigurumi Pattern that fits in your palm colorful, charming, and completely addictive to make once you start.
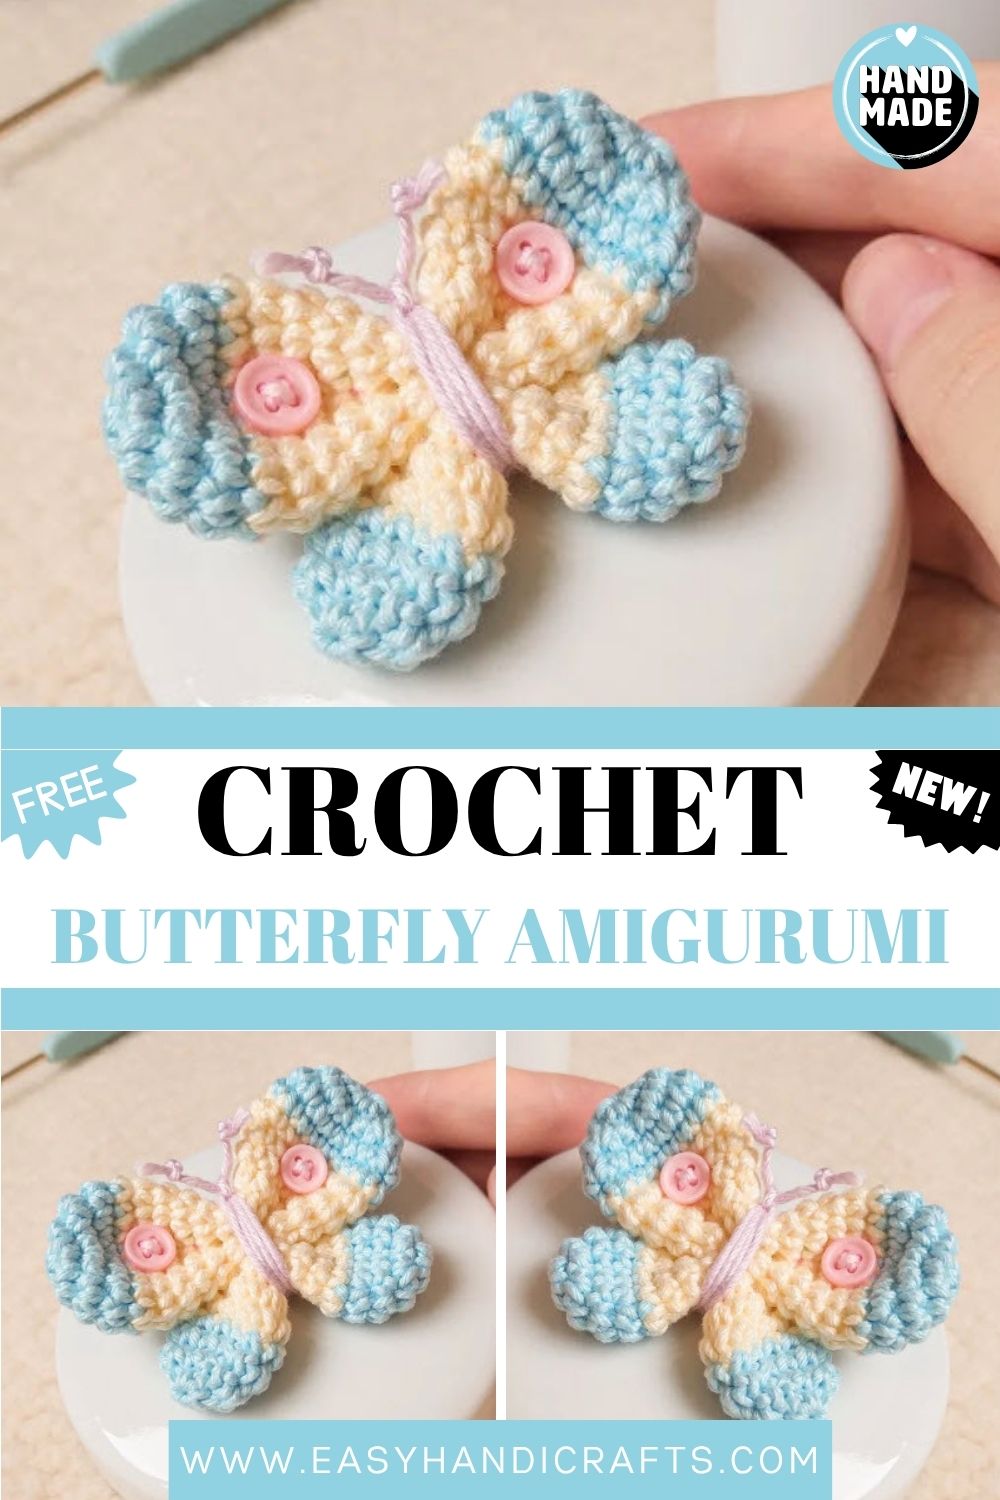
Butterflies carry a kind of magic that never gets old, and this tiny Crochet Butterfly Amigurumi Pattern version captures every bit of it. Worked in smooth cotton yarn with a fine hook, this pattern builds two-layered wing sets that give the butterfly its distinctive, realistic shape. The finishing technique, wrapping yarn at the center to form the body is both clever and satisfying. Whether you display it, gift it, or add it as an embellishment, this little butterfly is a pattern worth keeping close.
Skill Level
Beginner-friendly with basic stitch knowledge. Anyone comfortable with single crochet, magic rings, and simple increases can complete this confidently.
Materials Needed
- 100% cotton yarn 254m/125g – Blue, Pink, Beige
- Crochet hook: 2.0 mm
- Sewing needle
- Scissors
- Mini buttons for detail (optional: sew or glue)
Finished Size
Approximately 8 cm – a perfect pocket-sized butterfly.
Abbreviations & Stitch Guide
- ch — chain
- sc — single crochet
- dc — double crochet
- hdc — half double crochet
- slst — slip stitch
- inc — increase (2 sc in same stitch)
- inc.dc — double crochet increase
- dec — decrease (2 stitches crocheted together)
- BLO — back loop only
Pattern: Larger Wings (Make 2)
Begin with blue yarn. Work in a continuous spiral unless noted otherwise.
Round 1: 6 sc in magic ring
Round 2: 6 inc = 12 sts
Round 3: (1 sc, 1 inc) x 6 = 18 sts
Round 4: 18 sc
Change color to yellow.
Round 6: (4 sc, 1 dec) x 3 = 15 sts
Round 7: 15 sc
Round 8: (3 sc, 1 dec) x 3 = 12 sts
Rounds 9–11: 12 sc
Round 12: (3 sc, 1 inc) x 3 = 15 sts
Round 13: 15 sc
Round 14: (4 sc, 1 inc) x 3 = 18 sts
Round 15: 18 sc
Change color to blue.
Rounds 16–17: 18 sc
Round 18: (1 sc, 1 dec) x 6 = 12 sts
Round 19: 3 dec
Finish off and weave in ends.
Pattern: Smaller Wings (Make 2)
Begin with blue yarn.
Round 1: 6 sc in magic ring
Round 2: 6 inc = 12 sts
Rounds 3–4: 12 sc
Change color to yellow.
Round 5: (2 sc, 1 dec) x 3 = 9 sts
Rounds 6–8: 9 sc
Round 9: (2 sc, 1 inc) x 3 = 12 sts
Round 10: 12 sc
Finishing Touches
- Lay both larger wings side by side and tie them together at the center.
- Place the smaller wings on top and tie all four wings together at the center point.
- Take your pink yarn and wrap it several times around the center joining point this wrapped section becomes the butterfly’s body.
- Secure with two firm knots to hold everything in place.
- Leave both yarn tails long; these become the antennae. Tie a small knot at the tip of each one to finish them off neatly.
- Sew or glue mini buttons onto the larger wings as decorative detail.
- Weave in any remaining loose ends and give the wings a gentle reshape if needed.
Customization & Variations
- Swap the blue base for lavender, mint, or coral to completely change the mood of the butterfly.
- Use variegated or ombre yarn for wings that shift color naturally without changing skeins.
- Replace the yellow contrast section with white or cream for a softer, more muted palette.
- Try embroidery floss instead of yarn for a thinner, more delicate body wrap at the center.
- Add seed beads or tiny sequins along the wing edges for a sparkling, decorative finish.
- Make the butterfly in all one color for a minimalist, modern look.
- Scale up by using a 3.5 mm hook and DK weight yarn for a larger butterfly.
- Attach a brooch pin to the back and wear it as a wearable fiber art piece.
Common Mistakes to Avoid
- Skipping a stitch count check at the end of each round leads to misshapen wings that are hard to fix later count every round.
- Pulling the magic ring too tight before joining all 6 starting stitches can cause it to close unevenly; close it gently after all stitches are in.
- Cutting yarn too short when finishing off leaves nothing to weave in securely always leave at least a 15 cm tail.
- Forgetting to mark the first stitch of each round is the most common reason for losing count in spiral crochet.
- Wrapping the body yarn unevenly at the center makes the butterfly look lopsided; aim for consistent, snug wraps side by side.
- Using acrylic yarn instead of cotton with a fine hook creates a looser, less defined fabric cotton holds the shape much better at 2.0 mm.
Finishing Tips for a Polished Result
- Block the finished wings lightly with a damp cloth and let them dry flat. This evens out any tension inconsistencies and makes the shape crisp.
- Use a tapestry needle with a blunt tip when weaving in ends to avoid splitting the cotton fibers.
- Weave ends in at least two directions for a secure finish that won’t loosen with handling.
- When wrapping the body, keep your tension consistent, tight but not strangling the wing center.
- Trim antenna tails to equal lengths before tying the final knots for a neat, symmetrical look.
- If gluing buttons, use a fabric-safe adhesive and press firmly for 30 seconds; allow to cure fully before gifting.
Gifting Ideas
- Tuck one inside a birthday card as a handmade surprise that doubles as a keepsake.
- Make a set of three in different color palettes and present them in a small gift box lined with tissue paper.
- Attach to a hair clip or headband for a charming accessory gift for little girls.
- String several butterflies onto a length of twine to create a nursery or bedroom garland perfect for baby shower gifts.
- Pair with a potted plant by wiring the butterfly onto a wooden skewer and tucking it into the soil as a decorative pick.
- Bundle with a small skein of yarn and the printed pattern as a gift set for a crafting friend who is just starting out.
- Attach to a wrapped gift in place of a traditional bow for a memorable, reusable finishing touch.
Final Thoughts
This Crochet Butterfly Amigurumi Pattern is one of those patterns that looks far more impressive than the time it actually takes. The construction is logical, the finishing is satisfying, and the result is genuinely beautiful. Whether you are crocheting your very first amigurumi or adding another small project to a growing collection, this butterfly fits naturally into both. The combination of structured rounds, simple color changes, and a creative no-sew body assembly makes it a pattern that teaches good habits while still being genuinely enjoyable. Make one, then make a dozen they have a way of multiplying quickly.