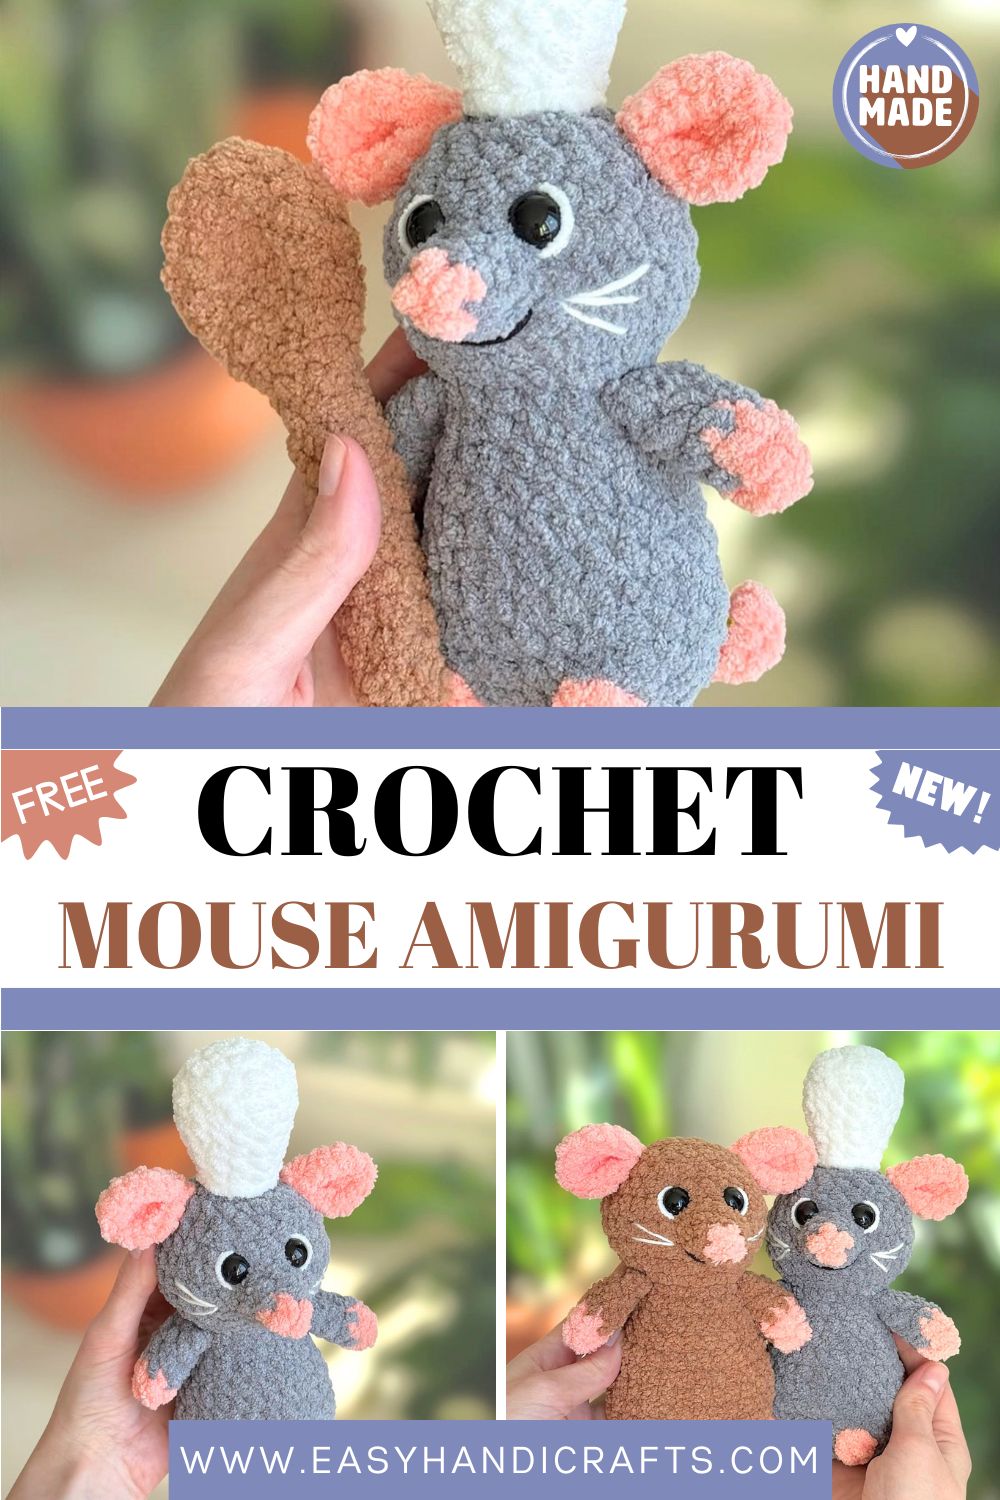
Fabulous Crochet Mouse Amigurumi Pattern for Playful kitchen Decor
Tiny hat, wooden spoon, and a face you cannot stay grumpy at. This little grey chef Crochet Mouse Amigurumi Pattern is soft, squeezable, and ready to take over a corner of your kitchen shelf. Grab your hook and let’s make him together.
Few amigurumi projects feel as cheerful as a mouse who clearly thinks he runs the kitchen. Stitched mostly in chunky chenille, he works up quickly and stays soft enough to squish all day. Whether you are gifting him or keeping him for yourself, this round-by-round Crochet Mouse Amigurumi Pattern keeps things simple from the first magic ring to the final spoon.
Pattern Overview
Before you reach for your hook, here is the lay of the land so nothing catches you off guard:
- He is built from a handful of small pieces that all get sewn together near the end.
- You will hook up a nose, two arms, two ears, one combined body and head, a chef’s hat, and a spoon.
- Head and body grow as a single shape, which means a smoother finish and far less seaming.
- One smart round shape both the legs and the curly tail at once, so there is less to fuss over later.
- Chenille does the heavy lifting, so the body bulks up quickly and stays gentle on beginners.
- The face, ears, hat, and spoon all go on after the main shape is stuffed and closed.
Materials
- Super bulky yarn (6) (I used Premier Basix Chenille) in:
- grey for the body,
- pink for the legs, arms, ears, nose, and tail
- white for the chef hat
- brown for the spoon
- Thinner acrylic or cotton yarn in:
- white for embroidering the face details
- black for embroidering the face details
- Size 5 mm crochet hook (use a 5.5 mm hook to make a bigger size)
- Black safety eyes (12 mm)
- Tapestry needle
- Fiberfill
- Stitch markers
- Scissors
Skills and Abbreviations
magic ring, single crochet (sc), increase stitch (inc), invisible decrease stitch (dec), slip stitch (sl st), back loop only (BLO), front loop only (FLO), bobble stitch (BO – 3 unfinished double stitches), chain (ch), working on chain.
The Pattern
Nose
Start with pink yarn.
- Rnd 1: 4 sc in a magic ring [4]
Change to grey yarn.
- Rnd 2: (sc, inc)*2 [6]
- Rnd 3: (2 sc, inc)*2 [8]
Sl st in the first st. Fasten off, leaving a long tail for sewing.
Arms
Make 2 arms. Start with pink yarn.
- Rnd 1: 4 sc in a magic ring [4]
- Rnd 2: (sc, inc)*2 [6]
Change to grey yarn.
- Rnd 3-5: sc in all 6 [6] (3 rounds)
Do not stuff the arm. Fold in half and crochet 3 sc through both sides of the arm. Fasten off and weave in the yarn ends.
Ears
Make two in pink yarn.
- Rnd 1: 8 sc in a magic ring [8]
- Rnd 2: inc in all 8 [16]
Fasten off, leaving a long tail for sewing. Pinch the bottom of the ear and sew the first 2 stitches of each side together to make them slightly pointy.
Body and Head
Starting the Base
Start with grey yarn. Chain 8. Starting from the second chain, crochet around the chain.
- Rnd 1: inc, 5 sc, 4 sc in the last st, 5 sc, inc [18]
- Rnd 2: 2 inc, 5 sc, 4 inc, 5 sc, 2 inc [26]
Making the Legs and Tail
Next round we are going to make the legs and the tail.
- Rnd 3: BLO: 3 sc, in both loops: BO, BLO: 5 sc, in both loops: BO, BLO: 9 sc, 12 chain, starting from the second chain: 11 sl st on the chain, 7 sc [26]
- Rnd 4-6: sc in all 26 [26] (3 rounds)
- Rnd 7: (11 sc, dec)*2 [24]
- Rnd 8: sc in all 24 [24]
Start stuffing the body with fiberfill and continue stuffing as you go. Do not overstuff the bottom; it should stay flat.
Shaping the Body
- Rnd 9: (4 sc, dec)*4 [20]
- Rnd 10: sc in all 20 [20]
- Rnd 11: (3 sc, dec)*4 [16]
Adjust the position of the arms if they are not in the center. In the next round, we will crochet through the body and the arms at the same time.
Joining the Arms and Building the Head
- Rnd 12: 3 sc through the first arm, 5 sc, 3 sc through the second arm, 5 sc [16]
- Rnd 13: FLO (sc, inc)*8 [24]
- Rnd 14: (3 sc, inc)*6 [30]
- Rnd 15-17: sc in all 30 [30] (3 rounds)
- Rnd 18: (3 sc, dec)*6 [24]
- Rnd 19: (2 sc, dec)*6 [18]
Sew the nose between rounds 15-17. Insert the safety eyes between rounds 17 and 18, right above the nose. Start stuffing the head and stuff as you go.
Closing Up and Adding the Face
- Rnd 20: sc in all 18 [18]
- Rnd 21: all dec [9]
Add more stuffing to the head if needed. Fasten off, leaving a tail. Using a needle, weave the yarn tail through the front loop of each remaining stitch and pull tight to close. Weave in the yarn end. Embroider the whiskers and eye details with the white thin yarn. Embroider the smile with the black thin yarn under the nose. Sew the ears to each side of the head between rounds 20 and 21.
Chef Hat
Make it in white yarn.
- Rnd 1: 8 sc in a magic ring [8]
- Rnd 2: inc in all 8 [16]
- Rnd 3: (3 sc, inc)*4 [20]
- Rnd 4: BLO sc in all 20 [20]
- Rnd 5: (4 sc, dec, 4 sc)*2 [18]
- Rnd 6: (7 sc, dec)*2 [16]
- Rnd 7: (3 sc, dec, 3 sc)*2 [14]
- Rnd 8: (5 sc, dec)*2 [12]
- Rnd 9: sc in all 12 [12]
- Rnd 10: sl st in all 12 [12]
Sl st in the first st. Fasten off, leaving a long tail for sewing. Stuff with fiberfill. Do not overstuff the top of the hat; it should stay flat. Sew the hat to the top of the head (round 21).
Spoon
Make it in brown yarn.
- Rnd 1: 6 sc in a magic ring [6]
- Rnd 2: inc in all 6 [12]
- Rnd 3: (3 sc, inc)*3 [15]
- Rnd 4-5: sc in all 15 [15] (2 rounds)
- Rnd 6: (3 sc, dec)*3 [12]
- Rnd 7: sc in all 12 [12]
- Rnd 8: all dec [6]
- Rnd 9-20: sc in all 6 [6] (12 rounds)
Fasten off, leaving a tail. Using a needle, weave the yarn tail through the front loops of the remaining stitches and pull tight to close. Weave in the end securely. Flatten the spoon at the center of the wide part of the piece, and make a few stitches with a needle to help it stay flat. Then fasten off and weave in any remaining yarn ends.
Special Techniques
A few stitches here ask a little more of you than plain rounds, so a quick heads-up helps. The bobble (BO) is what gives the front legs their plump, perched shape, and it is really just three half-finished double crochets gathered into one. You will also dip in and out of back loops and front loops at set points, and those small shifts are what let the body bend and sit the way it should. Add in a bit of chain work for the base and a couple of pink-to-grey color swaps, and the little chef starts to take shape.
Skill Level
Call it advanced beginner. Magic rings, increases, decreases, and a couple of color changes are all you really need, with the bobble being the one new trick to practice.
Common Mistakes to Avoid
- Too much filling in the base. Keep the bottom flat or your Crochet Mouse Amigurumi Pattern will rock and tip instead of standing proud.
- Rushing past the loop notes. BLO and FLO rounds are not interchangeable; swap them by accident and the shape goes sideways.
- Adding the eyes too late. Those safety backs do not come off, so set them between rounds 17 and 18 before the head closes up.
- Going loose with chenille. This yarn loves to gape, so keep things snug and your stuffing stays hidden.
- Leaving tails for later. Tidying ends as you go beats digging through a stuffed, sealed piece afterward.
Assembly
- Stuff and close the head-and-body as one, keeping that base nice and level.
- Join the arms on round 12 by hooking right through the body so they land evenly on both sides.
- Settle the nose between rounds 15 and 17, then push the eyes in just above it.
- Stitch the whiskers and little eye highlights in white, and run the smile in black below the nose.
- Sew the ears on between rounds 20 and 21, pinching each base so the tips look slightly pointed.
- Stuff the hat lightly, then sew it down onto round 21 at the top of the head.
- Tuck the spoon into an arm or against the side and anchor it with a few small stitches.
Important Remarks
- Drop a stitch marker at the start of every round; chenille is soft but easy to lose track of.
- Reach for the 5.5 mm hook whenever you want a bigger, huggable version.
- Spend an extra minute placing the eyes and nose, since tiny shifts change his whole expression.
- Keep the hat and spoon seams neat, because those small props are exactly what sells the chef’s look.
Conclusion
So there he is, your pint-sized chef Crochet Mouse Amigurumi Pattern all set to liven up a shelf, a windowsill, or a kid’s room. Chunky yarn plus a few charming details make this one of those projects that feels quick yet still turns heads. Honestly, do not be surprised if one mouse becomes a whole little kitchen crew. Take your time, enjoy each round, and have fun watching this Crochet Mouse Amigurumi Pattern come together.