Impressive Cute Crochet Kawaii Baby Chick Phone Pouch Pattern
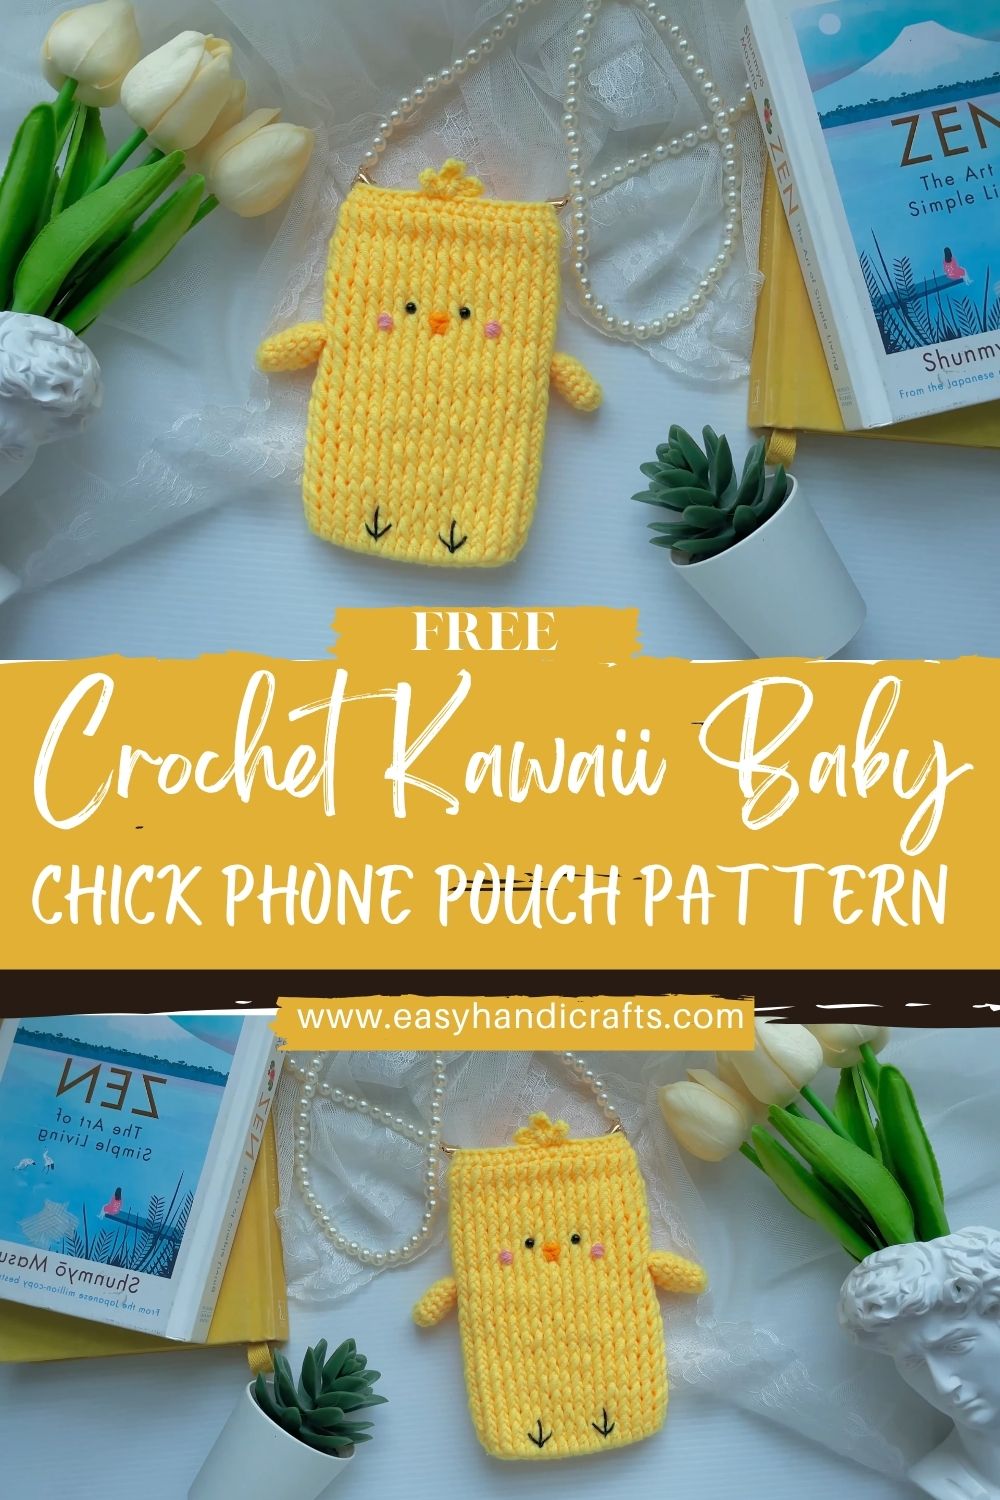
Making this cute little crochet kawaii baby chick phone pouch feels like bringing something soft and cheerful to life. The bright yellow color, tiny wings, and sweet face give it such a warm and playful look that instantly catches attention.
It’s one of those projects that’s not only fun to create but also makes you smile every time you see it. Plus, it’s actually useful too, keeping your phone safe while adding a handmade touch to your everyday routine.
Materials Needed
- Yarn (soft cotton or acrylic, worsted/medium weight – Category 4):
- Yellow (body): 50–80 g
- Orange (beak + feet): 10–15 g
- Black (eyes) and pink (cheeks): 5 g each (or embroidery thread)
- Optional white accent (tiny highlights): 5 g
- Crochet hook: 3.5 mm–4.0 mm
- Use 3.5 mm for a tighter, sturdier pouch
- Use 4.0 mm for a slightly softer fabric
- Safety eyes: 8–10 mm (optional)
- OR black embroidery thread for stitched eyes
- Yarn needle: 1
- Stitch markers: 2–4
- Scissors: 1 pair
- Optional strap or cord for hanging: 90–120 cm (35–47 in) for crossbody or 25–35 cm (10–14 in) for wrist strap
- Button or closure (optional): 1 button (12–18 mm) or a snap/button loop
Skill Level
Beginner / Easy
First, the pouch uses simple stitches and a repeatable pattern. Next, the details are small and forgiving, so everything can be adjusted before sewing permanently.
Making Time (Overview)
Approximately 2–3 hours, depending on strap choice and how much embroidery detail is added.
Instructions
1. Pouch Body (Main Base)
This body is made as a rectangle, then folded into a pouch.
- Make a foundation chain based on phone width:
First, measure the phone width and add a little ease. Next, chain to match that measurement, then add 2 extra chains for turning.
Meanwhile, a common starting point is 26–36 chains, but measuring the phone gives the best fit. - Crochet rows to build a rectangle:
Next, work in single crochet rows for a tight fabric that protects the phone. After that, chain 1, turn, and continue.
Meanwhile, keep the first and last stitch of each row neat to avoid wavy sides. - Check rectangle sizing (simple fit test):
After that, lay the phone on the rectangle. Next, the rectangle should be about 2× the phone height, plus a little extra if a flap is planned. - Add slight shaping if needed:
If the pouch looks too boxy, next add one gentle decrease at each edge for 2–4 rows near the top.
Meanwhile, this step is optional and only needed if a tapered “chick body” look is preferred. - Fold and seam the sides:
Next, fold the rectangle in half, matching edges. After that, stitch the sides together with whip stitch or slip stitch.
Finally, turn the pouch right-side out so seams hide inside.
Making time for pouch body: 60–90 minutes
2. Flap / Opening Edge
A clean top edge makes the pouch look finished, and a flap helps keep the phone secure.
- Create a tidy top edge:
First, crochet a round of single crochet around the opening. Next, add an extra round if the top needs more stability. - Make a simple fold-over flap (optional):
After that, crochet a small flap directly from the back edge of the pouch opening. Next, crochet back and forth for 6–10 rows, depending on flap length desired. - Add an optional buttonhole or loop:
Later, create a small chain loop at the end of the flap. Then, sew a button onto the front of the pouch so the flap can close neatly.
Making time for flap/top edge: 20–35 minutes
3. Additional Parts
Wings (Side Details)
- Crochet two small rounded wings:
First, crochet two small ovals or half-circles in yellow. Next, keep them slightly puffy by using a few extra stitches in the center. - Attach neatly to the sides:
After that, pin each wing to the pouch sides, about halfway down. Next, stitch around the edges with small, even stitches.
Making time for wings: 15–25 minutes
Top Tuft (Head Detail)
- Create a tiny tuft:
First, crochet a small cluster of chains, such as three short chain loops joined at the base. Next, keep it light so it doesn’t flop over. - Attach to the top center:
After that, stitch the tuft to the top edge of the pouch, slightly toward the back if a flap is used.
Making time for tuft: 5–10 minutes
Beak & Feet Embroidery
- Stitch the beak:
First, use orange yarn to embroider a small triangle or tiny “V” beak on the front area. Next, keep it centered below the eyes. - Stitch tiny feet:
After that, embroider two simple feet near the bottom front using short lines or a tiny three-toe shape.
Making time for beak + feet: 10–20 minutes
4. Accessories & Details
- Add blush cheeks:
First, use pink yarn or embroidery thread to stitch two small blush ovals under the eyes. Next, keep them soft and subtle for a kawaii look. - Optional strap or handle:
After that, attach a strap using one of these beginner-friendly options:- Crochet strap: chain the desired length, then single crochet back across for strength
- Cord strap: thread a cord through the side edges and knot securely
Later, reinforce strap joints with extra stitches so the pouch can handle daily use.
Making time for accessories/details: 15–30 minutes
Face & Assembly
- Position eyes evenly:
First, place safety eyes (or mark embroidery spots) before attaching anything else. Next, check symmetry by folding the pouch lightly down the center and adjusting placement. - Add beak and cheeks carefully:
After that, stitch the beak centered below the eyes, then add blush cheeks. Meanwhile, keep the cheeks at the same height so the face looks balanced. - Attach wings securely:
Next, sew wings on both sides with tight stitches. After that, tug gently to confirm they’re firmly attached. - Ensure clean and neat finishing:
Finally, weave in all ends inside the pouch, trim neatly, and smooth the shape with hands so it looks polished.
Special Features
- Cute kawaii chick design: simple face details that look instantly cheerful
- Functional phone pouch: keeps a phone protected and easy to grab
- Soft and cozy texture: comfortable to hold and pleasant in a bag
- Lightweight and portable: easy to carry daily without bulk
Sizing Tips
- Adjust the foundation chain for different phone sizes:
First, match the chain length to the phone width. Next, add a little ease so the phone slides in smoothly. - Use thicker yarn for a larger pouch:
After that, switching to thicker yarn naturally increases size, which is helpful for larger phones. - Use a smaller hook for a tighter fit:
Next, a smaller hook reduces gaps and makes the pouch sturdier, especially around the edges. - Quick test before seaming:
Finally, wrap the rectangle around the phone before stitching sides closed, then adjust rows if needed.
Finishing Tips
- First, keep tension even to avoid wavy edges.
- Next, stitch seams with consistent spacing so the sides look straight.
- After that, secure all loose ends by weaving through several stitches and changing direction once.
- Finally, shape the pouch with gentle hand-smoothing so it looks professionally finished.
Common Mistakes to Avoid
- Incorrect sizing for the phone:
First, avoid guessing chain count. Next, measure the phone width and make a quick wrap test before continuing. - Uneven stitch tension:
After that, slow down for the first few rows, because early tension sets the tone. Meanwhile, a slightly smaller hook can help tighten loose stitches. - Misplaced facial features:
Next, pin or mark eye placement before stitching the beak and cheeks. After that, step back and check the expression before finishing. - Loose attachments:
Finally, wings, tuft, and straps should be sewn with multiple passes, because those parts get tugged the most during use.
Variations & Customization Ideas
- Different colors:
First, try pastel yellow for a soft look, bright yellow for classic chick energy, or themed colors for a fun twist. - Add a bow or accessories:
Next, stitch a tiny bow near the tuft or add a small flower detail on one side of the face. - Create animal variations:
After that, swap the beak for a little muzzle to make a bear, or add long ears to create a bunny pouch. - Add a longer strap for crossbody style:
Finally, use a reinforced strap and add a button flap for extra security on the go.
Tutor Suggestions for ( Crochet Kawaii Baby Chick Phone Pouch)
First, focus on getting the pouch size right, because a good fit makes everything look neat. Next, count stitches at the end of each row so edges stay straight and the pouch doesn’t twist. After that, place facial features slowly and adjust before sewing, because tiny changes can completely change the expression. Finally, keep details simple clean stitching and balanced placement always look cute, even with basic shapes.
Conclusion
This Crochet Kawaii Baby Chick Phone Pouch is a sweet, beginner-friendly amigurumi project that mixes cuteness with everyday function. First, the simple pouch body works up quickly, and next, the wings, tuft, and blush details add personality without extra stress. Finally, with easy sizing tweaks and strap options, this chick pouch becomes a fun accessory or a thoughtful handmade gift.