Crochet Chicken Plush Hen with Belly Panel Amigurumi Pattern
This chicken design is suitable for confident beginners who know basic stitches and how to count rounds. and is still detailed enough for intermediate crocheters who enjoy shaping and assembly. It’s the kind of handmade plush that looks adorable as Easter décor, nursery décor, a desk companion, or a thoughtful baby gift with embroidered eyes for safety.

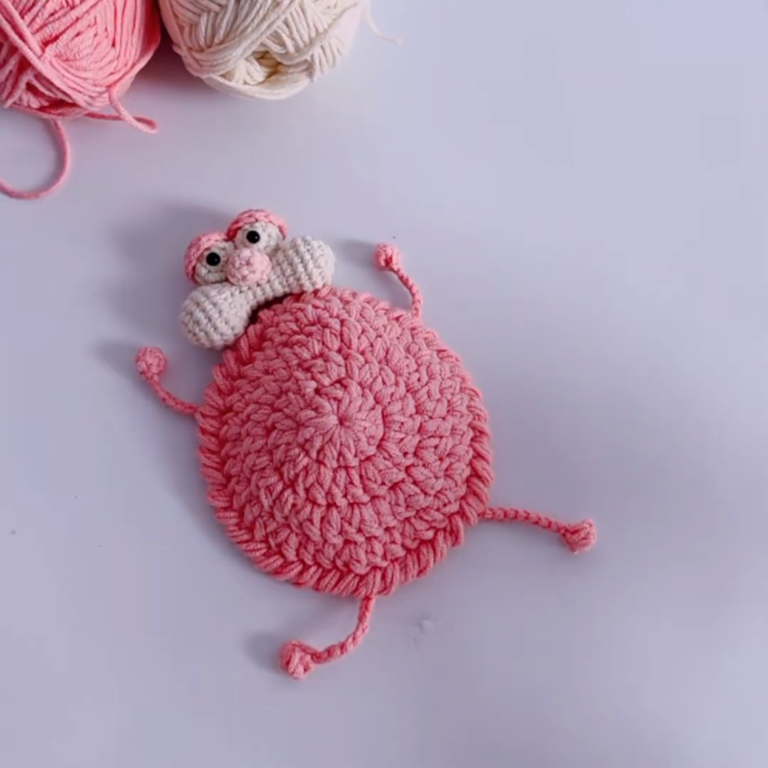
What makes this chicken extra cute (based on the image)?
A chicken inspires this pattern with these visible design features:
- A round/oval body that looks soft and huggable
- Large protruding eyes for that playful amigurumi expression
- A small red comb on top
- A bright orange/yellow beak centred on the face
- Little side wings that sit like flaps
- Long, thin legs with feet for that quirky “standing chicken” look
- A decorative belly panel with a small face/pocket-style detail that adds charm and texture to the front
Grab your yarn and let’s make a chicken that looks handmade in the best way—cosy, cheerful, and full of personality.
Materials Needed
Here’s what you’ll want on hand, with quick notes so you can substitute easily:
- Yarn (worsted/DK recommended)
- White (main body—classic hen)
- Light yellow (optional chick version or belly accents)
- Orange (beak, feet; can also use yellow-orange)
- Red (comb)
- Skin tone (optional eyelids/eye detail or belly detail)
- Brown (optional belly panel/pocket outline or decorative details)
Tip: Use the same yarn weight throughout for consistent sizing.
- Crochet hook: 2.5–3.5 mm (choose a hook smaller than the yarn label suggests for tight amigurumi fabric)
- Fiberfill/stuffing: For a firm, smooth shape
- Safety eyes (10–14 mm) or black beads
For baby toys: consider embroidered eyes instead of safety eyes. - Yarn needle (tapestry needle): For sewing pieces together and weaving ends
- Stitch marker: To mark the start of each round
- Scissors
- Optional embellishments
- Pink blush (fabric blush or diluted pink yarn stitching)
- Eyelashes (embroidery thread)
- Tiny bow/hat/apron
- Keychain clip for a mini version
Abbreviations / Crochet Terms (Simple Guide)
- MR = Magic Ring (adjustable ring to start crocheting in the round)
- sc = Single crochet
- inc = Increase (2 sc in the same stitch)
- dec = Decrease (single crochet 2 stitches together; use invisible decrease for neatness)
- sl st = Slip stitch
- ch = Chain
- hdc = Half double crochet (if used for shaping)
- dc = Double crochet (sometimes used for small accents)
Finished Size & Skill Level
- Approximate size: 6–9 in (15–23 cm) tall, depending on yarn/hook and leg length
- Skill level: Beginner to easy intermediate (simple shapes + assembly)
- Estimated time: 3–6 hours (faster with practice)
Colour & Design Variations
Make this chicken match your style (or your gift recipient):
- White chicken version: White body, orange beak/feet, red comb, brown or beige belly panel detail
- Yellow chick version: Yellow body, orange beak/feet, tiny comb (or skip comb)
- Belly panel variations:
- Solid oval panel
- “Pocket” panel (sewn on 3 sides only)
- Add a tiny embroidered face, heart, or egg motif
- Beak/comb/wing/feet options:
- Beak: mustard, gold, orange
- Comb: red, dark red, coral
- Wings: body colour or contrasting cream
- Feet: orange, tan, brown
- CCustomisationideas:
- Small bow on the head
- Mini hat (top hat or bonnet)
- Blush cheeks + eyelashes
- Little apron (farmhouse style)
- “Egg pocket” belly (hold a mini egg)
- Keychain version: use thinner yarn (sport/fingering) + smaller hook
Step-by-Step Crochet Pattern (Very Detailed)
Notes Before You Start
- Work in continuous rounds (do not join with sl st unless instructed).
- Use a stitch marker to mark the first stitch of each round.
- Keep tension tight so stuffing doesn’t show through.
- Stitch counts are shown at the end of each round in ( ).
Head/Body (One Piece)
Colour: White (or yellow for chick)
This section forms the rounded head that transitions into an oval body.
Rounds
Round 1: 6 sc in MR (6)
Round 2: inc x6 (12)
Round 3: (sc, inc) x6 (18)
Round 4: (2 sc, inc) x6 (24)
Round 5: (3 sc, inc) x6 (30)
Round 6: (4 sc, inc) x6 (36)
Round 7: (5 sc, inc) x6 (42)
Round 8: (6 sc, inc) x6 (48)
Rounds 9–12: sc around (48)
Tip: These even rounds help create a smooth, round head.
Round 13: (6 sc, dec) x6 (42)
Round 14: (5 sc, dec) x6 (36)
Round 15: (4 sc, dec) x6 (30)
At this point, you’re narrowing slightly—this forms the “neck” transition.
Round 16: (4 sc, inc) x6 (36)
Round 17: (5 sc, inc) x6 (42)
Round 18: (6 sc, inc) x6 (48)
Round 19: (7 sc, inc) x6 (54)
Now the body widens for a cute oval “chicken belly.”
Rounds 20–24: sc around (54)
Round 25: (7 sc, dec) x6 (48)
Round 26: (6 sc, dec) x6 (42)
Round 27: (5 sc, dec) x6 (36)
Round 28: (4 sc, dec) x6 (30)
Round 29: (3 sc, dec) x6 (24)
Start stuffing firmly now. Keep the head rounded and the body slightly oval.
Round 30: (2 sc, dec) x6 (18)
Round 31: (sc, dec) x6 (12)
Add more stuffing—especially around the lower belly—for a stable, plus feel.
Round 32: dec x6 (6)
Fasten off, close the hole, and weave in the end.
Belly Panel (Decorative Oval + Pocket-Look Detail)
Colour: Light yellow, cream, or skin tone (panel) + brown (optional outline)
This creates the decorative front panel seen in the image.
Belly Panel (Oval)
Round 1: ch 7
Work around the chain to form an oval:
- sc in 2nd ch from hook, sc in next 4 ch, 3 sc in last ch
- turn to underside of chain: sc in next 4 ch, 2 sc in last ch (14)
Round 2: inc, sc 4, inc x3, sc 4, inc x2 (20)
Round 3: sc, inc, sc 4, (sc, inc) x3, sc 4, (sc, inc) x2 (26)
Round 4: sc around (26)
Fasten off, leaving a long tail for sewing.
Mini “Pocket/Face” Detail (Small Oval)Co ColourBrown or contrasting shade
Round 1: ch 5
Oval around chain: sc in 2nd ch, sc in next 2 ch, 3 sc in last ch, sc in next 2 ch (underside), 2 sc in last ch (10)
Round 2: inc, sc 2, inc x3, sc 2, inc x2 (16)
Fasten off, leaving taia l.
Attach a mini oval detail on top of the belly panel (centred), sewing around the edges.
Pocket option: sew only the left, right, and bottom edges—leave the top open.
Beak (Small Triangle Beak)
Colour: Orange/yellow-orange
Round 1: 4 sc in MR (4)
Round 2: (sc, inc) x2 (6)
Round 3: sc around (6)
Fastening of, leaving a ail.
Shape tip: Lightly stuff just the tip (optional) so the beak protrudes.
Eyes (Placement + Protruding Look)
You can do either:
- Safety eyes directly into the head, OR
- Protruding “eye bases” (recommended to mimic the large raised eyes in the image)
Optional Eye Bases (Make 2) Colour: White
Round 1: 6 sc in MR (6)
Round 2: inc x6 (12)
Round 3: sc around (12)
Fasten off, leaving a tail.
Eye placement (recommended):
- Place eyes between Rounds 10 and 11 on the head area.
- Space them about 8–10 stitches apart (adjust to your preferred expression).
- If using eye bases, sew the bases on first, then place the safety eyes through the base and head (or sew/ embroider the pupils).
Comb (Small Red Top Comb)
Colour: Red
This creates a simple 3-bump comb.
Round 1: 6 sc in MR (6)
Round 2: sc around (6)
Fasten off, leaving a tail.
Comb bumps (worked into the edge):
Attach yarn to any stitch around the circle and work:
- (sl st, ch 2, 2 hdc in same st, sl st in next st) x3
Fasten off, leave a tail for sewing.
Alternative: If you prefer simpler, sew a small red half-circle on top.
Wings (Make 2)
Colour: White (or contrasting cream)
Wings are small, rounded flaps.
Round 1: 6 sc in MR (6)
Round 2: (sc, inc) x3 (9)
Round 3: (2 sc, inc) x3 (12)
Round 4: sc around (12)
Round 5: (2 sc, dec) x3 (9)
Flatten the wing and sc through both layers to close: 4 sc across (4)
Fasten off, leaving a long tail for sewing.
Tip: Don’t stuff wings—flat wings look neater.
Legs (Make 2) Colour: Orange (or brown)
These are long and thin, like the image.
Round 1: 6 sc in MR (6)
Rounds 2–14: sc around (6)
(Adjust length by adding/removing rounds.)
Lightly stuff only the top 1/3 if needed; keep most of the leg unstuffed for a slim look.
Fasten off, leaving a long tail for sewing.
Feet (Make 2) Colour: Orange/yellow-orange
Feet are made as a small base with “toes.”
Foot Base
Round 1: 6 sc in MR (6)
Round 2: inc x6 (12)
Round 3: sc around (12)
Fasten off, leaving a tail.
Toes (Simple Crochet Toes)
Attach yarn to the front of the foot base and create 3 toes:
- Toe 1: ch 4, sl st in 2nd ch from hook, sl st in next ch, sc in last ch, sl st back into foot base
- Toe 2: ch 4, repeat
- Toe 3: ch 3, repeat (slightly shorter toe)
Fasten off, weave ends.
Attach each foot to the bottom of a leg by sewing the leg end to the centre of the foot base.
Assembly (Placement + Sewing Guide)
A) Stuffing and Shaping (Body)
- Stuff the head firmly so it stays round.
- Stuff the body a bit firmer at the lower belly to help the chicken stand.
- Avoid overstuffing near the bottom seam (it can stretch stitches).
B) Eyes Placement
- If using safety eyes directly: insert between Rounds 10–11, 8–10 stitches apart.
- If using eye bases, sew the bases first, then attach the eyes centred on each base.
Tip: Pin the eyes first, then look from the front and top to ensure symmetry.
C) Beak Placement
- Sew beak centred between the eyes, slightly lower, roughly around Rounds 11–12.
- The beak should protrude outward like a small triangle.
D) Comb Placement
- Sew comb on top of head, slightly forward of centre—around Rounds 6–8.
- Make sure it lines up with the beak when viewed from the side.
E) Wings Placement
- Sew wings on the sides of the body at about mid-body height around Rounds 18–22.
- Position evenly (at the same height on both sides).
Tip: Use pins and count rounds to match placement.
F) Belly Panel Placement
- Centre the belly panel on the front of the body (the widest belly area).
- Sew neatly around the edge with small whip stitches.
- If making it a “pocket,” sew only the sides and bottom.
G) Legs + Balance
- Sew legs to the underside of the body, slightly forward so the chicken doesn’t tip backwards.
- Recommended placement: near the bottom, about 6–10 stitches apart, aligned with the face direction.
- After sewing legs, sew feet onto the floor-facing side and test standing.
Tip: If it’s wobbly, angle the legs slightly outward or add a bit more stuffing to the lower front belly.
Finishing
- Weave in all ends securely (especially legs and wings).
- Optional: add blush on the cheeks under the eyes, tiny eyelashes, or an apron.
- Shape with your hands: gently press the belly forward and round the head.
Helpful Tips for Beginners
- Maintain even tension: Tight stitches prevent stuffing from showing.
- Count every round: Use a stitch marker and recount if the shape looks off.
- Stuff gradually: Add small amounts and shape as you go, rather than waiting until the end.
- Symmetrical eyes: Pin both eyes first, then step back and check alignment.
- Neat sewing: Use matching yarn and small stitches; sew through stitch “bars” for clean seams.
- Clean colour changes: Finish the last yarn-over on the final stitch with the new colour.
Common Mistakes to Avoid
- Incorrect stitch counts: This can cause lumps or twisting—recount often.
- Overstuffing: Makes stitches stretch and fabric look holey.
- Uneven wings: Place using the same round numbers on each side.
- Misaligned eyes: Even a one-stitch difference can change the expression a lot.
- Loose attachments: Legs/feet must be very secure. Use extra passes.
- Unstable legs: Attach slightly forward and test balance before weaving in ends.
Uses & Ideas
This crochet chicken is perfect for:
- A sweet baby gift (use embroidered eyes)
- Easter decoration or table centerpiece
- Nursery décor (farm theme)
- A cute desk toy or stress companion
- A handmade shop product (great for craft fairs)
- A keychain/bag charm mini version (scale down yarn + hook)
- A farm-themed toy set with cows, pigs, and sheep
Care Instructions
- Hand wash gently in cool to lukewarm water
- Use mild detergent
- Press in a towel to remove water (don’t wring)
- Air dry fully
- Reshape: gently fluff and mould the head/body back into a smooth oval
Conclusion
This crochet chicken/amigurumi chicken pattern is a joyful make: a plump, round body, big, expressive eyes, a tiny comb and beak, side wings, long legs, and that charming decorative belly panel that gives it extra personality. Whether you crochet it as Easter décor, a nursery friend, or a handmade gift, it’s the kind of project that remains impressively approachable. Try a classic white hen, a bright yellow chick, or your own playful colours. This pattern is easy to customise and even more fun when you make it your own.