Cute Crochet Mini Whale Easy Amigurumi Pattern
Want an adorable pocket-sized crochet project that’s irresistibly cute? This mini amigurumi whale works up fast, uses simple stitches, and is perfect for beginners.
If you love small, squishy amigurumi that look adorable from every angle, this mini crochet whale is going to be your next favorite project. It’s designed to be round and chubby, with tiny side fins, a small tail, and a simple embroidered smiling face, the kind of handmade plush you can gift, decorate with, or keep in your bag as a calming companion.
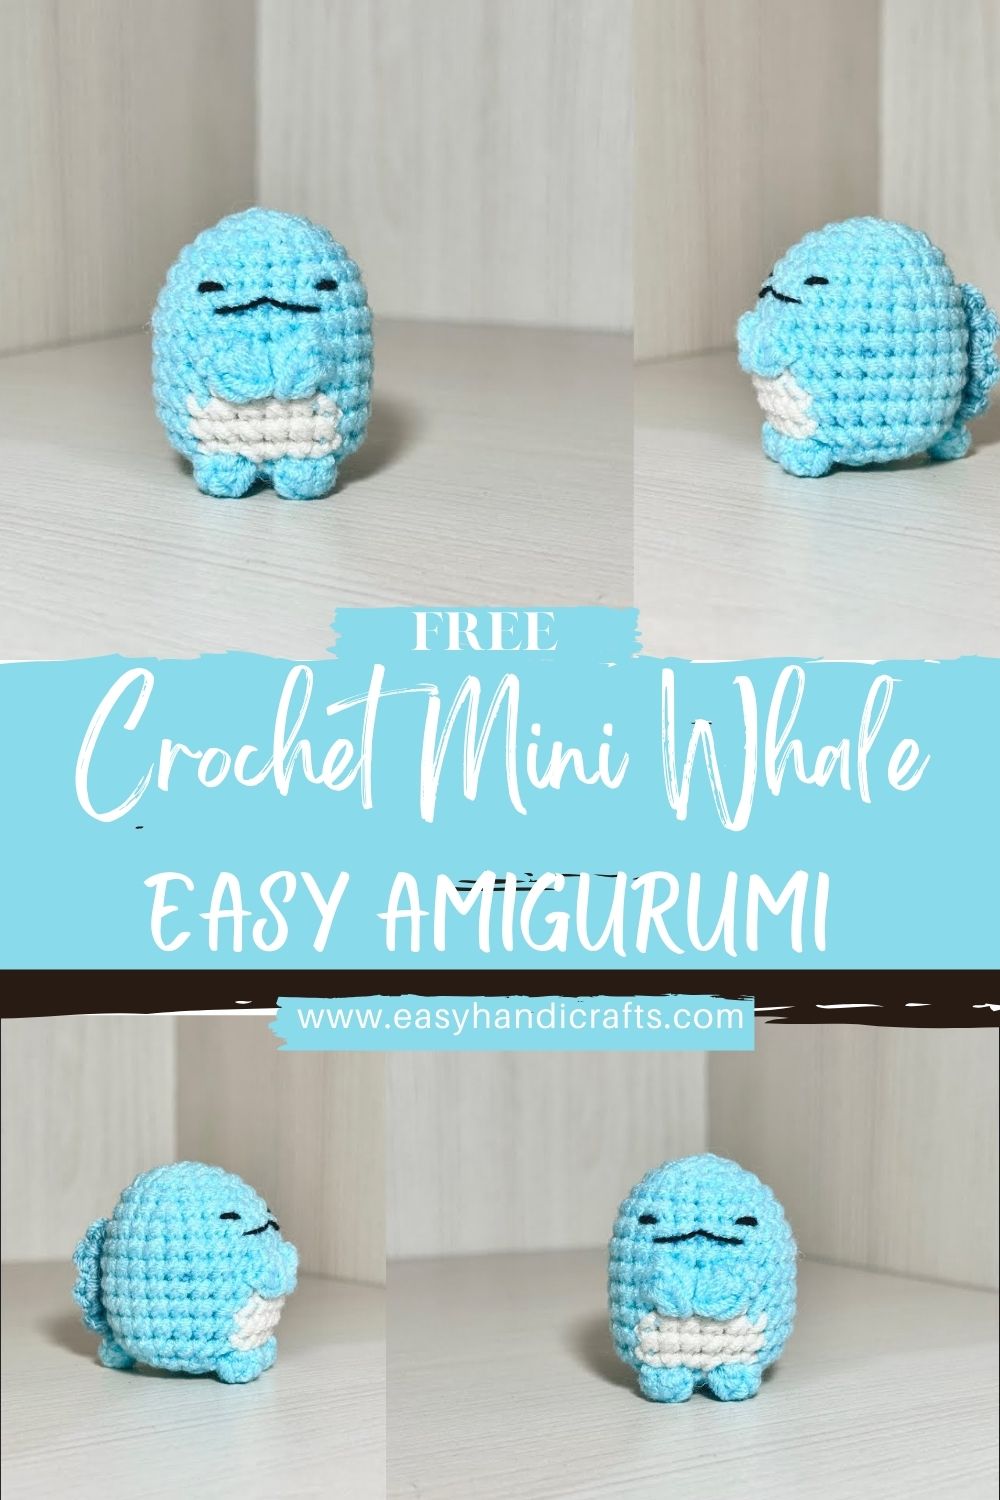
This tutorial is written with beginners in mind: you’ll practice working in continuous rounds, using basic increases and decreases to shape the body, and doing a clean color change for the white belly contrast. Even if you’re new to amigurumi, you’ll find the steps clear, the stitch counts consistent, and the assembly straightforward.
Materials Needed
- Soft yarn: blue + white (plush/velvet or smooth worsted, both work)
- Crochet hook: appropriate to your yarn (typically 3.0–4.5 mm; use smaller than the label suggests for tight stitches)
- Fiberfill stuffing
- Safety eyes or embroidery thread (for baby-safe version, embroider the eyes)
- Yarn needle (tapestry needle)
- Stitch marker
- Scissors
Detailed Visual Description of the Whale
This whale is designed to be:
- Round and chubby with a smooth dome shape on top
- Made with a soft plush yarn texture (optional but extra cuddly)
- Featuring small side fins that sit slightly low on the body for a cute, “floaty” look
- A tiny back tail that’s flattened and stitched on neatly
- A crisp white belly panel that contrasts with the blue top
- Minimal embroidered eyes and a simple smile for a gentle, friendly face
- Compact and pocket-sized, ideal as a desk buddy, gift topper, or keychain-sized plush
- Overall, cute and beginner-friendly, with no complicated shaping or advanced techniques
About Amigurumi
Amigurumi is the Japanese art of crocheting (or knitting) small stuffed toys, typically worked in the round with tight stitches so stuffing doesn’t show. It’s popular because it’s:
- Quick to finish (small projects = fast wins)
- Highly customizable (colors, faces, accessories)
- Beginner-friendly when patterns use basic shaping (inc/dec)
- Perfect for gifts, nursery decor, and collectibles
Skill Level
Beginner to Intermediate
Basic skills required:
- Working in the round (continuous rounds)
- sc, inc, dec
- Simple sewing (attaching fins and tail)
- Basic embroidery for the face (or inserting safety eyes)
Abbreviations
- MR = magic ring
- sc = single crochet
- inc = increase (2 sc in the same stitch)
- dec = decrease (single crochet 2 together, invisible decrease recommended)
- sl st = slip stitch
- ch = chain
- rep = repeat
STEP-BY-STEP PATTERN (Very Detailed)
Finished Size (Approx.)
- With plush yarn: ~3–4 in (7.5–10 cm) long
- With worsted yarn: ~2.5–3.5 in (6–9 cm) long
(Exact size depends on yarn, hook, and tension.)
Notes Before You Start
- Work in continuous rounds (do not join unless stated).
- Use a stitch marker to mark the first stitch of each round.
- For the cleanest shaping, use invisible decreases.
A. Head & Body (Worked in One Piece)
Color: Start with blue.
R1: 6 sc in MR (6)
R2: inc in each st around (12)
R3: (sc, inc) rep 6 times (18)
R4: (2 sc, inc) rep 6 times (24)
R5: (3 sc, inc) rep 6 times (30)
R6: (4 sc, inc) rep 6 times (36)
At this point, you’ll see a rounded “cap” forming the top of the whale.
R7–R10: sc in each st around (36) for 4 rounds
Belly Color Change Setup
We’ll create a simple white belly panel by crocheting a section of stitches in white across the front of the whale. The belly will look best if you keep it centered on the face.
Tip: If you want the belly centered perfectly, make sure your marker is at the “back” of the whale. You can shift the start of the round by adding a few extra sc before beginning the belly section (this is normal in amigurumi).
R11 (Belly Panel Round)
- sc 10 in blue
- switch to white: sc 16 in white
- switch to blue: sc 10 in blue
(36)
R12 (Maintain Belly Panel)
- sc 10 blue
- sc 16 white
- sc 10 blue
(36)
R13 (Slight Taper Begins)
- sc 11 blue
- sc 14 white
- sc 11 blue
(36)
This narrows the belly slightly for a soft “oval” look.
R14 (More Taper)
- sc 12 blue
- sc 12 white
- sc 12 blue
(36)
Begin Shaping Down (Decrease Rounds)
Switch fully back to blue after the belly section is complete (you can carry white inside if you prefer, but with plush yarn, it may show cut and weave at the ends for a cleaner finish).
R15: (4 sc, dec) rep 6 times (30)
R16: sc in each st around (30)
R17: (3 sc, dec) rep 6 times (24)
R18: sc in each st around (24)
R19: (2 sc, dec) rep 6 times (18)
Stuffing (Important!)
Start stuffing now.
- Add small pieces of fiberfill at a time.
- Push stuffing into the curve of the head and belly.
- Keep it firm but not stretched (overstuffing can distort stitches and belly shaping).
R20: (sc, dec) rep 6 times (12)
Add a little more stuffing, focusing on keeping the whale round.
R21: dec around (6)
Fasten off, leave a tail for sewing. Weave the yarn through the front loops of the last 6 stitches and pull tight to close. Hide the tail inside.
B. Side Fins (Make 2)
Color: blue
R1: 6 sc in MR (6)
R2: (sc, inc) rep 3 times (9)
R3: sc around (9)
Flatten the fin (press edges together).
R4: sc 4 across through both layers to close (4)
Fasten off, leave a long tail for sewing.
Fin Placement
- Place fins on the sides, slightly below the body’s midline.
- A good placement is between Rounds 11–15, aligned with the widest section.
- Pin first, then sew neatly with small stitches.
C. Tail (One Piece, Flattened)
Color: blue
R1: 6 sc in MR (6)
R2: inc in each st around (12)
R3: (2 sc, inc) rep 4 times (16)
R4: sc around (16)
Flatten the tail piece.
R5: sc 8 across through both layers to close (8)
Fasten off, leave a long tail for sewing.
Tail Attachment Method
- Sew the tail centered on the back end of the whale.
- Slightly angle the tail upward for a playful “swimming” pose.
- Stitch through both the tail edge and the body stitches to hold its shape.
D. Face Details
You can use safety eyes or embroidery.
Option 1: Safety Eyes
- Place eyes between Rounds 9–11, about 5–6 stitches apart.
- Ensure the belly panel faces forward and is centered before inserting.
- Add a small amount of stuffing behind the eye area to prevent it from sinking.
Option 2: Embroidered Eyes + Smile (Beginner-Friendly)
- With black embroidery thread or thin black yarn:
- Make two small straight stitches (or tiny “V” shapes) for eyes.
- Place them between Rounds 9–11, 5–6 stitches apart.
- Smile:
- Embroider a small curved smile centered between the eyes, about 1 round lower.
- Keep it minimal 2–3 short stitches can create a sweet expression.
E. Final Assembly
- Check orientation: belly faces front, tail goes at the back, fins on each side.
- Pin pieces first: This prevents uneven placement.
- Sew fins: Use whip stitch or ladder stitch; keep stitches small and tidy.
- Sew tail: Attach firmly, especially at the corners, so it doesn’t flop.
- Weave in all ends: Run the yarn tail through the body and trim to hide it.
- Final shaping: Gently roll the whale in your hands to smooth the stuffing and round out the body.
NOTE
This is an inspired instructional pattern based on the design, not a replica of the original pattern.
DISCLAIMER
Stitch counts and shaping may vary depending on yarn, hook size, and tension.
Customization Ideas
- Try different colors: pink, grey, mint, or pastel ombré for a dreamy whale
- Make it larger with chunky yarn and a bigger hook (keep stitches tight)
- Turn it into a mini keychain version: crochet smaller with thin yarn, add a keyring loop on top
- Add details: tiny blush cheeks, eyelashes, or a little embroidered water spout
Tips for Beginners
- Maintain even tension: Tight, consistent stitches prevent stuffing from showing.
- Stuff properly: Use small amounts and pack lumps gradually; they happen when you add too much at once.
- Use stitch markers: Mark your first stitch every round to avoid losing count.
- Working with plush yarn:
- Use a brighter light and feel the stitches with your fingers.
- Counting stitches carefully can be harder to see.
- Consider placing a marker every 6 stitches during the increase rounds.
Why You’ll Love This Pattern
- Quick and easy, a satisfying project you can finish in one sitting
- Beginner-friendly shaping with clear rounds and simple parts
- Makes a perfect gift for ocean lovers, kids, and baby showers (embroidered eyes recommended)
- Highly customizable in size, color, and facial expression
Conclusion
This mini crochet whale is small, soft, and full of character, proving that a simple shape and sweet face can create something truly special. Grab your blue and white yarn, take it one round at a time, and enjoy making a tiny ocean friend you’ll be proud to show off.