Crochet Modern Wrap Foreign Style Dress Pattern
Meet a passionate, modern, foreign-style crochet wrap dress pattern brimming with handmade charm, beginner-friendly, customizable, and gift-worthy for birthdays, holidays, or stylish everyday wear.
Clean, modern, and playfully cute, the Passionate Crochet Modern Wrap Foreign Style Dress Pattern transforms simple stitches into a flattering wrap silhouette with amigurumi charm. Petite textures, tidy shaping, and a sweet tie make it enjoyable to crochet; beginner-friendly repeats keep the pace relaxing while progress feels quick.
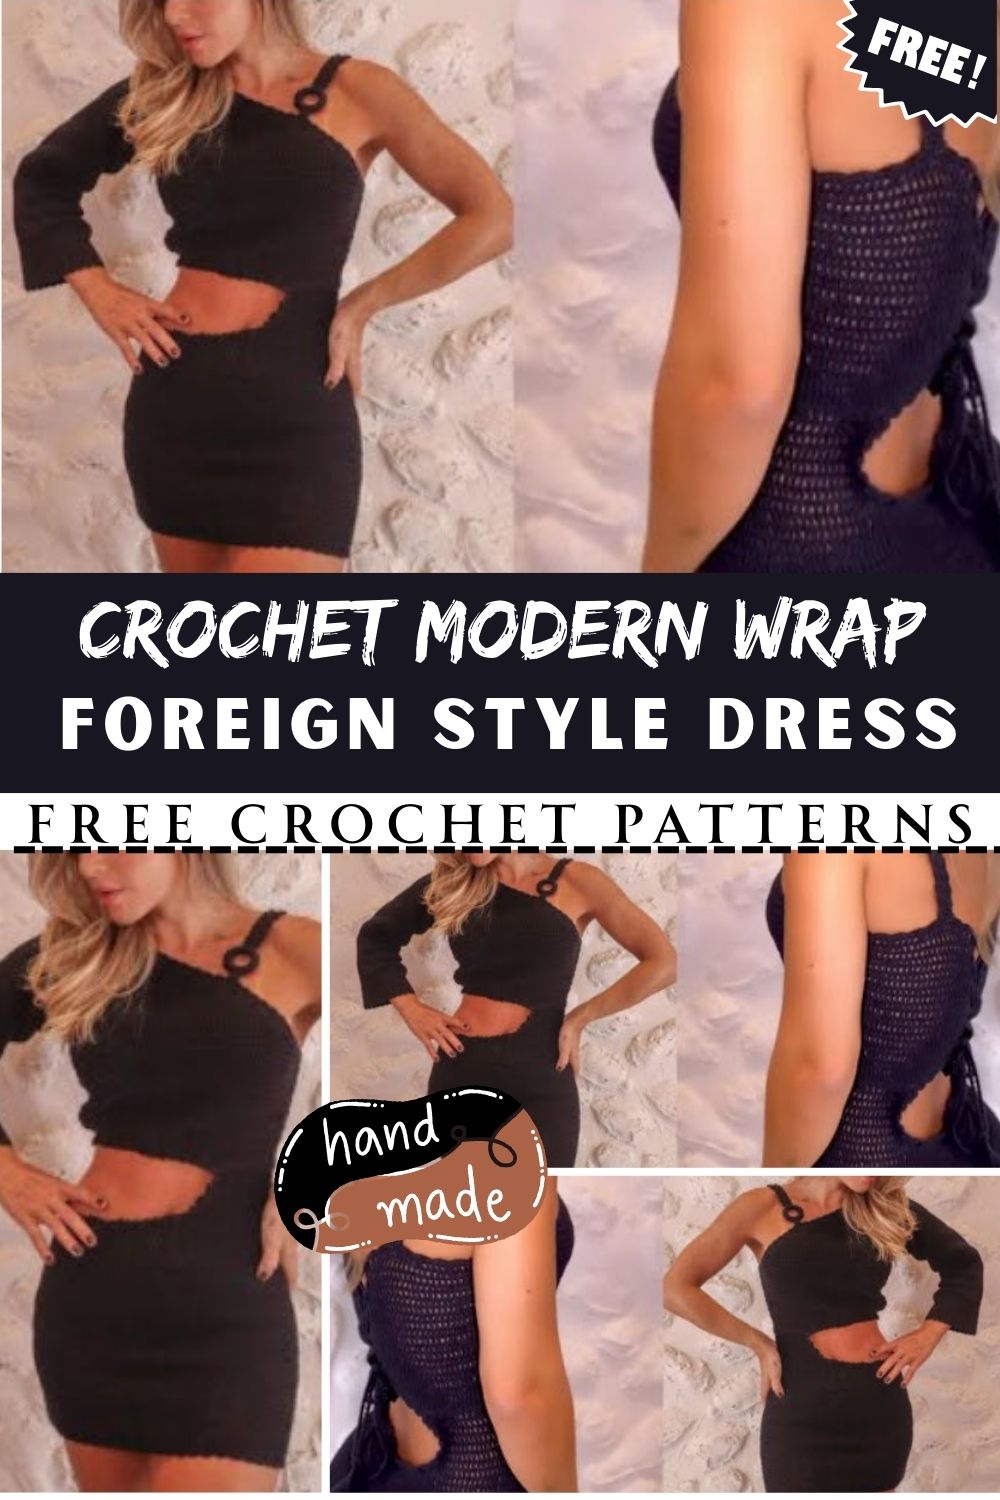
Customize length and sleeves for any season. Practical uses: wear it as a statement dress for dates or parties, layer it as a chic beach cover-up, or gift the handmade piece (or pattern) for birthdays, holidays, and bridal showers.
Passionate Crochet Modern Wrap Foreign Style Dress Pattern
Because you love modern style with handmade charm, this Passionate Crochet Modern Wrap Foreign Style Dress Pattern offers an elegant, foreign-inspired silhouette that feels easy, flattering, and fun to make. Moreover, the wrap fit adjusts gently to your shape, while the simple stitch repeats keep the process beginner-friendly and relaxing. Additionally, the dress layers beautifully over camis and slips, and it transitions effortlessly from brunch to beach to evening. For visual learners, although this guide stands on its own, you can use that URL as inspiration while you crochet.
What You’ll Make, at a Glance
- A modern wrap dress with clean lines, tidy texture, and soft drape.
- A customizable, size-inclusive fit with clear measuring guides.
- A confident beginner pattern built mainly on chain, single crochet, and half double crochet.
- A gift-worthy garment that looks boutique-made yet feels wonderfully approachable.
Because readability and flow matter to you, the following instructions use smooth transitions and short, clear steps. Additionally, you’ll see estimated making times for each stage, so you can plan your project with ease.
Items Needed
Because accurate materials lead to better results, choose quality yarn and a comfortable hook. Additionally, gather your tools before you begin so the project moves along smoothly.
- Yarn: DK weight (Category 3) with soft drape (cotton, bamboo, or cotton-blend recommended).
- Approximate yardage by size:
- XS: 875–950 yards (800–870 m)
- S: 1,050–1,150 yards (960–1,050 m)
- M: 1,200–1,350 yards (1,100–1,235 m)
- L: 1,375–1,550 yards (1,260–1,420 m)
- XL: 1,600–1,800 yards (1,465–1,645 m)
- 2X: 1,850–2,050 yards (1,690–1,875 m)
- 3X: 2,100–2,300 yards (1,920–2,105 m)
- 4X: 2,350–2,550 yards (2,150–2,335 m)
- 5X: 2,600–2,800 yards (2,380–2,560 m)
- If your DK skeins are ~250 m (273 yd) per 100 g, then you’ll need approximately:
- XS: 4 skeins
- S: 4–5 skeins
- M: 5–6 skeins
- L: 6 skeins
- XL: 6–7 skeins
- 2X: 7–8 skeins
- 3X: 8–9 skeins
- 4X: 9–10 skeins
- 5X: 10–11 skeins
- Approximate yardage by size:
- Hook: 4.5 mm (US 7) or size to meet gauge; optionally, a 4.0 mm for edging.
- Notions: 2 locking stitch markers, yarn needle, scissors, soft measuring tape, 4 stitch holders (or scrap yarn), and 2 removable safety pins for marking wrap tie placement.
- Blocking tools: Rustproof pins, blocking mats, and a spray bottle.
- Optional: 2 small snap fasteners or a hidden hook-and-eye for extra security at the crossover.
Because exact body measurements guide sizing, also measure:
- High bust and full bust
- Waist and high hip
- Desired dress length from shoulder to hem
- Desired sleeve opening (if adding sleeves)
- Shoulder width (tip to tip)
Sizing and Fit
Because wrap dresses need a comfortable overlap, choose a size based on your high bust and then check the waist and hip. Additionally, allow 2–4 inches (5–10 cm) of wrap overlap at the center front for security.
- Suggested finished bust (approximate garment measurements):
- XS: 32–34 in (81–86 cm)
- S: 36–38 in (91–97 cm)
- M: 40–42 in (102–107 cm)
- L: 44–46 in (112–117 cm)
- XL: 48–50 in (122–127 cm)
- 2X: 52–54 in (132–137 cm)
- 3X: 56–58 in (142–147 cm)
- 4X: 60–62 in (152–157 cm)
- 5X: 64–66 in (163–168 cm)
- Suggested length options:
- Mini: 34–36 in (86–91 cm)
- Midi: 40–43 in (102–109 cm)
- Tea: 44–47 in (112–119 cm)
Because personal proportions vary, lengthen or shorten the skirt panels as needed, and, importantly, keep the wrap ties aligned at your natural waist for the most flattering line.
Gauge and Swatch (15–30 minutes)
Because consistent fit depends on gauge, swatch before you start. Additionally, block the swatch so the numbers reflect your real fabric.
- Stitch pattern: Half double crochet (hdc) rows.
- Gauge target (after light blocking): 16 sts x 12 rows = 4 in x 4 in (10 cm x 10 cm) in hdc.
- Swatch steps:
- First, chain 24.
- Next, hdc in the second chain from the hook and across. Then chain 1, turn.
- Afterwards, hdc across for 16 rows.
- Then, block lightly and measure the center 4 in/10 cm.
- If you have more stitches than required, then go up a hook size; if fewer, then go down a size.
Because wrap dresses need drape, aim for a fabric that bends softly without large gaps.
Abbreviations and Stitches
Because clear terms boost confidence, use these standard US abbreviations:
- ch: chain
- sc: single crochet
- hdc: half double crochet
- dc: double crochet
- sl st: slip stitch
- st(s): stitch(es)
- RS/WS: right side/wrong side
- rep: repeat
Skill level: Confident beginner. Additionally, you only need to know how to work flat, seam, and edge evenly.
Construction Overview (5 minutes to review)
Because this modern wrap is modular, you will crochet it in three main rectangles: the Back Panel, Right Front Panel, and Left Front Panel. Additionally, you will seam shoulders, seam sides partially to shape the armholes, and then add edging and long waist ties. Optionally, you may add sleeves or leave it sleeveless for a breezy look. Consequently, this approach keeps shaping simple and sizing highly adjustable.
Step-by-Step Instructions with Times
Because pacing matters, each step includes an estimated time range for a relaxed, beginner-friendly speed. Additionally, time varies with size, yarn, and experience.
- Back Panel (3.5–6 hours)
- Purpose: Create the foundation that sets the width, length, and drape.
- Set-up:
- First, measure your desired back width from underarm to underarm; then multiply by your stitch gauge (sts per inch) to calculate your starting chain.
- Example: If your back width is 18 in and your gauge is 4 sts per inch, then chain about 72 + 2 for turning (74 total).
- Row 1 (WS): Hdc in second ch from hook and across; then ch 1, turn.
- Row 2 (RS): Hdc across; then ch 1, turn.
- Repeat: Rep Row 2 until your piece measures your desired length from shoulder to hem minus 1 in (2.5 cm) for final edging.
- Edge option: For a subtle texture, work every RS row in the back loop only (BLO) and every WS row through both loops; alternatively, keep all rows through both loops for maximum simplicity.
- Checkpoint:
- Because consistency prevents surprises, measure width and length every few inches.
- Meanwhile, place a marker at your natural waist so you know where the ties will sit later.
- Right Front Panel (2.5–5 hours)
- Purpose: Shape the first wrap side with a gentle diagonal.
- Set-up chain: Calculate 60% of your Back Panel chain count for the starting width (because the fronts overlap). For instance, if the Back Panel had 74 sts, then start with about 44–48 sts (rounding to an even number helps).
- Row 1: Hdc in second ch from hook and across; ch 1, turn.
- Rows 2–3: Hdc across evenly to establish height; ch 1, turn.
- Gentle wrap shaping:
- Next, on every RS row, hdc2tog over the last 2 sts to taper the neckline edge; then ch 1, turn.
- On every WS row, hdc evenly; ch 1, turn.
- Because you want a soft V, continue until the neckline edge tapers by about 25–35% of the original width, or until the panel reaches the same length as the Back Panel.
- Tip: Mark the neckline edge with a stitch marker so you decrease consistently on the same side.
- Left Front Panel (2.5–5 hours)
- Purpose: Mirror the right panel for the second wrap side.
- Set-up chain: Match the Right Front starting count.
- Rows 1–3: Work as for the Right Front.
- Mirror shaping:
- However, place your hdc2tog decreases at the opposite edge (the new neckline edge) on each RS row.
- Then, continue until the piece equals the Back Panel in length and mirrors the Right Front in width and slope.
- Shoulder Seams (15–30 minutes)
- Alignment:
- First, lay the Back Panel RS up; then place the Right and Left Front Panels RS down on top, aligning the shoulders.
- Next, ensure the front necklines meet at the center back neatly.
- Seaming:
- With yarn needle and mattress stitch (or whip stitch), sew shoulders from armhole edge inward for 3–5 in (7.5–12.5 cm), depending on size and shoulder width.
- Therefore, stop when the neck opening feels comfortable (generally 7–10 in wide).
- Try-on check:
- Afterwards, try it on carefully to confirm neck width and shoulder fit; adjust seam length if needed.
- Side Seams and Armholes (30–60 minutes)
- Measurements:
- Because armhole comfort is critical, mark down from the shoulder seam:
- Sleeveless armhole: 7–9 in (18–23 cm)
- Short sleeve armhole: 8–10 in (20–25 cm)
- Because armhole comfort is critical, mark down from the shoulder seam:
- Seaming:
- Next, seam from the hem upward to the marker on both sides.
- Consequently, leave the armhole openings unseamed.
- Fit check:
- Then, try it on to confirm ease at the bust and hip; adjust the side seams slightly if needed.
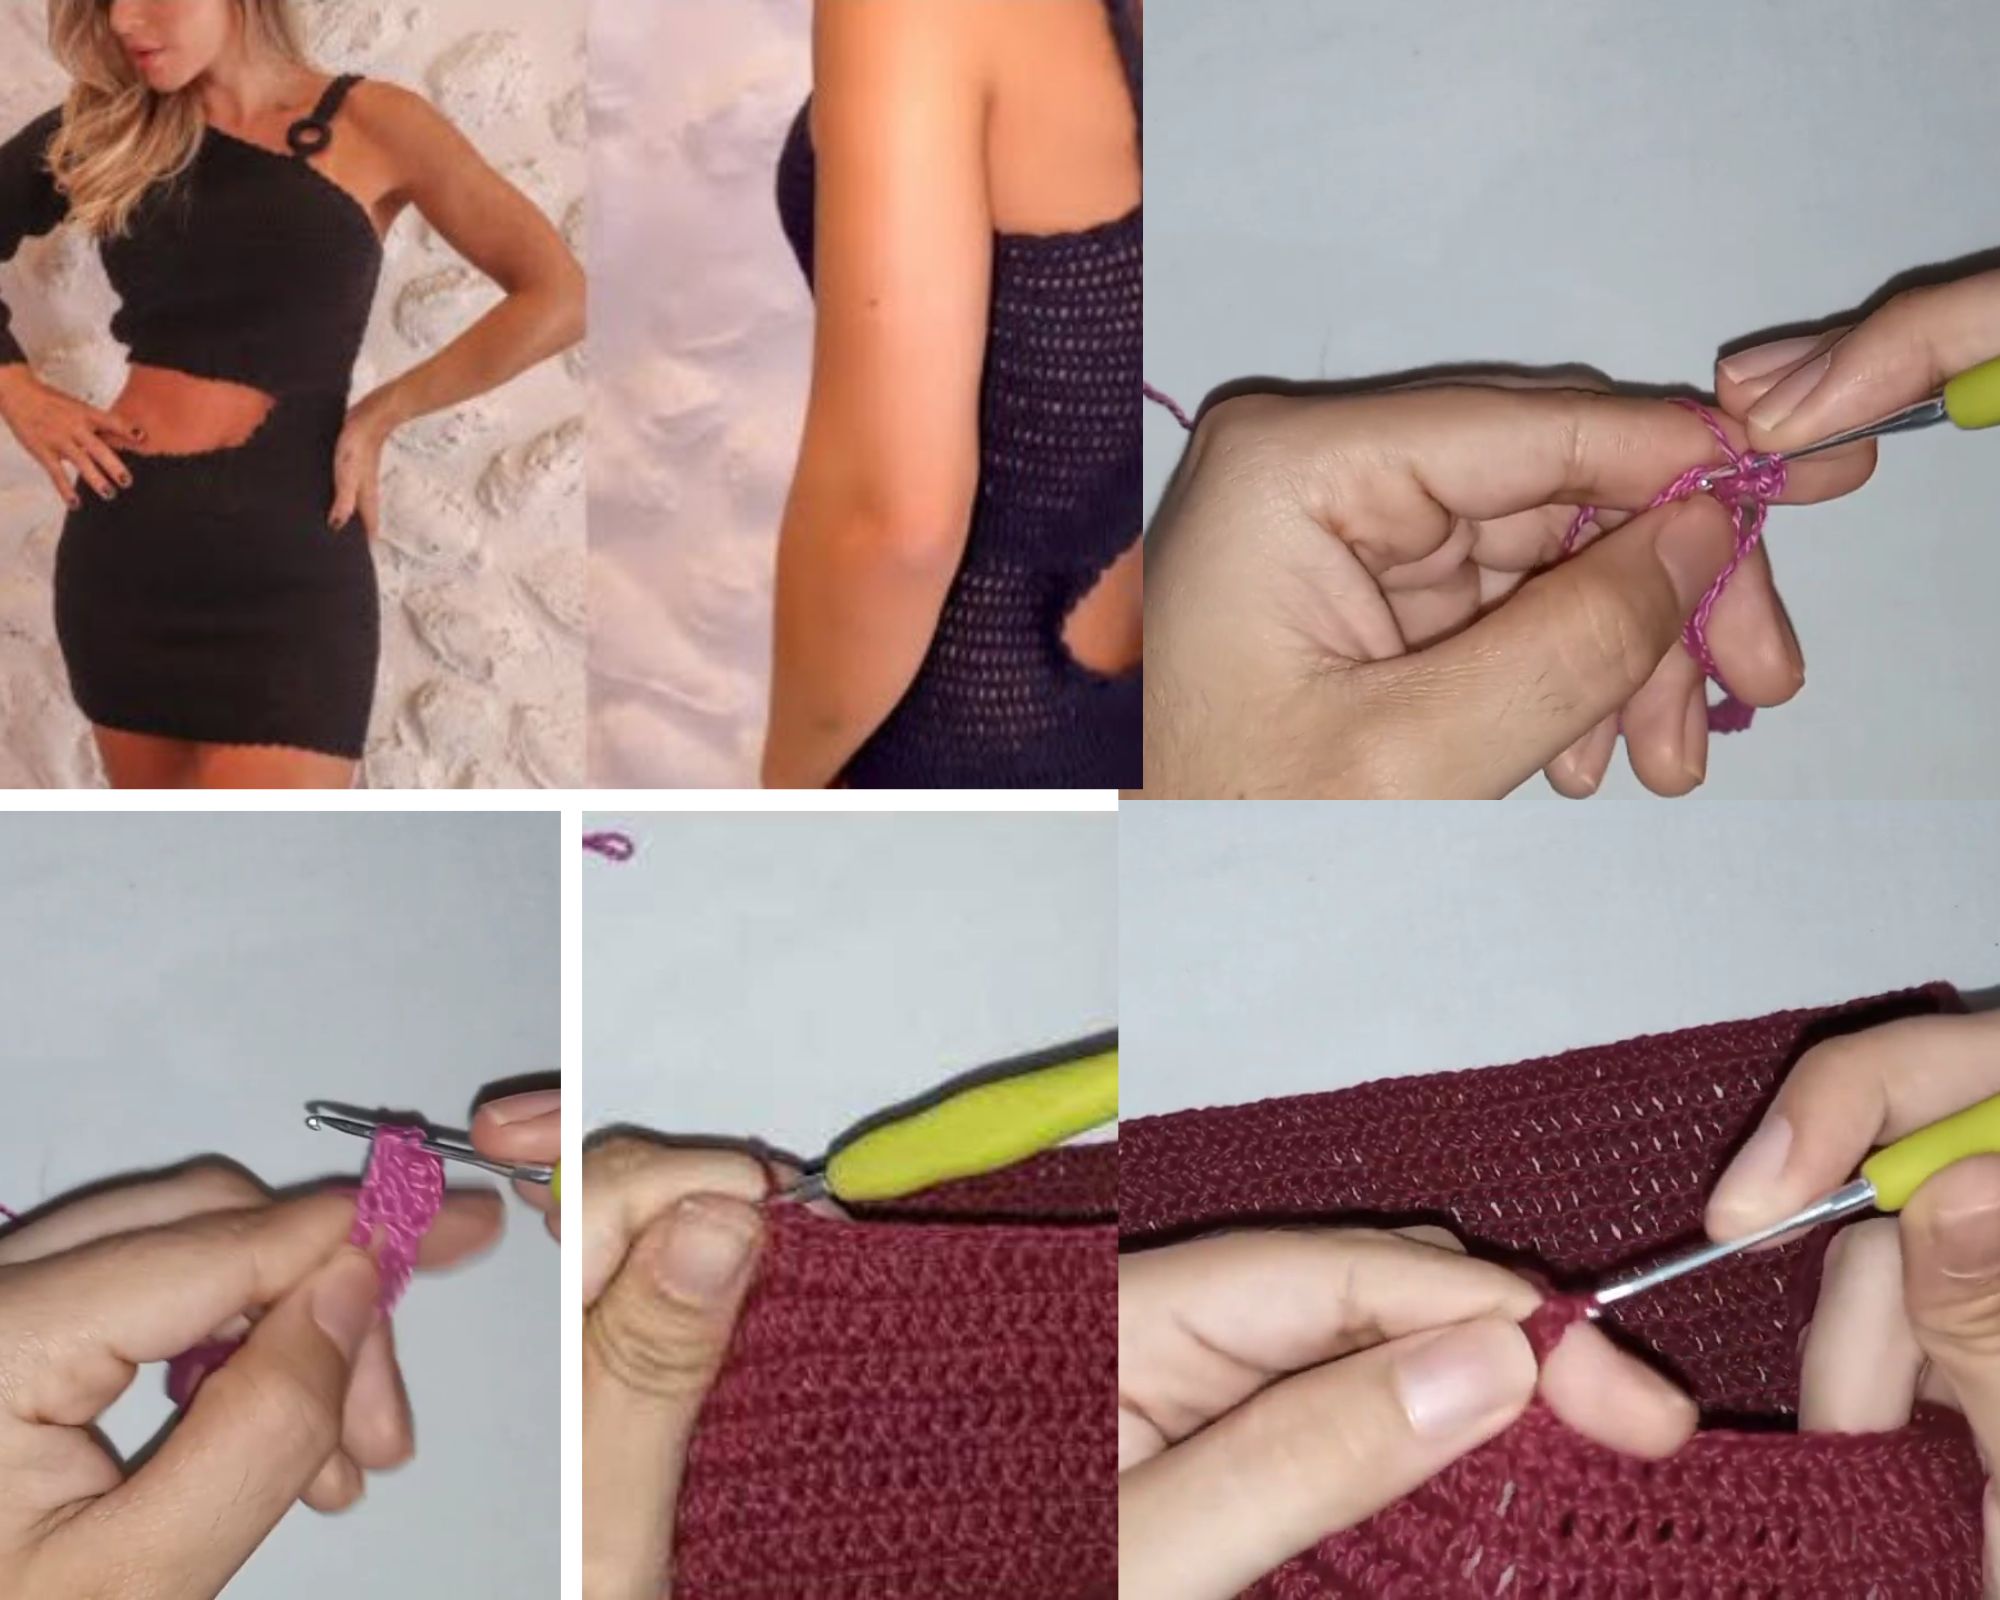
- Edging and Neckline Clean-Up (45–75 minutes)
- Neckline and front wrap edges:
- First, join yarn at the bottom hem of one front panel.
- Then, evenly sc up the front edge, around the back neck, and down the other front edge; place about 3 sc for every 2 rows to keep edges flat.
- Next, turn, ch 1, and work 1–2 more rows of sc for stability.
- Optionally, for a sleeker look, work one final row of sl st loosely.
- Hem edge:
- Afterwards, join yarn at one side seam along the hem; sc evenly across the hem for 1–2 rows to prevent flare.
- Because neat edges elevate the look, keep tension even, and avoid pulling too tight at corners.
- Waist Ties (40–90 minutes)
- Placement:
- Because wrap security matters, mark your natural waist on both fronts and the corresponding side seam of the inner wrap panel.
- Ties:
- Option 1 (crochet cord): Ch 120–160 for each tie (about 40–60 in/100–150 cm depending on size); then sl st back to create a flat cord.
- Option 2 (i-cord style): Ch 6, then work 1 row of sc; afterwards, fold lengthwise and sl st through both loops to form a thicker cord.
- Attachment:
- Next, securely sew one tie to the right-front waist edge and the other to the left-front waist edge.
- Additionally, create a small buttonhole-style opening:
- On the side seam of the inner wrap panel, skip 2–3 sts and reinforce the opening with overcast stitches so the inside tie can pass through cleanly.
- Because tie placement controls how the dress wraps, try on and adjust markers before final stitching.
- Optional Short Sleeves (1.5–3 hours)
- Pick-up:
- First, join yarn at the underarm; then sc evenly around the armhole.
- Body:
- Next, work hdc rounds for 3–6 in (7.5–15 cm), depending on desired sleeve length.
- Additionally, decrease 2 sts every other round if you prefer a slight taper.
- Finishing:
- Finally, add 1–2 rounds of sc for a neat cuff; fasten off and weave ends.
- Because sleeves add warmth and polish, choose them for cooler days; otherwise, enjoy the sleeveless style.
- Finishing and Blocking (45–90 minutes)
- End management:
- First, weave in all ends on the WS using a yarn needle.
- Block:
- Then, lay the dress flat on blocking mats, shape edges, and spray lightly with water.
- Afterwards, pin the neckline, front wraps, and hem so they dry smooth and straight.
- Closures (optional):
- Additionally, sew a tiny snap or hook-and-eye at the crossover if you want extra security.
- Final try-on:
- Finally, tie at the waist, smooth the wrap, and admire your handmade, foreign-style elegance.
Basic Tips for Success
Because a little preparation saves time, keep these tips handy:
- Swatch honestly and block it; then choose the hook that gives your target gauge.
- Mark your RS with a removable marker; consequently, your shaping stays consistent.
- Weigh your yarn after the back panel; then, plan yardage for fronts and ties accordingly.
- Try on after seaming shoulders and again after partial side seams; therefore, you can adjust armhole ease early.
- Work edging with a slightly smaller hook; as a result, edges sit flat and tidy.
- Steam lightly or spray-block; however, avoid heavy heat on acrylics.
Common Mistakes and How to Avoid Them
Because clarity prevents frogging, check these pitfalls:
- Too-tight chain foundation: Instead, use a larger hook for the starting chains; then switch back to your main hook.
- Uneven neckline decreases: Mark the neckline edge and decrease only on RS rows; consequently, the V-shape remains symmetrical.
- Skipping stitch counts at edges: Place a marker every 10 rows; afterwards, recount to stay on track.
- Wavy edges from crowded stitches: Evenly space edging stitches (roughly 3 sc for every 2 rows); moreover, avoid tugging at corners.
- Tie placement too high or low: Try on with markers at the natural waist; then, attach ties only after confirming placement.
Variations and Customization for (Crochet Modern Dress Pattern)
Because your style is personal, tailor the dress with these options:
- Texture swap: Instead of all hdc, alternate 2 rows hdc with 1 row dc for airy drape; consequently, the skirt flows more.
- Ribbed waist: Additionally, add a slim ribbed band (sc BLO for 4–6 rows) at the waist before attaching ties for gentle definition.
- Statement border: Moreover, finish the front edges with a 2–3 row shell pattern for a romantic touch.
- Sleeve options: Choose cap sleeves (2–3 in/5–7.5 cm), elbow-length sleeves (10–12 in/25–30 cm), or flutter sleeves (increase evenly every round).
- Length shifts: For a mini, stop at 34–36 in total length; for a midi, extend to 40–43 in; therefore, add rows evenly to both fronts and back.
- Color play: Because color changes add drama, stripe the skirt, color-block the bodice, or edge in a contrasting shade.
Detailed Sizing Tips
Because everybody is unique, follow these size-smart strategies:
- Bust and overlap: Choose a base size so the back panel matches your underarm-to-underarm measurement; then, let the fronts overlap by 2–4 in (5–10 cm) at the center front for secure coverage.
- Waist alignment: Mark your natural waist early and match tie placement to that line; consequently, the wrap cinches at the most flattering point.
- Hip ease: If your hips are fuller, then add 1–2 extra stitches at each side of the back panel (every 6–8 rows) for a gentle A-line.
- Torso length: If you’re long-waisted, then extend the bodice by 1–2 in (2.5–5 cm) before shaping the wrap; alternatively, if short-waisted, shorten slightly for balance.
- Armhole depth: Try on after shoulder seams; then, set armhole height so it neither digs nor gaps (typically 7–10 in).
Care and Wear for (Crochet Modern Dress Pattern)
Because handmade garments deserve love, wash your dress according to the yarn care instructions. Additionally, lay flat to dry and reshape the wrap edges while damp. Consequently, your dress will keep its modern lines and soft drape. Furthermore, style it with a slip, sandals, a belt bag, or layered jewelry; therefore, your look shifts from beachy to evening-ready in minutes.
Frequently Asked Quick Answers
- How long does the whole project take? Generally, 8–16 hours depending on size, speed, and sleeve choice.
- Which sizes are best for beginners? Start with XS–M or a sleeveless mini; then, attempt sleeves once comfortable.
- Can I use worsted-weight yarn? Yes; however, check the gauge and expect a bit more structure and less drape.
- Do I need closures besides ties? Not strictly; nevertheless, a discreet snap at the crossover adds confidence on windy days.
Why This Stays SEO-Friendly and Natural
Because we’ve woven the phrase Passionate Crochet Modern Wrap Foreign Style Dress Pattern into clear, helpful sentences, it reads naturally while remaining searchable. Additionally, descriptive headings, transitional wording, and beginner-first guidance boost readability and user experience. Consequently, you get a confident start, a smooth make, and a dress you’ll love to wear or gift.
Quick Recap Before You Start
- Swatch to confirm gauge; then pick your hook.
- Crochet Back, Right Front, and Left Front rectangles; subsequently, seam shoulders and sides.
- Add neat edging, secure waist ties, and optional sleeves; afterwards, block for a polished finish.
- Try on at key checkpoints; therefore, the fit stays custom and flattering.
Because your creativity deserves a pattern that adapts to you, this wrap dress balances simplicity with style. Additionally, it highlights handmade artistry while staying beginner-friendly and gift-ready. Finally, enjoy every stitch, and proudly wear your Passionate Crochet Modern Wrap Foreign Style Dress Pattern masterpiece wherever the day takes you.