Free Crochet Snow White Princess Doll Amigurumi Pattern
Fairy tale characters have always held a special charm in the enchanting world of amigurumi, and this beautiful Free Crochet Snow White Princess Doll Amigurumi Pattern is a perfect example of that appeal. Rosy cheeks, a lovely blue-and-yellow dress, and a tiny red bow tucked into her hair make her instantly recognizable at first glance. Beginners with basic single crochet skills will find this an easy and enjoyable project, while collectors will surely want to add her to their princess collection. Once you try this pattern, you’ll want to build a complete and beautiful set of all your favorite fairy tale characters.
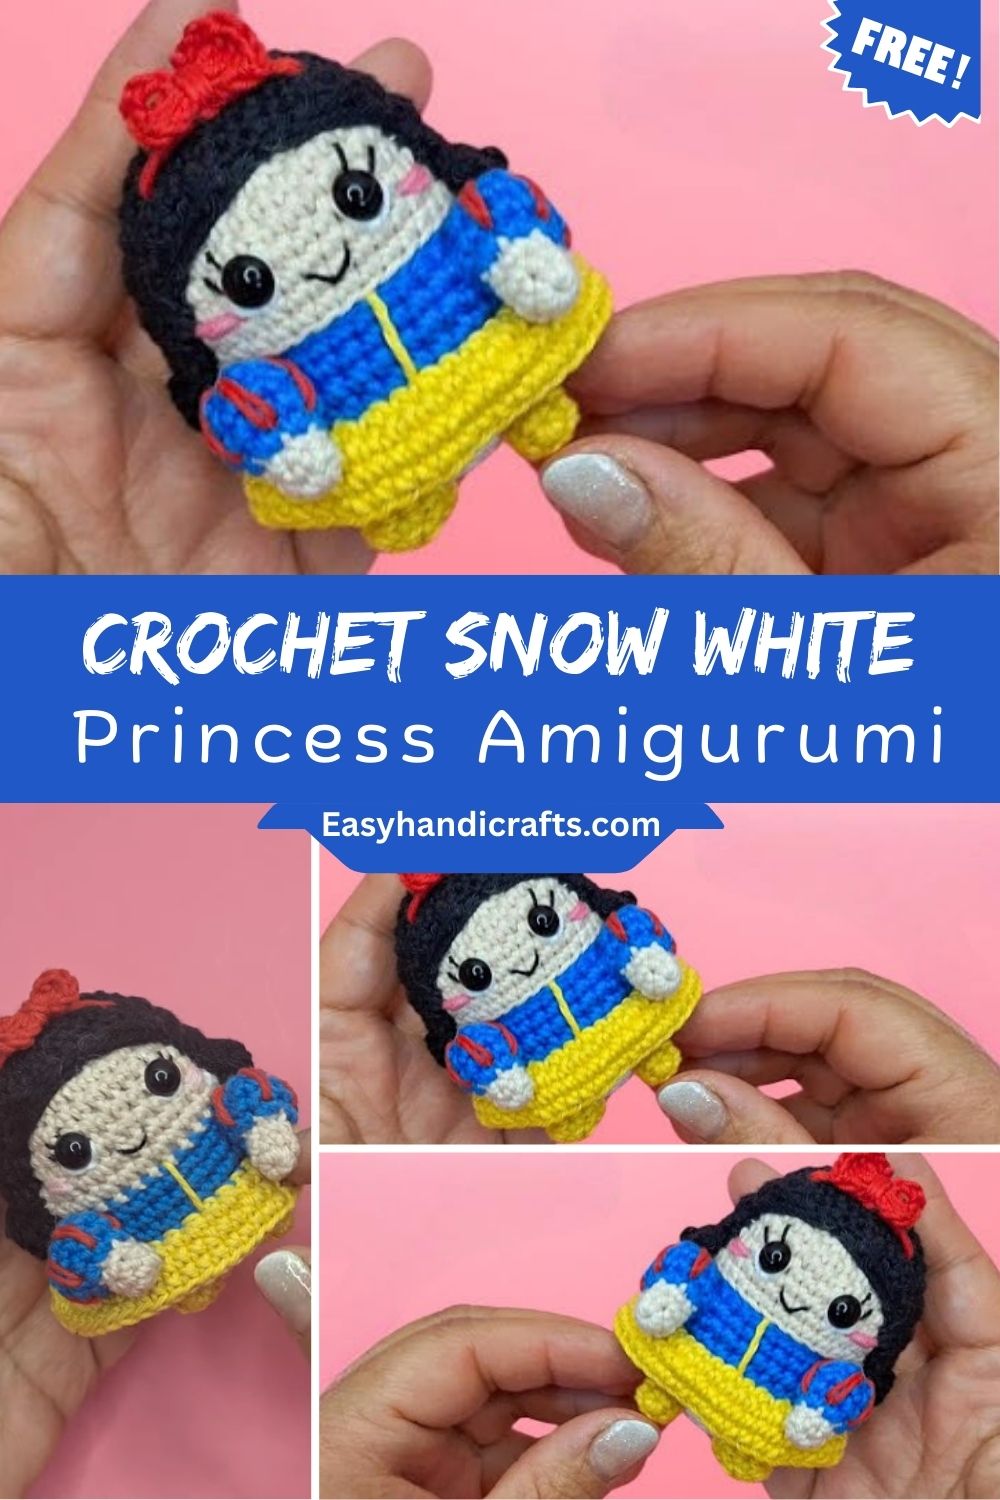
Small details like her puffed sleeves, dark hair, and tiny bow give the finished piece a polished, handmade quality. Once the individual pieces are complete, assembly is quick, and the transformation from separate parts into a recognizable character feels genuinely rewarding.
Project Details
- Skill Level: Beginner to Advanced Beginner
- Finished Size: Approximately 8–10 inches tall (varies by yarn and hook combination)
- Estimated Time Required: 6–10 hours, depending on experience
- Recommended Yarn Weight: DK or sport weight cotton-acrylic blend
- Crochet Hook Size: 2.5mm–3mm (adjust based on yarn weight for a tight, stuffing-proof fabric)
Materials Needed
- Skin-tone yarn (for face, arms, and legs)
- Royal blue yarn (for the bodice and skirt)
- Yellow yarn (for sleeves and skirt panel)
- Black or dark brown yarn (for hair)
- Red yarn (for the bow)
- White yarn (for the collar trim)
- 2.5mm–3mm crochet hook
- Small safety eyes (4–5mm) or black embroidery thread for a safety-conscious version
- Fiberfill stuffing
- Tapestry needle
- Stitch markers
- Scissors
- Optional: pink blush pastel for embroidered cheeks, small ribbon or bead for extra accessories
Crochet Stitches & Techniques
This pattern uses a manageable set of amigurumi basics, so nothing here should intimidate a beginner willing to learn a couple of new tricks along the way.
- Magic Ring – forms the tight starting point for the head, body, and limbs
- Single Crochet (sc) – the primary stitch used throughout the doll
- Increase (inc) – two single crochets worked into one stitch to shape rounded parts
- Invisible Decrease (dec) – keeps decrease rows smooth and nearly seamless
- Chain Stitch (ch) – used for connecting pieces and starting flat sections like hair strands
- Slip Stitch (sl st) – closes rounds and joins seams neatly
- Color Changes – swapping yarn mid-round to create the dress and hair details
- Fastening Off – securing the final stitch before weaving in ends
- Sewing Pieces Together – whip stitch or mattress stitch to join limbs, hair, and accessories
Pattern Instructions
Making the Head
Begin with skin-tone yarn and work a magic ring of six stitches, increasing evenly over the next few rounds until the head reaches roughly 24–30 stitches around. Continue several rounds without shaping to build height, then gradually decrease while stuffing firmly as you go. A smooth, evenly stuffed head makes every later step easier, since facial features rely on a solid surface underneath.
Crocheting the Body
Switch to blue yarn once the head is complete, or crochet the body as a separate piece depending on your preferred assembly style. Build the body with a similar magic ring start, increasing to the desired width, then work straight rounds for the torso before narrowing slightly at the waist. Stuff lightly as you close the final rounds so the body stays soft enough for sewing.
Arms and Legs
Legs typically begin in yellow or skin tone for shoes, transitioning to skin tone for the leg itself, then finishing in blue or white to blend into the dress hem. Arms follow a smaller version of the same shaping logic: a tiny magic ring, gentle increases for the hand area, then straight rounds up to the shoulder, finished in a sleeve color if desired. Keep limbs slightly understuffed near the joining point so they sew on smoothly.
Hair
Dark hair strands can be crocheted as individual chains that get sewn onto the head in layers, or worked directly onto the head using surface crochet techniques for a fuller, more secured look. Start at the crown and work outward in sections, building volume gradually rather than all at once. A center part and slightly waved side pieces give the classic Snow White silhouette without needing an overly complex hairstyle pattern.
Dress and Bodice Details
The signature look comes from layering colors rather than complex stitch patterns. Crochet a fitted blue bodice first, then add a yellow skirt panel and puffed sleeves using simple increase rounds. A thin strip of white yarn sewn around the collar creates the classic Peter Pan-style neckline, while a small red bow stitched at the back finishes the silhouette beautifully.
Facial Features
Position safety eyes carefully before final stuffing, spacing them evenly and testing placement with pins first. Embroider small black eyebrows above the eyes and a subtle pink or red mouth using simple straight stitches. Light pink blush on the cheeks, added with a bit of pastel or embroidery, brings warmth and life to the finished face.
Joining All Pieces
Pin the arms, legs, and hair onto the body before sewing anything permanently, checking proportions from multiple angles. Once everything looks balanced, sew each piece securely using a whip stitch, weaving in loose ends as you finish each attachment. Working slowly through this stage prevents lopsided limbs or a crooked head later on.
Final Assembly
Attach the finished head to the body, adjusting the neck angle slightly forward for a more lifelike pose. Secure the bow, smooth any stray yarn ends, and give the hair a final trim or shape if needed. A quick check under good lighting helps catch any uneven stuffing or visible gaps before calling her complete.
Tips for Success
- Count stitches at the end of every round to catch mistakes early
- Use a stitch marker on the first stitch of each round for easy tracking
- Stuff firmly but evenly, adding small amounts at a time rather than one large clump
- Weave in yarn ends through several stitches for a secure, invisible finish
- Test eye placement with pins before locking safety eyes in permanently
- Work with a slightly smaller hook than the yarn label suggests for tighter, stuffing-proof fabric
Personalization Ideas
- Swap the blue and yellow palette for another princess-inspired color scheme
- Create a seasonal version with festive colors for Christmas or Halloween displays
- Change the facial expression with a slightly upturned or closed-eye embroidery style
- Add a tiny woven basket, apple, or forest animal as a companion accessory
- Crochet a mini keychain-sized version using thread-weight yarn and a smaller hook
- Turn the finished doll into an ornament by adding a loop at the top of the head
Common Mistakes to Avoid
Rushing through the increase rounds often leads to a lumpy or uneven head shape, so slow down and count carefully during shaping rows. Overstuffing tends to distort the doll’s proportions, while understuffing leaves the fabric floppy and prone to sagging over time. Skipping the pinning stage before sewing frequently results in crooked limbs, so always test placement first. Loose tension around color changes can also leave visible gaps, so pull yarn snug when switching colors mid-round.
Frequently Asked Questions
What yarn works best for this Crochet Snow White Princess pattern?
A cotton-acrylic blend in DK or sport weight gives good stitch definition while remaining soft enough for a child’s toy.
Can I make this doll without safety eyes?
Yes, embroidered eyes with black thread work well and are a safer option for very young children.
How long does the whole Crochet Snow White Princess project usually take?
Most crocheters finish in six to ten hours, spread across a few crafting sessions.
Is this pattern suitable for a first amigurumi project?
It works well for confident beginners who already know magic ring, single crochet, and basic shaping.
What size hook should I use?
A 2.5mm to 3mm hook paired with DK weight yarn typically produces the right density for stuffing.
Can I turn this into a different character?
Absolutely, changing the dress and hair colors easily transforms her into another princess or original character.
How do I keep the hair from unraveling?
Secure each strand with a few tight stitches at the base and add a small dot of fabric glue if extra hold is needed.
Conclusion
Making a Crochet Snow White Princess amigurumi is a satisfying project that rewards patience with a genuinely charming result. Every stage, from the first magic ring to the final bow, builds skills that carry over into future doll patterns. Give this project a try, and share a photo of your finished princess with the crochet community once she’s complete.