Free Crochet Valentine Hearts Pattern for Beginner Friendly
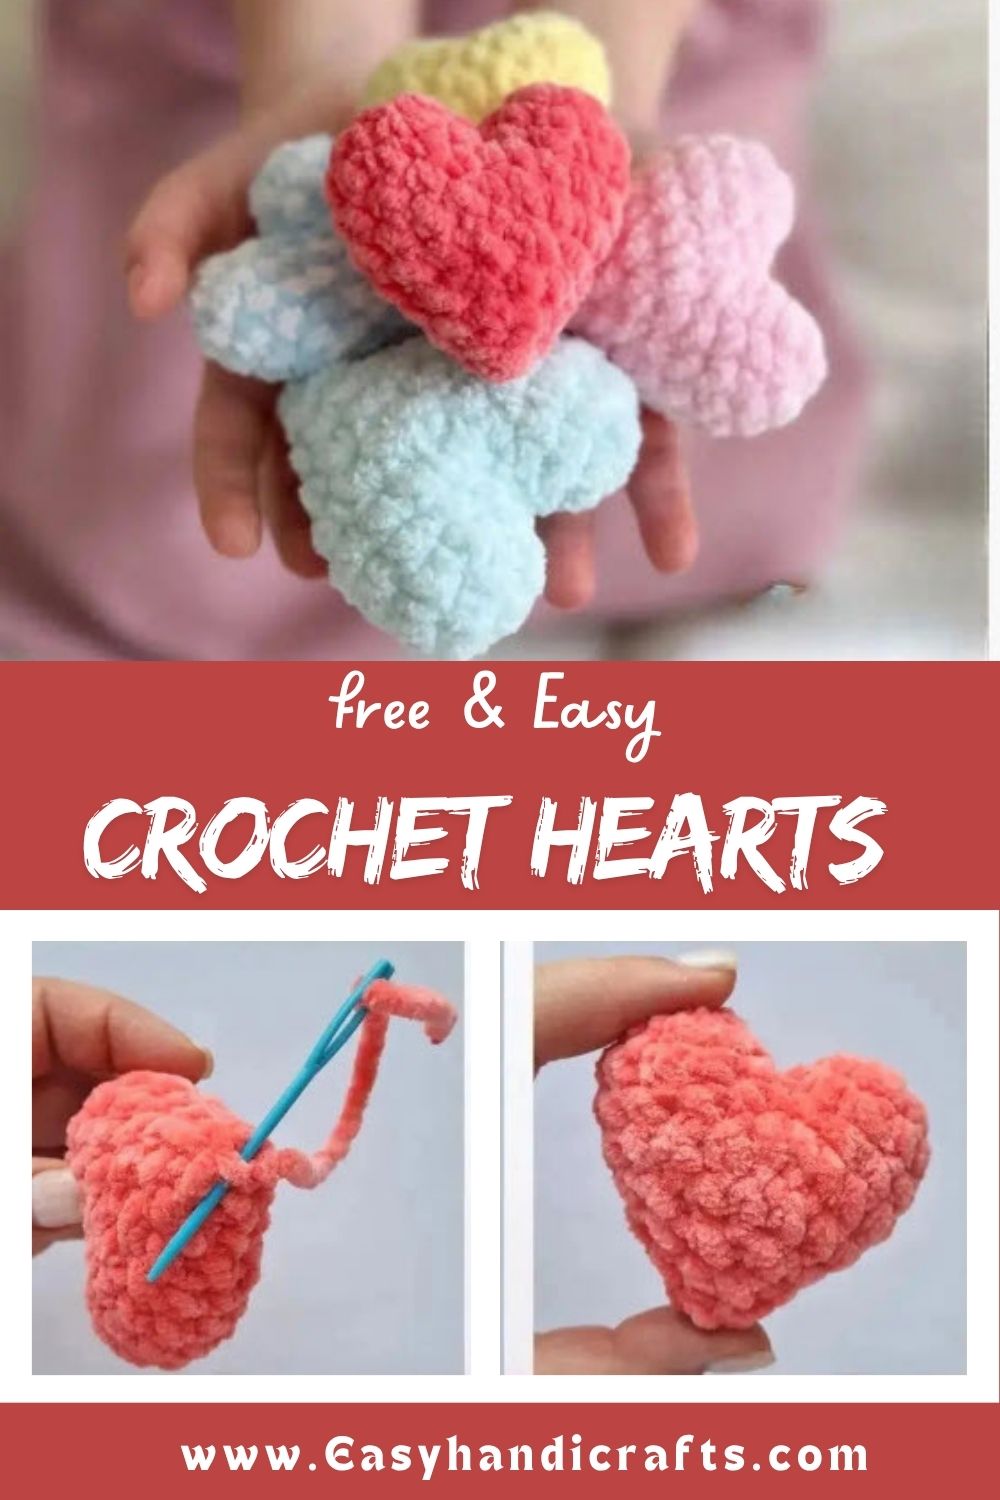
Grab your hook because these squishy Crochet Valentine Hearts are about to become your new favorite Valentine’s project. Two simple pieces, one chunky yarn, and a beginner can finish this in no time.
Want a crochet pattern that’s both easy and quick to finish? This is the perfect choice. With soft chenille yarn and a 3.5mm hook, you create two simple pieces, then stuff them and shape them into a soft, huggable heart. Thanks to the clean stitching, the seam is almost invisible, making the finished heart look remarkably polished and professional, even though it’s surprisingly simple to make.
Skill Level
Low-key, this Crochet Valentine Hearts pattern suits total beginners well. You only need basic stitches like single crochet, increases, and decreases, plus simple assembly steps, making it ideal for anyone starting amigurumi.
Pattern Overview
- The Crochet Valentine Hearts is built from two separate lobes that are joined together mid-pattern.
- Each lobe starts in a magic ring and grows through a single increase round.
- Once connected, the two pieces merge into one continuous round of stitches.
- A gentle decrease sequence shapes the rounded top and pointed bottom of the heart.
- Fiberfill is added midway through so the final rounds close around a firm, huggable shape.
- The whole project works up quickly, usually in well under an hour once you’re comfortable with the flow.
- Because the heart is worked in the round with no separate front and back panels, there’s very little sewing involved beyond closing one small gap.
- The chunky chenille yarn does a lot of the visual work here, giving the finished heart a soft, plush texture without needing extra embellishment.
Special Techniques
- Magic ring start: Both lobes begin in a magic ring, which keeps the top of the heart tight with no visible gap.
- Piece joining: A single connecting stitch links the two lobes into one continuous round instead of two separate pieces sewn later.
- Hidden seam closure: The small hole left between the lobes gets sewn shut with the leftover yarn tail, so no visible seam shows on the finished heart.
- Progressive stuffing: Fiberfill goes in halfway through the decrease rounds, then topped off just before closing, which keeps the shape even and prevents lumps.
- Marking the round start: Since the joining stitch shifts where each round technically begins, placing a stitch marker right after connecting the lobes keeps your stitch counts accurate for the rest of the pattern.
Materials
You’ll only need a handful of basic supplies to get started:
- 14ply chenille yarn, Himalaya Dolphin Baby 100g/120m or a similar alternative
- Hook, 3.5 mm
- Large eye needle
- Fiberfill
- Scissors
Real talk, if you can’t find the exact yarn brand listed, any soft 14ply chenille yarn with a similar yardage will work just as well. The plush texture is what gives these hearts their signature cuddly look, so avoid swapping in a thin, smooth yarn if you want that same finish.
Abbreviations
MR – Magic Ring | CH – Chain | SLST – Slip Stitch | SC – Single Crochet | INC – Increase (2sc in one stitch) | DEC – Decrease (2sc together) | ()*5 – Repeat instructions 5 times
Instructions
Round 1–3 (First Part):
- 5sc in MR, or ch2 and 5sc in the second chain from hook (5)
- 5inc (10)
- 10sc (10)
Slip stitch, cut the yarn, leaving a tail about 10cm long.
Round 1–3 (Second Part):
- 5sc in MR, or ch2 and 5sc in the second chain from hook (5)
- 5inc (10)
- 10sc (10)
Crochet 2 extra sc (see photo for placement).
Take the first part and insert your hook into the next stitch after the slip stitch. Work 1 sc to connect the pieces. This single sc becomes the first stitch of the next round, so mark it with a stitch marker.
Round 4 (Joining Round): Crochet 10 sc on the first part, including the 1 sc that connected the two pieces, then immediately crochet 10 sc on the second part, forming one common round of 20 sc (20).
There will be a small hole between the two pieces. Using your needle and the yarn tail left over from the first part, sew this hole closed, then fasten the end inside the heart.
Round 5–9 (Shaping and Stuffing): 5. 20sc (20) 6. (2sc, dec)*5 (15) 7. (dec, 1sc)*5 (10) 8. 10sc (10)
Stuff the heart at this point.
- 5dec (5)
Add the remaining fiberfill until the heart is fully stuffed. Cut the yarn, pull the tail through the closing hole with your needle, fasten off, and hide the end inside the heart.
Customization and Variation
- Swap in different chenille colors to make a rainbow set of hearts instead of a single shade.
- Use a thinner yarn weight with a smaller hook for a mini keychain-sized heart.
- Add a small crochet loop at the top point for hanging as an ornament or garland piece.
- Mix two colors within one heart by switching yarn partway through the rounds for a two-tone look.
- Embroider a small initial or tiny flower onto the front for a personalized gift touch.
- Try a fuzzy or speckled yarn instead of solid chenille for a completely different textured look on the same base pattern.
Common Mistakes
- Pulling the magic ring too loose, which leaves a visible gap at the top of the lobes.
- Skipping the stitch marker after joining the pieces, which makes it easy to lose track of the round’s start.
- Under-stuffing before the final decrease rounds, leaving the heart soft and floppy instead of firm.
- Rushing the seam closure, which can leave a small hole visible between the two lobes.
- Miscounting the decrease rounds, which throws off the heart’s pointed bottom shape.
- Using a hook size that’s too small or too large for the yarn weight, which can make the stitches too tight to work through or too loose to hold their shape.
Finishing Tips
- Weave in all yarn tails securely before setting the heart aside, so nothing unravels with handling.
- Use a blunt large-eye needle for sewing the seam, since it slides between stitches without splitting the yarn.
- Steam-block chenille lightly if the stitches look uneven, but avoid direct heat since chenille yarn can flatten.
- Fluff the yarn gently with your fingers after stuffing to hide any tight or uneven stitches.
- Check the shape from multiple angles before fastening off completely, so both lobes look symmetrical.
- Give the finished heart a gentle squeeze test to check the firmness feels even throughout before calling it done.
Gifting Ideas
- String several hearts together on a ribbon for a Valentine’s garland.
- Attach a single heart to a gift tag for a handmade touch on wrapped presents.
- Bundle a few hearts in a small jar or pouch as a quick, low-cost gift.
- Turn one heart into a keychain or bag charm with a small clasp.
- Pair a heart with a handwritten card for a simple, thoughtful Valentine’s Day gift.
- Sew a few hearts onto a plain hairband, headband, or hat for a cute wearable accessory.
Important Remarks
The reference photos for this pattern carry a watermark from easyhandicrafts.com, so credit belongs to that source for the original styling and photography. The written pattern above has been organized and explained independently for clarity and ease of use.
Conclusion
No joke, this Crochet Valentine Hearts pattern is one of the quickest, most rewarding amigurumi projects to keep in your rotation. With just a handful of supplies and a couple of simple techniques, you’ll have a soft, plump heart ready for gifting, decorating, or just keeping for yourself. Try a few colors, experiment with size, and you’ll have a whole basket of hearts ready before Valentine’s Day arrives.