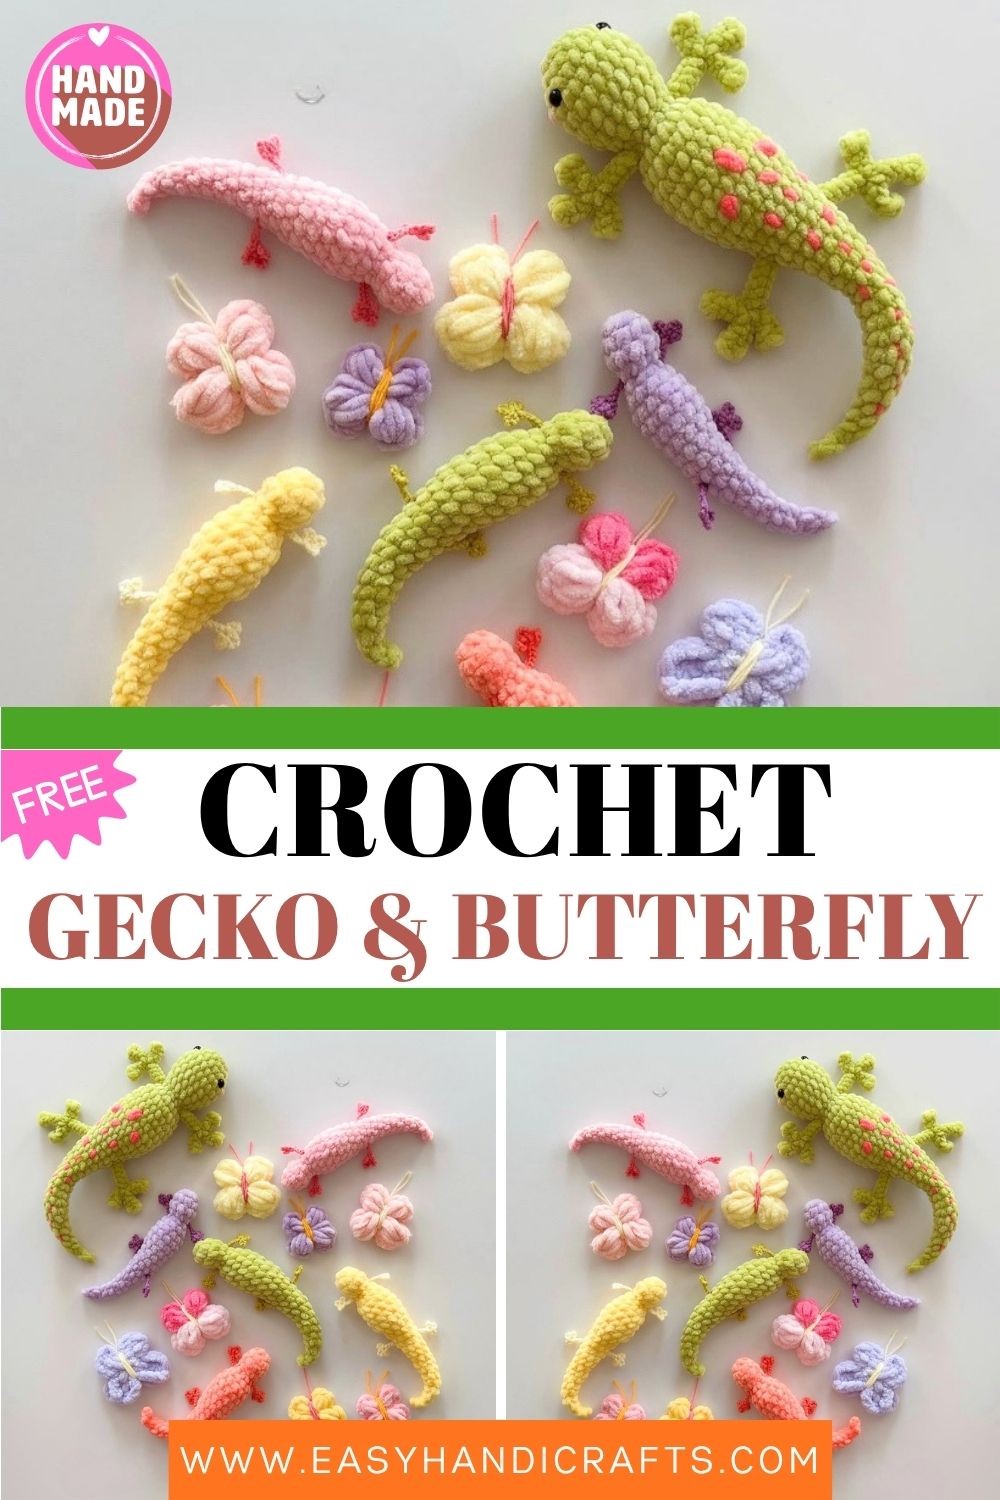
Handmade Pastel Gecko & Butterfly Crochet Set | Rainbow Kawaii Plush
This tiny pastel gecko with delicate toes and a tapered tail is the most charming little reptile you will ever crochet!
Not every amigurumi pattern starts at the head and travels all the way down to the tip of the tail. This mini gecko pattern does exactly that. It works from the rounded head through the plump body and gradually tapers down into a long, slim tail, all in one continuous piece with no seams to worry about along the main body. Furthermore, the legs are added afterward using a simple chain and slip stitch technique that creates three perfectly spaced toes on each foot without any complicated construction. The result is a tiny gecko that looks impressively detailed for such a small and beginner-accessible pattern. In addition, the combination of Himalaya Dolphin Baby for the body and Yarn Art Jeans for the toes creates a wonderful texture contrast that makes the finished piece feel genuinely handcrafted and thoughtful. Whether you choose soft pastels, bright rainbow tones, or a realistic gecko colorway, this little lizard is endlessly customizable and deeply satisfying to make from the very first magic ring to the very last woven-in end.
Skill Level
Beginner to intermediate. Single crochet, increase, and decrease are the only stitches used in the body. Additionally, the leg technique uses chains and slip stitches, which are easy to master with one practice attempt.
Materials You Will Need
Yarn:
- Himalaya Dolphin Baby, any color you love for the body
- Yarn Art Jeans for the legs and toes
Other Supplies:
- Crochet hook — 3.5 mm for the body
- Crochet hook — 2.0 mm for the legs and toes
- Stitch marker
- Yarn needle
- Scissors
- Fiberfill stuffing
- Embroidery thread for the tongue and toe details
Abbreviations
- MR — Magic Ring
- SC — Single Crochet
- INC — Increase (2 sc in the same stitch)
- DEC — Decrease (invisible decrease)
- RND — Round
- CH — Chain
- SLST — Slip Stitch
- FO — Fasten Off
Pattern: Mini Gecko Body
The gecko is worked from the head down to the tip of the tail in one continuous piece.
Rnd 1: 6 sc in MR (6) Rnd 2: (sc, inc) x3 (9) Rnd 3: 9 sc (9) Rnd 4: (sc, dec) x3 (6) Rnd 5: (sc, 2 inc) x2 (10) Rnd 6: (4sc, inc) x2 (12) Rnd 7–11: 12 sc for 5 rounds (12) Rnd 12: (4sc, dec) x2 (10) Rnd 13: 10 sc (10) Rnd 14: dec, 8 sc (9) Rnd 15: 9 sc (9) Rnd 16: dec, 7 sc (8) Rnd 17: 8 sc (8) Rnd 18: dec, 6 sc (7) Rnd 19: 7 sc (7) Rnd 20: dec, 5 sc (6) Rnd 21: 6 sc (6) Rnd 22: dec, 4 sc (5) Rnd 23: 5 sc (5) Rnd 24: dec, 3 sc (4) Rnd 25: 4 sc (4) Rnd 26: dec, 2 sc (3) Rnd 27: dec, sc (2) Rnd 28–30: 2 sc for 3 rounds (2) Rnd 31: Fasten off.
Stuffing notes: Stuff the body gradually as you work through the rounds. Furthermore, do not stuff the last 10 rounds (Rnd 21–30). Leaving the tail unstuffed allows it to taper naturally and lie flat for a realistic gecko silhouette.
Pattern: Legs — Make 4
Using Yarn Art Jeans and 2.0 mm hook
Attach the yarn directly to the body at the leg position.
Chain 11. Count 5 stitches from the hook and work a slst into that stitch — first toe complete.
Chain 4 and slst into the 5th stitch — second toe complete.
Repeat the same process for the third toe.
Then work 5 slst back along the main chain toward the body.
Fasten off, cut yarn, and weave in all ends carefully.
Make all 4 legs the same way. Position the front legs around Rnd 6–7 and the back legs around Rnd 11–12 for a natural, balanced stance.
Tongue detail: Use a short length of red or pink embroidery thread. Thread through the tip of the head at Rnd 1 and leave two short equal tails extending from the front. Knot securely at the base and trim to your preferred tongue length.
Customization and Variation Ideas
- First, use a hand-dyed or self-striping yarn for the body so the color shifts automatically through the rounds. This creates a natural scale-pattern effect without any color change work.
- Additionally, add tiny French knot spots along the back using contrasting embroidery thread. This mimics the markings of a leopard gecko and adds beautiful surface detail.
- Moreover, experiment with the leg length by adding extra chains before placing the toes. Longer legs give the gecko a more spider-like, elongated look that photographs dramatically.
- Furthermore, make a matching pair in complementary colors — a mint gecko and a peach gecko displayed side by side create a sweet kawaii set.
- Also, add small safety eyes or embroider simple dot eyes using black thread. Embroidered eyes give a softer expression, while safety eyes create a more classic amigurumi look.
- Finally, crochet a tiny leaf or branch using green yarn and display the finished gecko perched on top of it for a complete nature-themed scene.
Common Mistakes to Avoid
- First, losing track of the round count during the long tail section: Use a stitch marker consistently from Rnd 1 onwards. The gradual decreases in the tail are easy to miscount without one.
- Additionally, stuffing the tail: Do not stuff Rnd 21 onwards. Stuffed tails become stiff and bulky and lose the slim, tapered shape that makes the gecko look realistic.
- Also, attaching legs unevenly: Mark all four leg positions with pins before attaching any of them. Stand the gecko upright and check the balance from all angles before committing.
- Furthermore, using the wrong hook for the legs: The 2.0 mm hook is essential for the Yarn Art Jeans leg yarn. Using the larger body hook creates loose, floppy legs that do not hold their shape.
- Moreover, cutting the tongue embroidery thread too short: Leave slightly more thread than you think you need before knotting. A gecko tongue that is too short loses its character immediately.
- Finally, pulling the magic ring too tight at Rnd 1: A too-tight ring makes Rnd 2 very difficult to work into. Pull it snug, but leave just enough space to insert the hook comfortably for the next round.
Finishing Tips
- First, after completing all four legs, lay the gecko flat and gently adjust each leg outward so all toes point away from the body. This final shaping step takes thirty seconds and makes a significant visual difference.
- Additionally, use the yarn needle to carefully separate any toe loops that stuck together during the slip stitch construction. Each toe should be clearly defined for the best finished look.
- Moreover, weave in every tail end through at least three direction changes before trimming. Dolphin Baby yarn is fluffy and hides ends beautifully,y but only when they are properly anchored.
- Furthermore, a gentle steam press over the body using a damp cloth helps even out any tension bumps in the decreasing tail section without flattening the stuffed body.
- Also, if the head looks slightly asymmetric after finishing, insert a tapestry needle through the top and wiggle gently to redistribute the stuffing inside before the fiberfill settles.
- Finally, photograph the finished gecko from above on a light background. The tapered tail, tiny toes, and textured body all read beautifully from a top-down angle.
Gifting Ideas
- First, nestle the finished gecko inside a small wooden box lined with dried moss for a nature-themed gift presentation that looks genuinely curated and special.
- Additionally, make a matching set of two geckos in coordinating pastel colors and package them together as a kawaii reptile duo. Pair with a small handwritten care card for a personal touch.
- Moreover, these geckos make wonderful gifts for children who love animals and reptiles. They are soft, squeezable, and have no small removable parts if eyes are embroidered rather than safety eyes.
- Furthermore, attach a small keychain ring to the finished gecko for a handmade bag charm that reptile lovers will genuinely use and appreciate every single day.
- Also, consider selling these at craft fairs alongside a small sign explaining the yarn brands and colors used. Buyers love knowing the story behind a handmade piece.
- Finally, gift a gecko alongside a small terrarium plant or air plant for a nature-lover’s gift set that feels cohesive, creative, and completely original.
Conclusion
This mini gecko pattern is a masterclass in how much personality a simple set of stitches can create. The head-to-tail construction makes the whole piece feel satisfying and logical to work through. Furthermore, the chain-and-slip-stitch legs are clever, quick, and produce results that look far more complex than they actually are. Therefore, use your stitch marker faithfully, resist the urge to stuff the tail, and take your time placing the legs evenly. In addition, do not skip the embroidered tongue; it is a tiny detail that gives this little gecko an enormous amount of charm. In conclusion, whether you make this in rainbow pastels, realistic earth tones, or your own completely original colorway, this gecko will be one of those finished pieces you keep coming back to admire.
Happy crocheting! Cannot wait to see your tiny gecko come to life.