Kawaii Crochet Teapot Amigurumi | Handmade Plush Gift

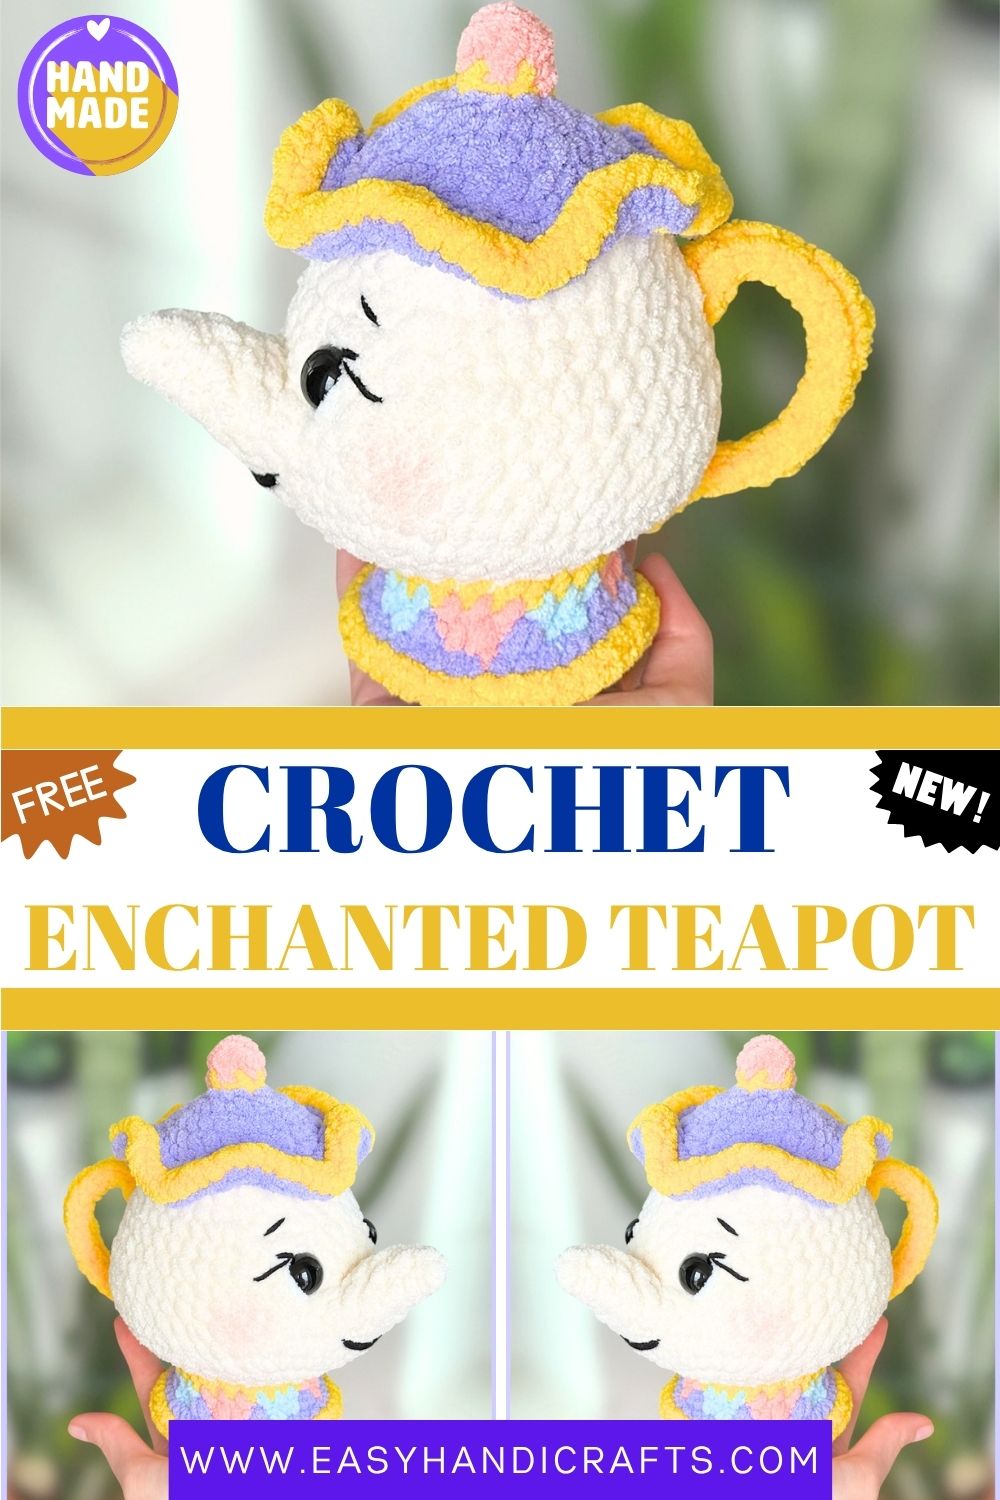
She’s winking at me, and honestly, I don’t know how to handle it. This handmade crochet enchanted teapot has a pastel purple lid, golden trim, a little pink knob on top, and the most charming face I’ve ever put on a plush. Fairytale energy, fully unlocked. Who’s this for?

She’s round, she’s soft, she’s got a winking eye embroidered in the most perfect little arc. Her body is a creamy white chenille-yarn plush and squishy, with a pastel purple lid trimmed in bold yellow, a tiny pink pom on top, and a chunky golden handle that curves out like she’s ready to pour. Around the base, there’s a little band of pastel colour work, pink, blue, lilac, the kind of detail that makes you look twice.
 

Kawaii Crochet Teapot Amigurumi Handmade Plush Gift
Made By:crochets_byliza

Materials & Tools

Yarn

Super Bulky Chenille Yarn (Weight 6)
Recommended: Bernat Baby Blanket or Premier Basix Chenille

  • Cream White
  • Pink
  • Purple
  • Blue
  • Yellow

Thinner Acrylic or Cotton Yarn (Weight 3–4)

  • White — for eye highlights
  • Black — for face embroidery

Supplies

  • 5mm crochet hook
  • 16mm black safety eyes
  • Tapestry needle
  • Fiberfill stuffing
  • Stitch markers
  • Scissors
  • Cosmetic blush (optional)

Abbreviations

  • MR — Magic Ring
  • SC — Single Crochet
  • INC — Increase
  • DEC — Invisible Decrease
  • SL ST — Slip Stitch
  • BLO — Back Loop Only
  • FLO — Front Loop Only
  • CH — Chain

Skills Used

  • Magic ring
  • Working into chains
  • Changing yarn colors

Difficulty Level: Intermediate

Special Techniques

  • Working in Front Loops Only (FLO) and Back Loops Only (BLO)
  • Changing yarn colors throughout the pattern
  • Creating a nose opening mid-round
  • Rejoining yarn to specific rounds
  • Embroidering facial details with thinner yarn

Main Body

Start with pink yarn

Round 1–2

Rnd 1: 6 SC in MR (6)
Rnd 2: SC in all 6 sts (6)

Change to Yellow Yarn

Rnd 3: SC in all 6 sts (6)

Change to Purple Yarn

Rnd 4: BLO — INC in each stitch (12)
Rnd 5: INC in each stitch (24)
Rnd 6: (3 SC, INC) × 6 (30)
Rnd 7–8: SC in all 30 sts (30) — 2 rounds

Decorative Edge

Important:
The next round is worked in Front Loops Only (FLO). After completing it, join the cream white yarn into the Back Loops of the same round.

Rnd 9: FLO — (3 SC in one stitch, INC) × 15 (75)

  • SL ST into the first stitch to join
  • Change to yellow yarn and SL ST around for decorative trim

Return to Rnd 9 and join cream white yarn in the Back Loops Only (BLO).

Continue Body

Rnd 10: BLO — SC around (30)
Rnd 11: (2 SC, INC, 2 SC) × 6 (36)
Rnd 12: SC around (36)
Rnd 13: (5 SC, INC) × 6 (42)
Rnd 14: SC around (42)
Rnd 15: (3 SC, INC, 3 SC) × 6 (48)
Rnd 16: SC around (48)

Nose Opening

Note:
In the next round, create an opening for the nose.

Rnd 17:
21 SC, skip 6 stitches, CH 8, 21 SC (50)


(6 SC, INC) × 3,
8 SC across the chain,
(6 SC, INC) × 3 (56)

 SC around (56)

Insert Safety Eyes

Place 16mm safety eyes between Rounds 15–16, leaving 5 visible stitches between them, positioned 1 stitch above the nose opening.

Begin stuffing the body and continue stuffing as you crochet.

Shaping

Rnd 20: (5 SC, DEC) × 8 (48)
Rnd 21: (2 SC, DEC, 2 SC) × 8 (40)
Rnd 22: (2 SC, DEC) × 10 (30)
Rnd 23: (SC, DEC) × 10 (20)

Change to Yellow Yarn

Rnd 24: FLO — (4 SC, INC) × 4 (24)

Change to Pink Yarn

Rnd 25: SC around (24)
Rnd 26: (INC, 2 SC, INC, 2 SC) × 4 (32)

Change to Purple Yarn

Rnd 27: (3 SC, INC) × 8 (40)
Rnd 28: BLO — SC around (40)
Rnd 29: DEC around (20)
Rnd 30: DEC around (10)
Rnd 31: DEC around (5)

Finishing the Body

Fasten off, leaving a yarn tail.

  • Weave the yarn through the front loop of the remaining stitches
  • Pull tightly to close the opening
  • Insert the needle through the center and pull gently to flatten the bottom
  • Secure and weave in ends

Rejoin yellow yarn to the first front loop of Rnd 28 and SL ST around for trim.


Color Key

  • Pink sections → Crochet with pink yarn
  • Blue sections → Crochet with blue yarn
  • Purple sections → Crochet with purple yarn

Nose

Return to Rnd 17, where the nose opening was created.

Join the cream white yarn to the first skipped stitch.

Round 1

6 SC into skipped stitches,
1 SC on side,
8 SC across the chain,
1 SC on opposite side (16)

Begin lightly stuffing the nose now and continue adding stuffing as you work.

Rnd 2: (2 SC, DEC) × 4 (12)
Rnd 3: SC around (12)
Rnd 4: (SC, DEC) × 4 (8)
Rnd 5: SC around (8)
Rnd 6: DEC around (4)

Finish Nose

Fasten off, leaving a tail.

  • Weave through the front loops of the remaining stitches
  • Pull tight to close
  • Secure and weave in ends

Handle

Using yellow yarn

Chain 20, leaving a starting tail for sewing.

Turn the piece and begin in the second chain from the hook:

Row 1: SC across 19, CH 1, turn (19)
Row 2: SL ST across (19)

Cut yarn, leaving a long tail for sewing.

Sew the handle onto the side opposite the nose.

Face Details

Using thin black yarn, embroider:

  • Eyes
  • Eyebrows
  • Smile

Using thin white yarn, add eye highlights.

Optional: Lightly apply cosmetic blush to cheeks for a soft, rosy look.

Tips & Suggestions

  • Do not overstuff the bottom. This helps the teapot sit flat and stable.
  • Embroider the face after attaching the nose for easier placement.
  • Chenille yarn gives the plush a soft, fluffy texture.
  • A touch of cosmetic blush adds extra cuteness to the cheeks.

Latest Posts

Leave a Reply

Your email address will not be published. Required fields are marked *