Precious Crochet Mini Dessert Amigurumi for Beginners Patterns
Colorful crochet desserts always make me smile, especially when they have fluffy cream, sweet little berries, and cute layers you can build step by step. This Crochet Mini Dessert Amigurumi project is all about making cupcakes and cream cakes that look playful yet realistic.
If you are looking for a simple crochet dessert pattern, you will love these mini sweets amigurumi. Each crochet cupcake toy is quick to finish, and it is perfect beginner crochet food for keychains, small gifts, decorations, or kids’ play food.
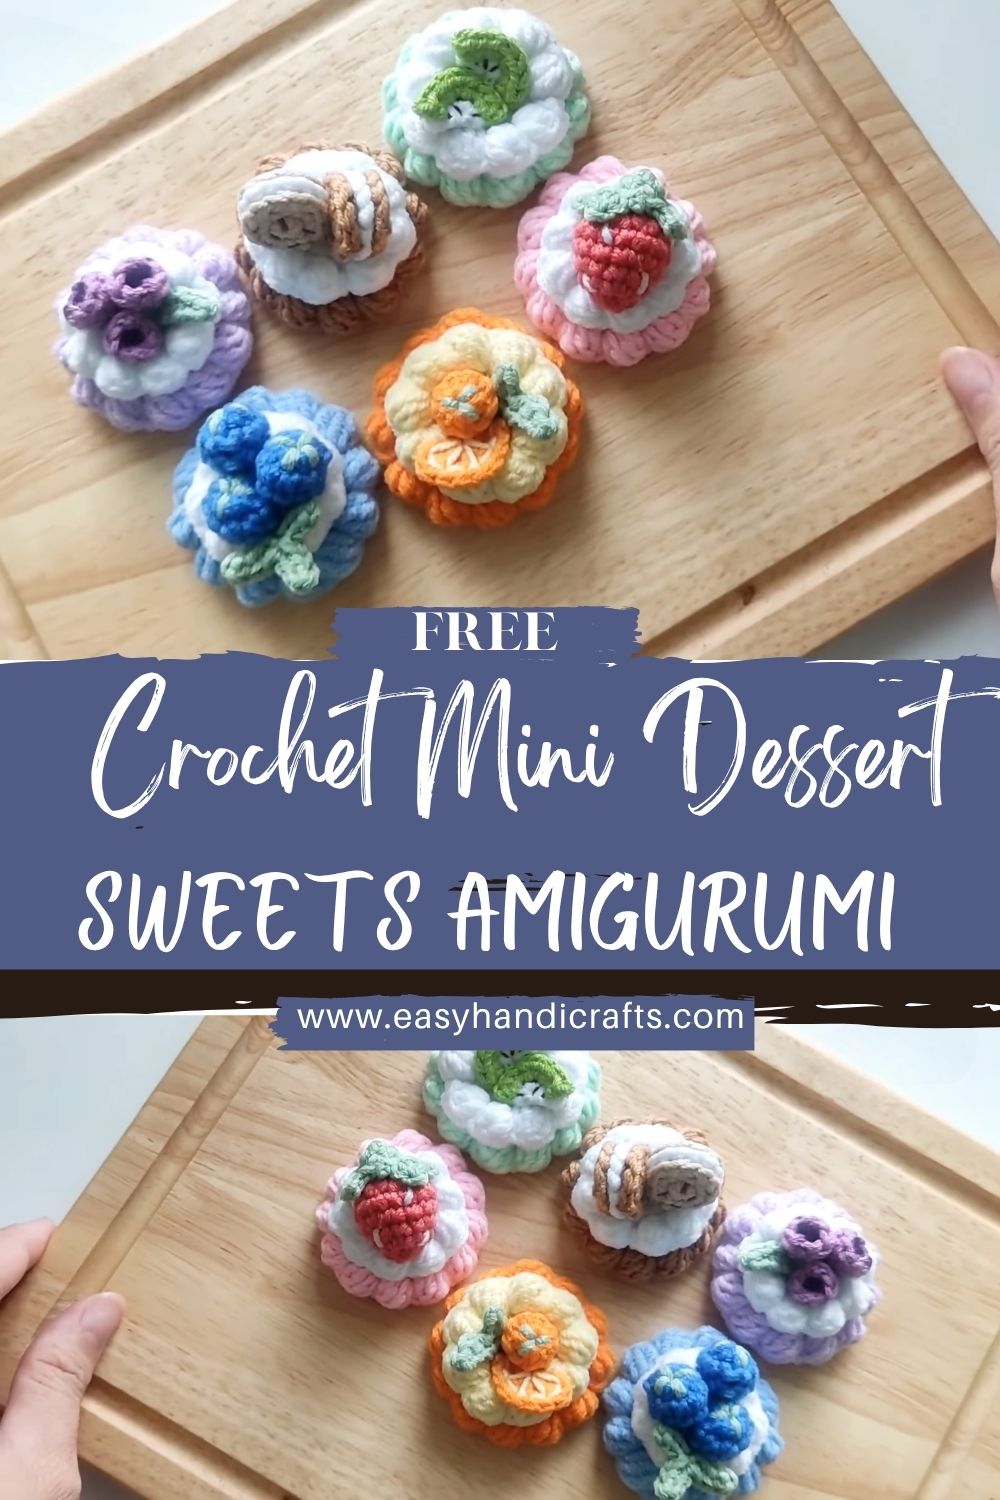
Mini crochet desserts are the kind of project that feels relaxing from the first stitch. They are small, quick to finish, and you can mix colors as if you were decorating real pastries. First, you make a simple base, next you add a cereal layer, then you top it with berries or citrus slices. After that, you step back,k and suddenly you have a tiny dessert that looks surprisingly realistic.
What makes this Crochet Mini Dessert Amigurumi collection extra fun is the variety. You can crochet cupcakes, cream sandwich cookies, strawberries, blueberries, and little fruit slices, all in soft pastel and bright shades. They are perfect for keychains, party favors, teacher gifts, nursery shelf decor, and kids’ play food. Also, the simple shapes mean beginners can follow along without feeling overwhelmed.
Materials Needed
- Cotton yarn (multiple colors for desserts): total 40 to 60 g
- Suggested colors: pastel pink, light brown, bright orange, berry red, blueberry blue, lemon yellow
- Plan about 10 to 15 g per dessert if making a small set
- White yarn (cream layer): 15 to 25 g
- Green yarn (leaves): 5 g
- Crochet hook: 2.5 mm to 4.0 mm
- 2.5 to 3.0 mm for tight, neat mini stitches
- 3.5 to 4.0 mm for a slightly bigger, softer look
- Safety eyes (optional for cute faces): 6 mm (or 5 mm for tiny pieces)
- Stuffing (small amount): 10 to 20 g polyfill
- Stitch marker: 1
- Tapestry needle: 1
- Scissors: 1
Optional: keychain rings, jump rings, and a small dab of fabric glue for extra security on tiny toppings.
Abbreviations (US Terms)
- MR = magic ring
- sc = single crochet
- inc = increase (2 sc in one stitch)
- dec = decrease (sc2tog)
- sl st = slip stitch
- ch = chain
- rep = repeat
- FO = fasten off
Skill Level
Beginner to Easy level. These mini desserts use basic stitches such as single crochet, simple increases, and decreases to shape them. If you can crochet a small ball and change colors, you can make a whole dessert set.
Finished Size
Most pieces will be mini-sized, about 2 to 4 inches tall or wide, depending on the dessert you make. Size changes based on yarn thickness, hook size, and how tightly you crochet.
Time Planning at a Glance
Total time estimate: 1.5 to 3 hours for 3 to 5 mini desserts (depending on details)
- Base dessert: 15 to 25 min each
- Cream layer: 10 to 20 min each
- Toppings (fruits): 5 to 15 min each
- Assembly: 10 to 20 min each
Important Notes Before Starting (5 Beginner Tips)
- Use tight stitches so stuffing does not peek through, especially on small fruit pieces.
- Count your stitches every round because tiny amigurumi shows mistakes quickly.
- Practice color changes on a scrap first so your layers look clean.
- Handle small parts carefully and leave longer tails for sewing. Tiny pieces are easier to attach with a long yarn tail.
- Stuff a little at a time and shape as you go so the dessert stays cute and rounded, not lumpy.
Crochet Pattern
This is a mix-and-match style pattern. You can make one cupcake, then add different toppings to create a whole dessert menu. Work in continuous rounds unless stated otherwise. Use a stitch marker to keep your place.
A. Base (Cupcake or Cake Base)
The base is the “cake” part. You can make it as a cupcake bottom, a cookie base, or a mini cake round.
1) Start the base
- Round 1: MR, 6 sc. (6)
- Round 2: inc in each stitch. (12)
- Round 3: (sc, inc) rep around. (18)
- Round 4: (2 sc, inc) rep around. (24)
2) Shape slightly upward
- Round 5: sc around in back loops only. (24)
- This creates a neat edge and helps the base stand up.
- Rounds 6-7: sc around. (24)
3) Close and lightly stuff
- Round 8: (2 sc, dec) rep around. (18)
- Add a pinch of stuffing to keep the base plump.
- Round 9: (sc, dec) rep around. (12)
- Round 10: dec around. (6)
- FO and close. Weave in the end.
Tip: If you want a flatter cookie base instead of a cupcake body, stop after Round 4 and FO, then use it as a flat disc.
B. Cream Layer
This is where the dessert starts to look magical. You can make a simple flat cream circle or a fluffy piped look using texture.
Option 1: Simple Cream Round (great for beginners)
- Round 1: MR, 6 sc. (6)
- Round 2: inc around. (12)
- Round 3: (sc, inc) rep around. (18)
- Round 4: sc around. (18)
- FO leaving a long tail for sewing onto the base.
Option 2: Fluffy Cream Top (textured look)
- Crochet the same as Option 1 through Round 3.
- Round 4: (sl st, ch 1, sc in same stitch) rep around to create small bumps.
- FO leaving a long sewing tail.
This gives that whipped, airy vibe without complicated stitches.
C. Fruit Toppings
Choose one or make a whole mix. They are tiny, fast, and honestly addictive.
1) Mini Blueberry (Make 2 to 5)
- Round 1: MR, 6 sc. (6)
- Round 2: sc around. (6)
- Round 3: (sc, inc) rep 3 times. (9)
- Round 4: sc around. (9)
- Lightly stuff or leave unstuffed for a flatter berry look.
- Round 5: (sc, dec) rep around. (6)
- FO and close.
2) Mini Strawberry (Make 1 to 3)
- Round 1: MR, 6 sc. (6)
- Round 2: (sc, inc) rep around. (9)
- Round 3: sc around. (9)
- Round 4: (2 sc, inc) rep around. (12)
- Round 5: sc around. (12)
- Add a small pinch of stuffing.
- Round 6: (2 sc, dec) rep around. (9)
- Round 7: (sc, dec) rep around. (6)
- FO and close.
3) Mini Citrus Slice (Orange or Lemon)
This is a cute flat topper that looks great on cream cakes.
- Round 1: MR, 8 sc. (8)
- Rounds 2-3: sc around. (8)
- FO. Use your needle to weave through the outer loops of the last round and gently pull to shape a slight “slice” curve.
- Optional: embroider tiny segment lines with a lighter shade.
D. Decorative Details
1) Tiny Leaves (for berries or strawberry tops)
- Ch 5.
- In 2nd ch from hook: sl st, then sc in next, then hdc in next, then sc in last.
- FO leaving a tail to sew.
Make 1 leaf for a strawberry, or 2-3 small leaves to decorate a whole dessert cluster.
2) Extra cream swirl (optional)
If you want a taller whipped cream look:
- Ch 15.
- Work 2 sc in each chain back across.
- It will naturally curl into a swirl.
- Roll it gently and stitch it onto the cream layer.
E. Optional Face (Kawaii Style)
If you want your desserts to look like happy little characters:
- Add 6 mm safety eyes to the base before closing, placing them about 4-5 stitches apart.
- Or embroider eyes with black yarn using tiny straight stitches.
- Make a small smile with one simple curved stitch.
- Optional: add blush cheeks with two short pink stitches.
This turns the whole set into the cutest mini play food.
Assembly Instructions
- First, sew the cream layer onto the top center of the base. Keep stitches small and even.
- Next, decide on your topping layout before attaching. Place fruit in a triangle cluster or a neat circle for balance.
- Then, attach toppings one by one using yarn tails. Stitch through the cream and into the base for extra strength.
- After that, add leaves beside berries or on the strawberry top.
- Finally, tug gently on each topping to make sure it is secure, especially if a child will use it as play food.
Tip: For keychains, sew a small loop of chain stitches at the top before attaching toppings.
Finishing Touches
- Check the dessert from all sides and make sure it sits nicely and looks even.
- Adjust stuffing by adding a little more through a small gap if needed, then stitch closed.
- Shape the cream top with your fingers so it looks fluffy and centered.
- Weave in all yarn ends neatly and trim close.
A clean finish makes the mini desserts look more realistic and gift-ready.
Beginner Tips (5 Helpful Crochet Tips)
- Use a stitch marker every round so you never lose your place.
- If your circles ripple, your tension may be loose. Try a smaller hook.
- For tiny parts, use longer yarn tails because they act like built-in sewing thread.
- When changing colors, finish the last yarn-over of the previous stitch with the new color for a smoother transition.
- Take a quick photo of your topping layout before sewing. It helps you remember the “cute arrangement” you liked best.
Common Mistakes to Avoid
- Loose stitches: stuffing shows, and the dessert looks messy
- Uneven layers: cream top not centered or not sewn flat
- Wrong proportions: toppings too big for the base, or cream too small
- Poor attachment: berries fall off if they are only stitched to the cream lightly
- Overstuffing:the base becomes stretched and loses its neat shape
Variations to Personalize
- Different dessert types: try a donut ring, a triangular cake slice, or a mini ice cream scoop.
- Pastel or bright themes: make a soft pastel set for nursery decor, or a bright rainbow set for play food.
- Turn them into keychains by adding a chain loop and a keyring for backpacks and pencil cases.
- Create a full dessert set: cupcakes fruit tarts, sandwich cookies, and cream cakes for a mmini-bakery vibe
- Add sparkle: sew tiny beads as sprinkles, or stitch “chocolate drizzle” lines with dark brown yarn.
Conclusion
Mini desserts are one of those crochet projects that bring instant joy because each piece is small, colorful, and full of personality. This Crochet Mini Dessert Amigurumi collection is perfect if you want something beginner-friendly yet creative and impressive. Start with one cupcake, then add a berry, then make a whole tiny bakery, and enjoy every cozy stitch along the way.