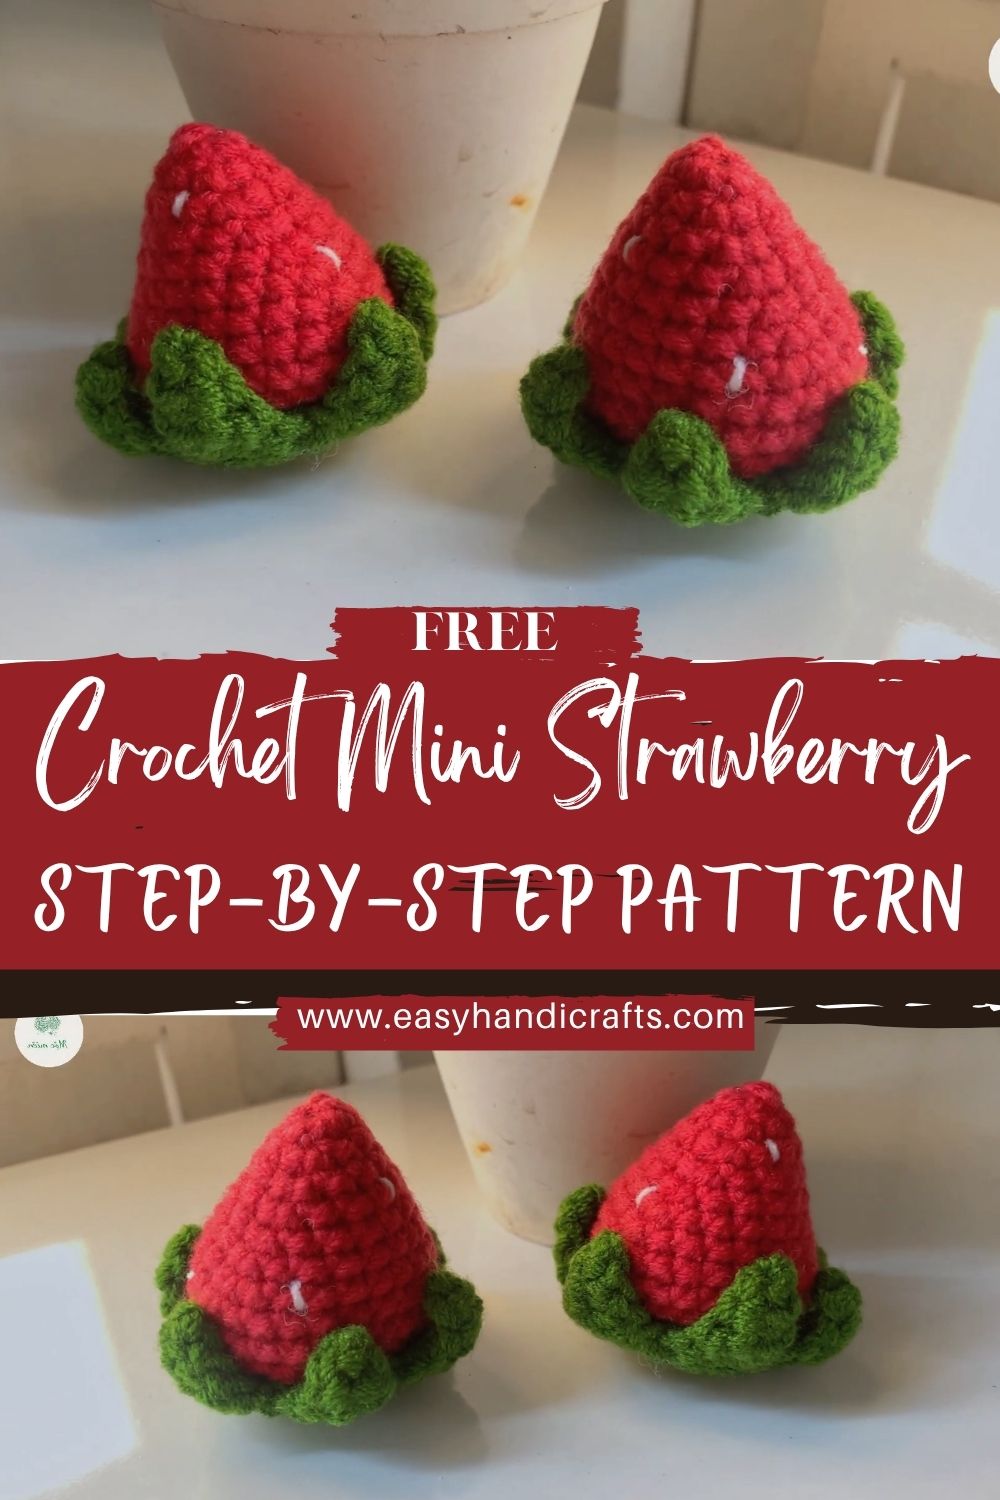
Berry-bright projects have a special kind of charm, small, cheerful, and impossible to put down once you start. Soft red yarn, tiny seed stitches, and a pop of leafy green create a Crochet Mini Strawberry that looks as lovable as it feels.
Crochet Mini Strawberry Amigurumi is a cozy little make that works up quickly, even for newer crocheters. The shape is simple, the details are fun, and the finished cutie is perfect for gifting or turning into a crochet strawberry keychain.
Amigurumi is the art of crocheting small stuffed toys, usually animals, food, or cute characters. The stitches are worked tightly in rounds, then filled with stuffing to create a soft shape. Think of it as crochet that turns into a tiny plush.
Fruit makes fantastic amigurumi because the shapes are friendly and recognizable. Strawberries are extra popular thanks to that classic look: a rounded base, slightly pointed top, bright red color, and those little seed details. They’re cheerful, timeless, and instantly “read” as a strawberry even when made super small.
Why This Mini Strawberry Is Perfect for Beginners
This mini strawberry crochet design keeps things simple:
- Mostly single crochet in continuous rounds
- Easy increases and decreases to shape the berry
- Minimal sewing (often just the leaves)
- Quick results, whichmakes practice feel rewarding
It’s a great first crochet fruit pattern because it teaches shaping without feeling complicated.
Ways to Use a Small Crochet Strawberry
This small crochet strawberry is compact and versatile. Here are a few cozy ideas:
- Add a ring for a crochet strawberry keychain
- Tie onto gift wrapping as a reusable topper
- Make a bowl of mini fruits for play kitchen decor
- Attach to a bag zipper or backpack
- Create a cute garland for a craft room or nursery
Materials Needed
Keep supplies simple and beginner-friendly:
- Red yarn (body): worsted or DK weight works nicely
- Green yarn (leaves): same weight as body
- White yarn or embroidery thread (seeds): embroidery floss gives crisp seeds
- Crochet hook: 2.5 mm to 3.5 mm (choose smaller than yarn label for tighter stitches)
- Stuffing: polyester fiberfill
- Yarn needle: for weaving ends and seed stitching
- Scissors
- Stitch marker: to track rounds
- Optional keychain ring: jump ring + keychain clasp, or a simple split ring
Skill Level, Size, and Time
- Skill Level: Beginner
- Finished Size: Mini (about small palm size, depending on yarn/hook)
- Estimated Time: Quick project (about 30–60 minutes)
Abbreviations
- MR = magic ring
- sc = single crochet
- inc = increase (2 sc in one stitch)
- dec = decrease (single crochet decrease / invisible decrease)
- sl st = slip stitch
- ch = chain
- FO = fasten off
Time Planning (So It Feels Easy)
Strawberry body
About 15–25 minutes to crochet the red shape.
Stuffing & shaping
5 minutes, including smoothing out lumps.
Leaf making
10–15 minutes, depending on how many leaf points you add.
Assembly
5–10 minutes to sew the leaves and tidy the top.
Finishing
5 minutes for weaving ends, shaping, and adding a keychain ring (optional).
Step-by-Step Pattern Instructions
Strawberry Body
This strawberry amigurumi pattern creates a rounded base with a slightly pointed top—soft, compact, and sweet.
Round 1: MR, 6 sc into ring (6)
Round 2: inc around (12)
Round 3: (sc, inc) around (18)
Round 4: (2 sc, inc) around (24)
Round 5: (3 sc, inc) around (30)
At this point, the base should look nicely rounded and cup-like.
Rounds 6–8: sc around (30)
These even rounds give the berry its plump middle.
Round 9: (3 sc, dec) around (24)
Round 10: sc around (24)
Round 11: (2 sc, dec) around (18)
Round 12: sc around (18)
Round 13: (sc, dec) around (12)
Round 14: dec around (6)
FO leaving a tail. Use a needle to weave through the last 6 stitches and pull tight to close.
Shape note: This decrease section forms that gentle strawberry “point” without making it too sharp.
Stuffing and Shaping
Stuffing makes the difference between “cute plush berry” and “wrinkly little blob,” so take a moment here.
- Begin stuffing after Round 10 or 11, when the opening is still roomy.
- Add small pinches of stuffing rather than one big clump.
- Push stuffing into the rounded base first, then lightly fill toward the top.
- Aim for firm but squishy—the stitches should look smooth, not stretched.
Before closing completely, gently pinch and roll the strawberry between your palms to even out its shape.
Leaves (Top or Base)
The inspiration look includes simple green leafy details that flare outward like a tiny crown. You can attach leaves at the top (classic) or at the base for a playful twist.
Simple Leafy Crown (worked in a small circle)
With green yarn:
Round 1: MR, 6 sc (6)
Round 2: inc around (12)
FO leaving a sewing tail.
Now, create leaf points around the circle by joining yarn anywhere on the edge:
(sl st, ch 2, 2 sc into same stitch, ch 2, sl st into next stitch) Repeat around.
This makes small looped leaves with a bit of texture and lift.
Prefer sharper leaves? Replace “2 sc into same stitch” with “(sc, hdc, sc)” if you like—just keep the leaves small so the strawberry stays mini.
Seeds Embroidery
The tiny white seeds are what make this crochet strawberry pattern instantly recognizable.
- Thread a yarn needle with white yarn or embroidery floss.
- Add short, slightly angled stitches across the strawberry body.
- Space them evenly in a loose spiral pattern, leaving the top area a bit less crowded.
- Keep seed stitches small—more “dash” than “line.”
Tip for a neat look: place a few seeds, step back, then fill gaps rather than trying to plan every seed from the start.
Assembly
- Position the green leaves over the strawberry’s closed top.
- Stitch the leaf circle down using the green tail, catching only the outer loops where possible so the stitches stay hidden.
- Weave in ends securely inside the strawberry.
Optional: For a keychain loop, stitch a small hanging loop at the top:
- Attach yarn at the leaf center, ch 8–12, sl st back into the same spot, then weave in ends.
Clip a keychain ring through the loop.
Beginner Tips (For a Neat, Tiny Strawberry)
Keep stitches tight
Amigurumi looks best when stuffing doesn’t peek through. Use steady tension and avoid loose single crochet. If gaps appear, drop down a hook size.
Choose the right hoo.k
A smaller hook than the yarn label suggests creates a smooth fabric. For worsted yarn, 3.0–3.5 mm is often a comfortable range; for DK, 2.5–3.0 mm works well.
Shape with your hands
Rolling and gently pressing the berry after stuffing helps it look intentionally rounded, especially around the base.
Common Mistakes to Avoid
Overstuffing or understuffing
- Overstuffing stretches stitches and makes the berry look lumpy.
- Understuffing causes dents and an uneven silhouette.
Add stuffing gradually and smooth as you go.
Uneven decreases
Random-looking bumps often come from visible decreases. Try an invisible decrease (insert hook into the front loop of the next stitch, the front loop of the following stitch, yarn over, nd pull through, yarn over, er and finish).
Messy seed stitching
Seeds that are too long or too dense can overwhelm the tiny shape. Keep them short and gently spaced for that “sprinkled” strawberry look.
Incorrect leaf placement
Leaves sewn too far down can hide the strawberry’s cute point. Center them at the top so the berry still has a defined shape.
Creative Variations
Pastel strawberry
Swap red for blush pink, cream, or soft coral. White seeds look extra delicate on pastel yarn.
Keychain version
Add a sturdier hanging loop (or stitch through a metal jump ring) so your mini strawberry crochet can handle daily use on a bag.
Large plush strawberry
Use blanket yarn and a larger hook, keeping the same stitch counts for a chunkier, extra-squishy strawberry. (Expect a looser fabric—tighten tension or size down the hook if needed.)
Striped or textured strawberry
Add a few subtle surface lines with surface slip stitches, or work a round in the back loop only to create gentle ridges.
Gift set with multiple fruits
Pair this strawberry with other crochet fruit pattern favorites, tiny lemon, orange, or blueberry shapes, for a cute bowl of minis.
Finishing Touches
Weaving in ends
Run yarn tails through the inside of the strawberry and back out in a different spot, then trim. This helps keep everything secure and hidden.
Final shaping
Cup the strawberry in your palms and lightly press the base on a flat surface to help it sit nicely. A little smoothing goes a long way for that polished “store-bought cute” look.
Attaching a keychain or accessories
Slide the keychain ring through the yarn loop at the top, or stitch directly around the ring for extra strength. This turns your Crochet Mini Strawberry Amigurumi into a charming zipper pull, bag charm, or crochet strawberry keychain gift.
Conclusion
Soft, bright, and wonderfully tiny, this Crochet Mini Strawberry Amigurumi is the kind of project that brings instant joy, is quick to crochet, easy to personalize, and adorable in any color. Grab your red and green yarn, add a sprinkle of white seeds, and enjoy making a little berry that’s perfect for gifting, decorating, or keeping close as a cheerful handmade charm.