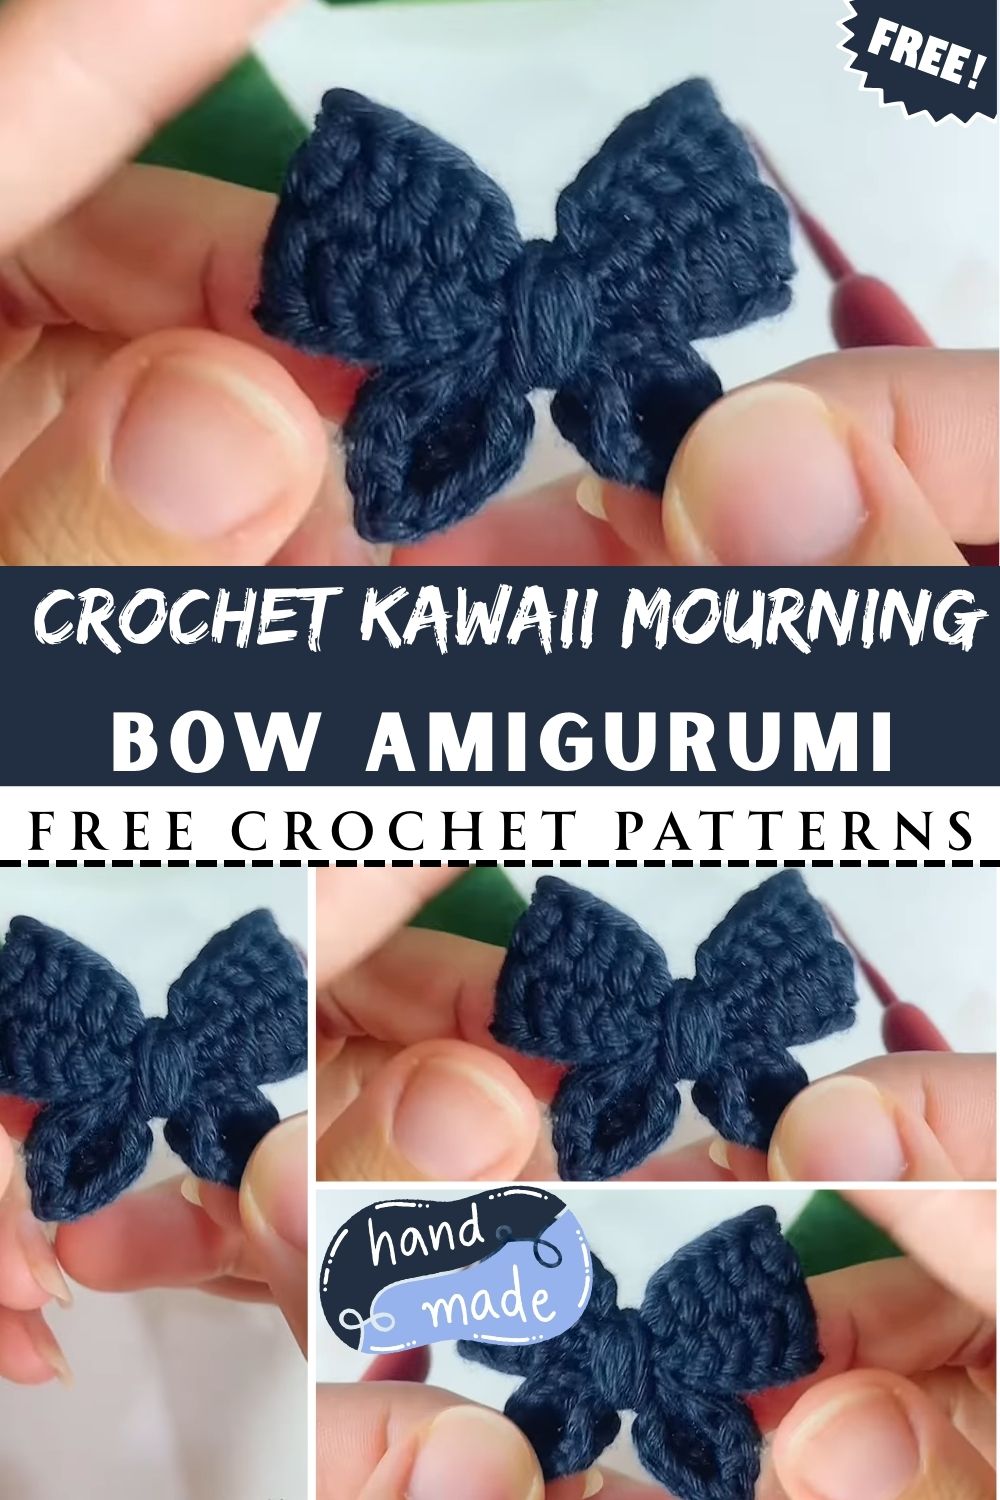
Velvety-cute drama in the tiniest form, nothing says “sweetly elegant” like a perfectly shaped little bow. This miniature design has soft curves, a neat texture, and that wrapped center knot that makes it look polished and intentional.
The Crochet Kawaii Mourning Bow Amigurumi is small enough for accessories yet detailed enough to feel special. Make one as a crochet bow keychain, hair clip, bag charm, or a thoughtful handmade add-on for gifting.
Bows are one of those crochet projects that feel instantly rewarding. They work up quickly, use very little yarn, and look adorable in almost any color. In amigurumi and kawaii crafting, bows also add personality—pop one onto a plush, a pouch, or a hat and everything suddenly looks more “finished.”
A good crochet bow pattern strikes a balance: tidy edges, symmetrical loops, and a center that cinches just right. That’s exactly what this design focuses on.
What makes this kawaii mourning bow unique
This bow leans elegantly with a slightly dramatic flair, think “mini formal bow” with a cute twist. The look comes from three details:
- Soft, rounded loops rather than stiff triangles
- Textured stitches that give the fabric a rich, plush feel
- A wrapped center knot that creates that classic bow silhouette
In darker shades (especially black), it reads as a “mourning” style bow—tasteful, refined, and a little gothic. In pastels, it becomes sweet and dreamy.
Ways to use a tiny bow like this
Because it’s compact and symmetrical, this mini bow crochet design fits almost anywhere:
- hair clips, baby clips, and headbands
- bag charms and zipper pulls
- planner bands, bookmarks, and gift toppers
- doll accessories and tiny plush decorations
- a simple crochet bow keychain for everyday cuteness
Why beginners will enjoy it
This is a crochet bow for beginners because it relies on basic stitches and simple shaping—no complicated increases, no sculpting, no tricky assembly. The bow’s “wow” factor comes from how it’s folded and wrapped, not from advanced techniques.
Materials Needed
Yarn (recommended)
- Cotton yarn or lightweight yarn for crisp definition
- Sport weight (#2) or DK weight (#3) works beautifully
- Amount: 5–10 g (scrap-friendly)
Color ideas:
- Classic mourning: black, charcoal, deep espresso
- Soft kawaii: blush, lavender, cream
- Elegant neutrals: ivory, taupe, dusty rose
Tools
- Hook size:
- Sport/#2 yarn: 2.5 mm
- DK/#3 yarn: 3.0 mm
Choose the smaller end for tighter stitches.
- Yarn needle
- Scissors
- Stitch marker (helpful for counting rows, optional)
Optional attachments
- Keychain ring + jump ring
- Alligator clip (hair clip)
- Brooch pin back
- Sew-on snap (for removable bows)
Skill Level + Size + Time
- Skill Level: Beginner
- Finished Size: about 1.5–2.25 in (4–6 cm) wide, depending on yarn and hook
- Estimated Total Time: 20–40 minutes per bow
Abbreviations
- MR = magic ring (not required for this pattern, but handy for add-ons)
- ch = chain
- sc = single crochet
- dc = double crochet
- sl st = slip stitch
- FO = fasten off
Time Planning Section
- Base bow piece: 10–18 min
- Shaping (pinch + secure): 3–6 min
- Center wrapping: 3–7 min
- Finishing (ends + attachment): 4–10 min
Step-by-Step Pattern Instructions
Pattern Notes (quick and helpful)
- This bow is made as a small flat rectangle, then pinched at the center to form loops.
- Stitch counts matter for symmetry, so a quick recount is worth it.
- For a neat edge, keep turning chains consistent.
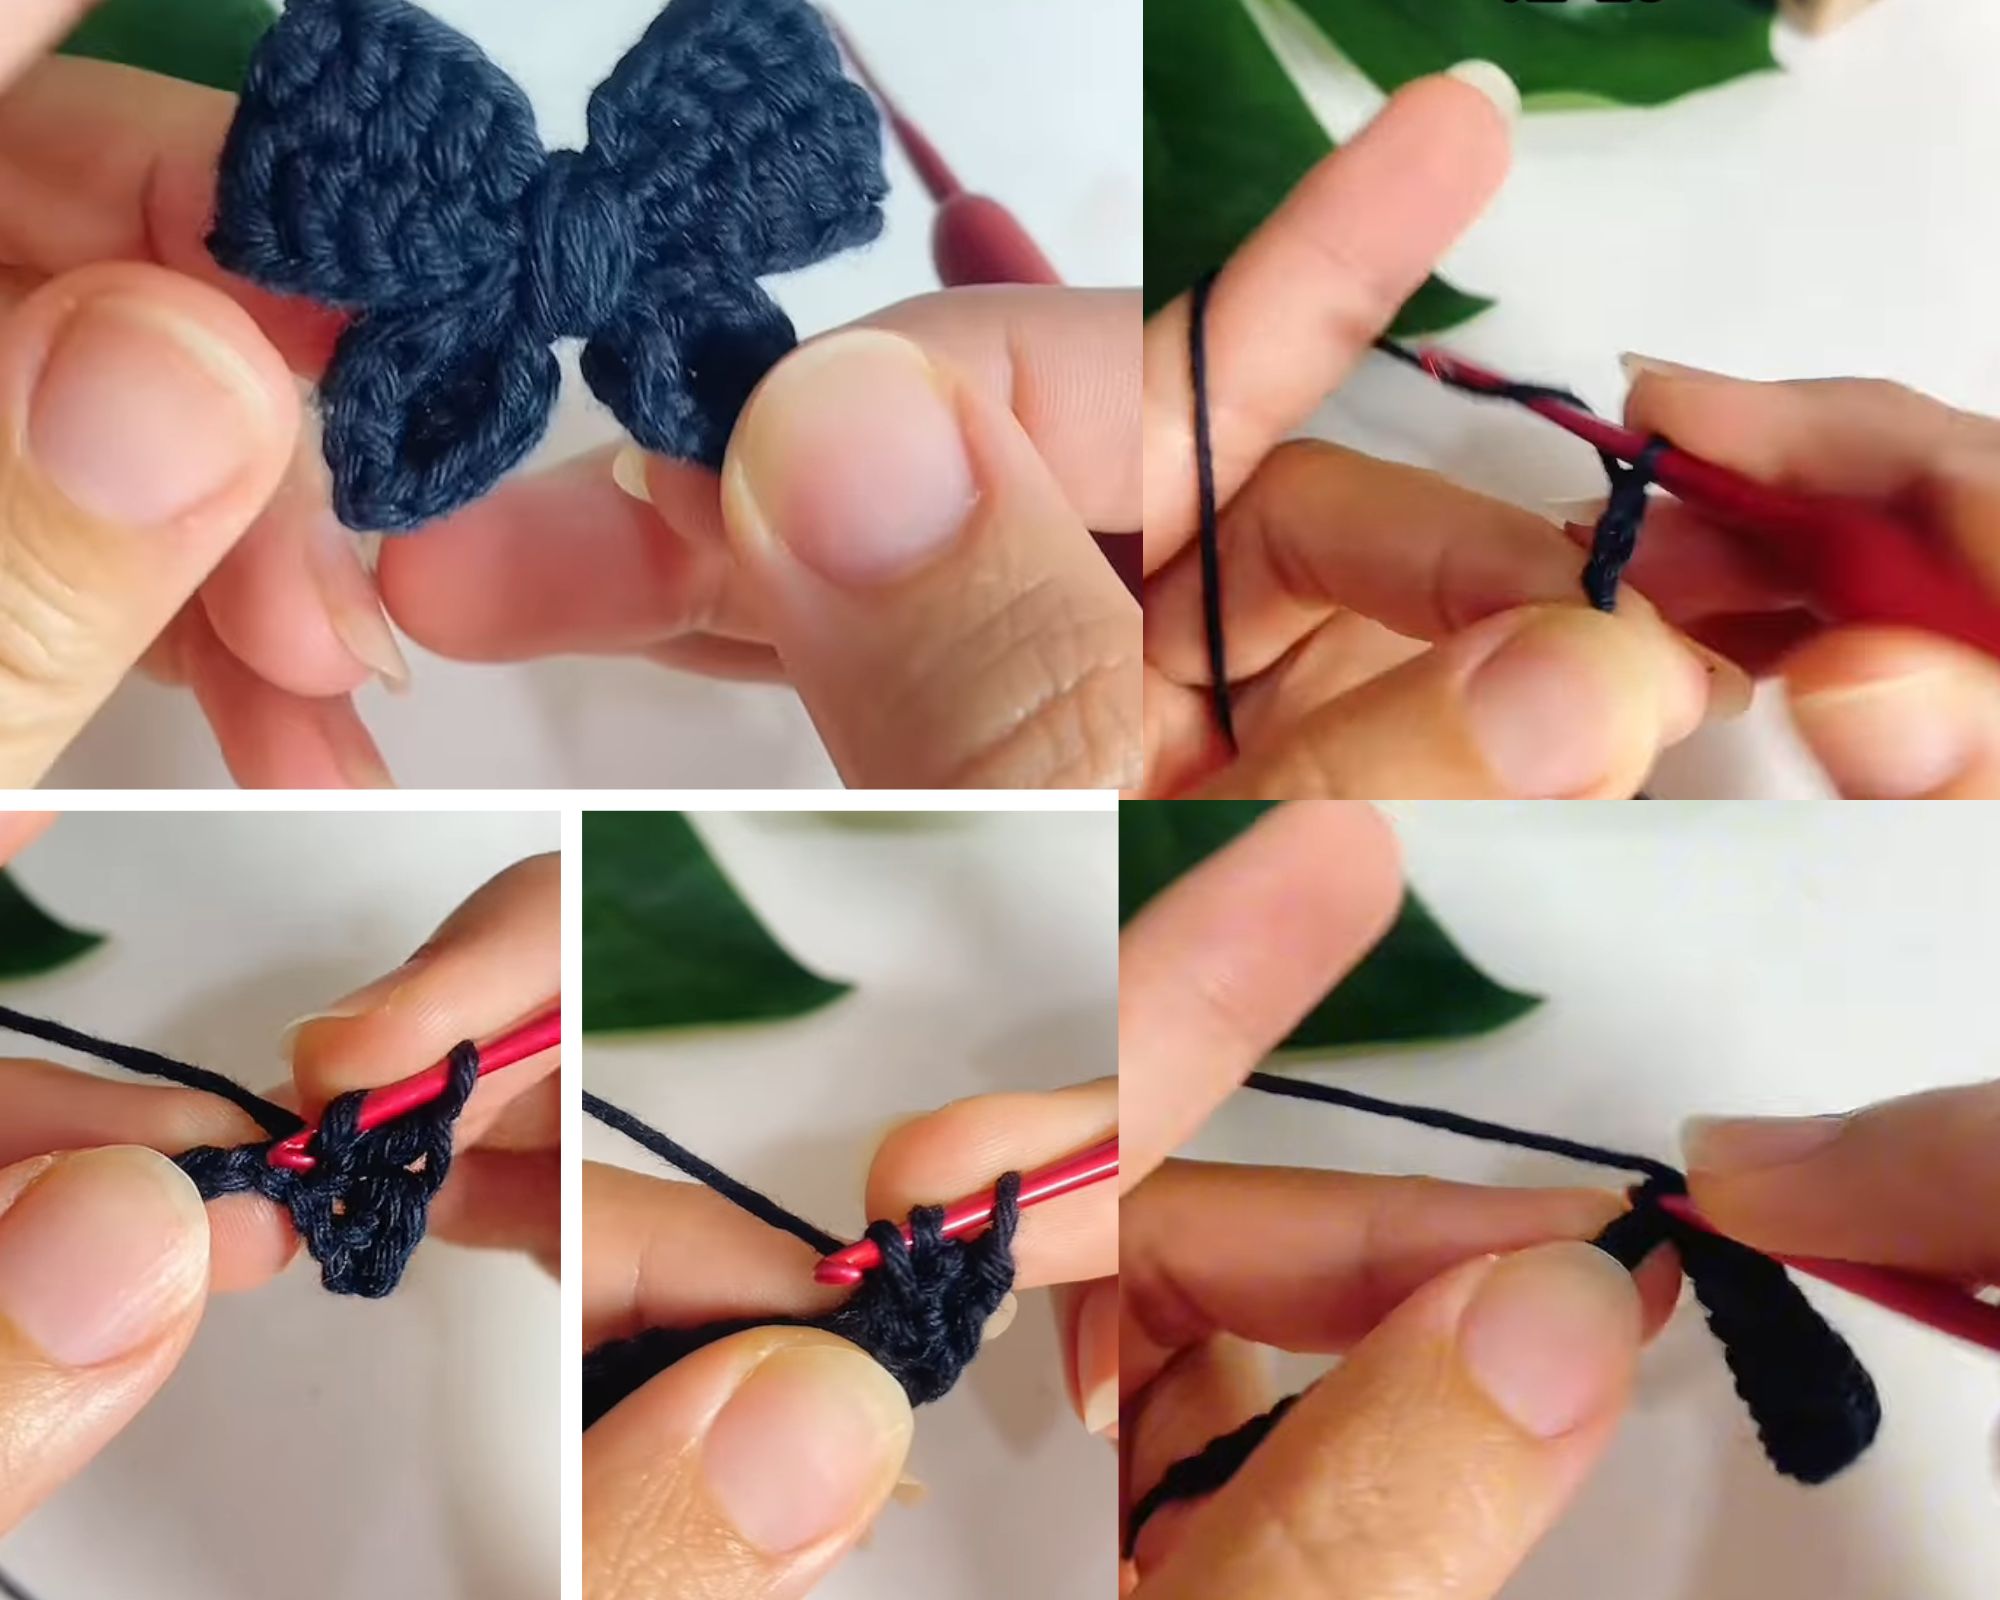
Creating the Bow Base
This base creates a compact, slightly textured fabric that holds its shape.
Foundation: ch 21 (adjustable; see sizing note below)
Row 1: sc in 2nd ch from hook and across (20 sc). ch 1, turn.
lass=”yoast-text-mark” />>Row 2: sc across (20 sc). ch 1, turn.
><strong>Row 3: dc across (20 dc). ch 1, turn.
class=”yoast-text-mark” />>Row 4:</strong> sc across (20 sc). ch 1, turn.
>Row 5: sc across (20 sc).
FO, leaving a 10–12 in (25–30 cm) tail for sewing and wrapping.
Sizing note (easy):
- Wider bow: start with ch 25
- Smaller bow: start with ch 17
Keep rows the same for a similar “chonky-cute” thickness.
Shaping the Bow
This is where the rectangle becomes a bow.
- Fold the rectangle so the short ends meet (forming a loop).
- Align edges neatly—this affects how symmetrical the bow looks.
- Using the yarn tail, sew the short ends together with small whip stitches.
- Aim for a firm seam; it keeps the bow stable on clips and keychains.
- Turn the piece so the seam sits at the back (or centered—either is fine).
Now the bow will look like a small tube/loop.
Center Knot / Wrap
That wrapped middle is what gives the “mourning bow” elegance.
- Pinch the bow at the center with your fingers, creating two even loops.
- With the same yarn tail (or a separate strand), wrap around the center 6–10 times.
- Fewer wraps = softer look
- More wraps = tighter, more dramatic cinch
- Pull wraps snug, but don’t distort stitches. The goal is tidy, not crushed.
- Flip to the back and tie off securely, then stitch the wrap in place with the needle so it won’t slide.
FO and weave in ends on the back.
Final Shaping
Small bows look best with a little hand-sculpting.
- Tug each loop gently so both sides match.
- Flatten and smooth the “front face” of the bow with your fingertips.
- Adjust the center wrap so it sits perfectly vertical and centered.
Texture tip: The dc row adds a subtle plush ridge. Place that ridge on the front for a richer look, or turn it inward for a smoother bow.
Optional Attachment (Keychain, Clip, or Accessory)
Choose one finishing style depending on how you want to use your kawaii bow amigurumi.
Keychain / Bag Charm
- Stitch a small loop at the back: attach yarn, ch 8–12, sl st to form a loop, FO.
- Add a jump ring through the loop and attach a keychain ring or lobster clasp.
- Reinforce with a few extra sewing stitches where the loop meets the bow.
Hair Clip
- Sew the bow onto an alligator clip using strong thread or the same yarn doubled.
- Stitch through the clip holes (or around the center bar) and the bow’s back seam.
- For extra grip, add a small felt rectangle between bow and clip.
Pin / Brooch
- Sew a pin back onto the bow’s back seam area.
- Keep stitches tight and pass through multiple times so it doesn’t wobble.
Beginner Tips
Keep stitches tight for clean edges
A bow is all about neat lines. Use a slightly smaller hook than you might for a soft scarf—tight stitches help the bow hold its shape and look crisp.
Pick yarn that matches the vibe
Cotton gives a structured, polished bow (great for “mourning” elegance). Softer acrylic makes a puffier kawaii look but can lose definition if it’s too fluffy.
Maintain symmetry without stress
Count stitches at the end of each row, especially after the dc row. Even one missed stitch can make one loop feel larger than the other.
Use pins when needed
A couple of sewing pins (or stitch markers) can hold the pinch in place while wrapping the center—especially helpful on slippery yarn.
Common Mistakes to Avoid
- Uneven sides: caused by inconsistent stitch counts or folding off-center
- Loose stitches: leads to a floppy bow that won’t keep its curves
- Incorrect center wrapping: too loose will slide; too tight will scrunch the loops
- Wrong yarn choice: very fuzzy novelty yarn can hide the bow shape
- Weak attachment: keychains and clips need reinforced stitches to survive daily use
Creative Variations
Color moods
- Pastel bow: baby pink, lilac, buttercream for a gentle kawaii style
- Gothic black bow: classic “mourning” look—try matte black cotton for drama
- Multicolor bow: variegated yarn for a playful, candy-sweet twist
- Glitter yarn bow: one sparkle strand carried with cotton makes it party-ready
Size and function tweaks
- Mini keychain bow: shorten the foundation chain and use sport weight yarn
- Baby hair clip bow: keep it lightweight and avoid bulky wraps
- Layered bow: make two rectangles (one slightly smaller), stack, then wrap together
- Charm bow: embroider a tiny heart or star at the center wrap with contrast thread
Finishing Touches
Weave in ends neatly
Tuck ends into the back seam area so the front stays flawless. Run the yarn tail through several stitches, change direction once, then trim close—this helps prevent ends from sneaking out later.
Shape for a “store-bought neat” look
Gently pinch and fan the loops so they curve outward. A little time spent nudging symmetry makes a big difference, especially for photos or gifting.
Secure accessories like you mean it
For clips and keychains, stitch through solid anchor points (the seam and center wrap area). A bow that’s meant to travel needs extra reinforcement—two or three passes of stitches beats one tight knot.
Conclusion
Small projects can still feel special, and this Crochet Kawaii Mourning Bow Amigurumi is a perfect example tiny, elegant, and wonderfully versatile. Whether it ends up as a hair clip, a sweet bag charm, or a crochet bow keychain, the polished center wrap and neat symmetry give it that “handmade with care” finish. Grab a bit of cotton yarn, choose a color that matches your mood, and enjoy a quick, cozy crochet win.