Charming Crochet Cup Sleeve And bag Pattern step by step for Newbies
A cute handmade drink accessory can make an everyday coffee run feel extra special. First, this Crochet Cup Sleeve And Bag Pattern brings cozy texture to a standard cup, and next, the matching strawberry mini bag adds a sweet amigurumi touch that looks practical.
Even better, the full set is small enough to finish in one relaxed crafting session. After that, it becomes a thoughtful gift idea that feels personal without being complicated.
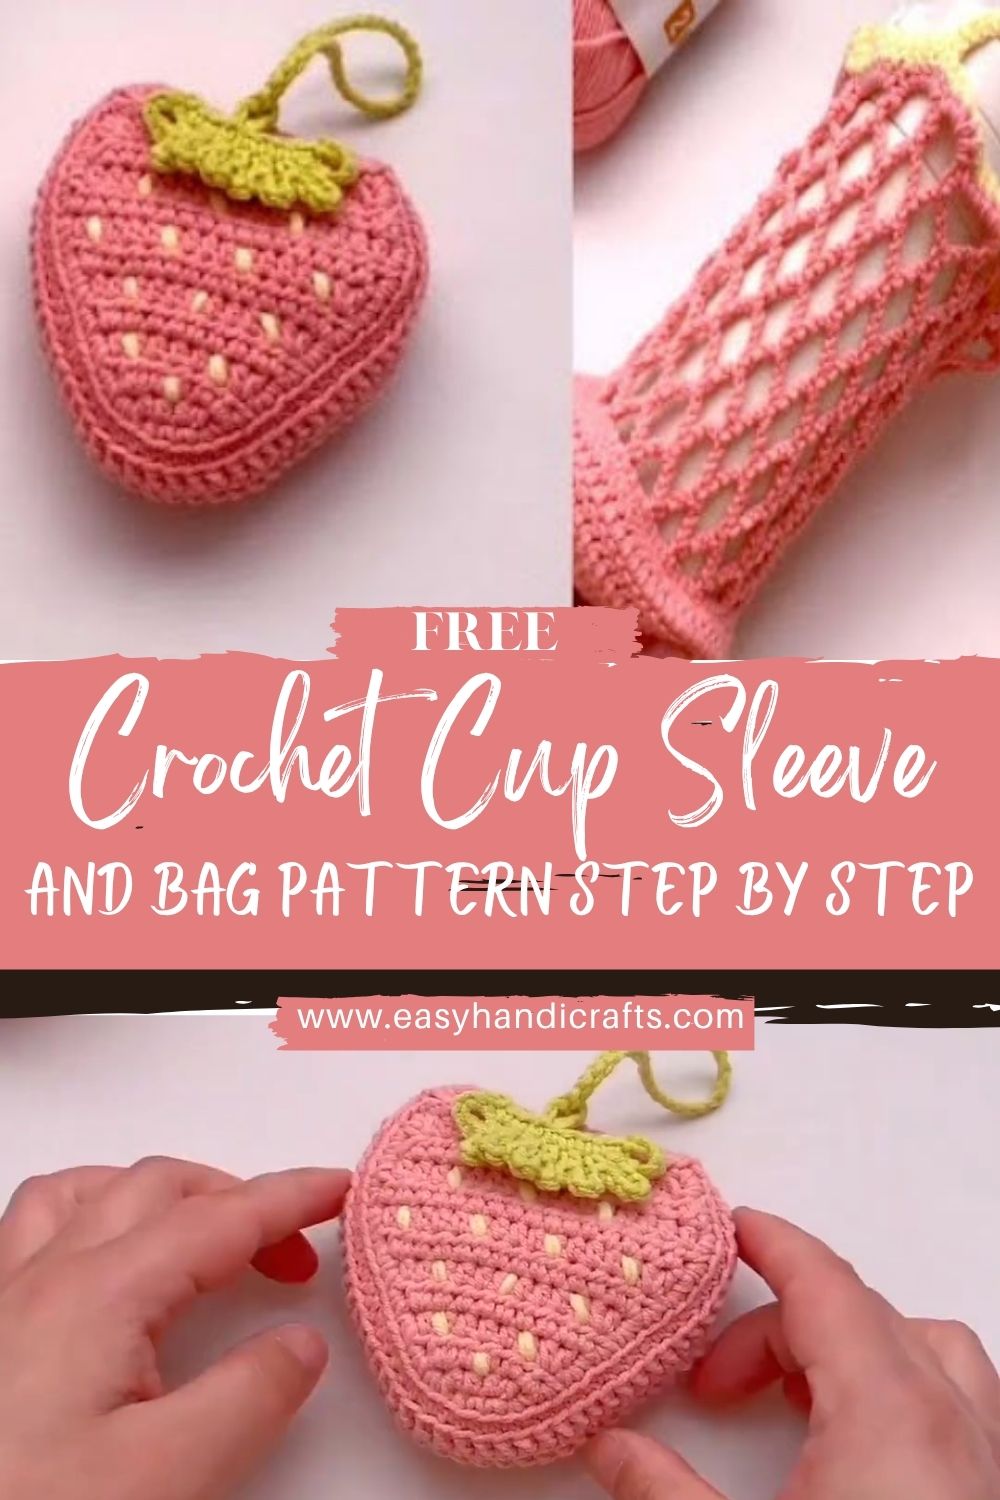
It’s a lovely choice for beginners because the shapes are straightforward and the stitches repeat in a calming rhythm. Next, it’s also perfect for gift makers, especially for teachers, coworkers, and friends who love small handmade surprises. Meanwhile, coffee lovers and handmade fans will appreciate how the set looks adorable while staying genuinely useful.
The best part is the customization. After that, colors can be changed to match any aesthetic, and the strap style can be swapped depending on whether the bag will hang from a wrist, a keychain, or a crossbody strap. Finally, the strawberry seeds and leafy top give the amigurumi bag that “finished” look without requiring advanced skills.
Materials Needed
- Yarn type and weight: soft cotton or acrylic, Category 4 (worsted) recommended
- Pink (strawberry body): 30–50 g
- Green (leaves and accents): 10–20 g
- Optional white/yellow accents (cute details): 5–10 g
- Optional neutral color for cup sleeve (or match pink/green): 40–70 g
- Hook size: 4.0 mm (use 3.5 mm for tighter fabric, especially for the mini bag)
- Stitch markers: 2–4
- Yarn needle: 1 tapestry needle
- Measuring tape: 1 (helpful for cup sizing)
- Scissors: 1 pair
- Button or loop (optional for sleeve closure):
- 1 button, 15–20 mm OR a crocheted loop/tie
- Keychain ring or strap (for mini bag):
- Keychain ring: 20–25 mm (optional)
- Strap option: 90–120 cm (35–47 in) for crossbody, or 25–35 cm (10–14 in) for wrist strap
Skill Level
Beginner / Easy
First, the cup sleeve uses simple rows and an easy texture pattern. Next, the strawberry mini bag uses basic amigurumi shaping with steady stitch counting, which is completely manageable with a stitch marker.
Making Time (Overview)
Approximately 2–4 hours for the full set, depending on strap length and decoration details.
Instructions
1. Cup Sleeve (Main Body)
A good sleeve should feel snug because it stretches slightly with use.
- Measure the cup:
First, measure around the cup where the sleeve should sit (usually the middle). Next, subtract 2–3 cm (1 in) for a snug fit. - Create the foundation chain:
Next, chain to match that measurement. For many standard takeaway cups, this often lands around 44–54 chains, depending on yarn and tension.
Meanwhile, avoid chaining too tightly, because a tight foundation can make the sleeve feel stiff. - Work the sleeve in rows (adjustable and beginner-friendly):
First, single crochet across the chain for a firm base. Next, chain 1 and turn.
After that, add a simple texture that still stretches nicely, such as:- Mesh look: single crochet, chain 1, skip 1 repeated across
- Ribbed look: half double crochet in the back loop only for each row
Meanwhile, keep edges straight by counting stitches at the end of each row.
- Add height:
Next, crochet until the sleeve height is about 7–9 cm (2.75–3.5 in).
After that, hold it against the cup to confirm it covers enough area for comfort. - Close the sleeve (choose one method):
- Simple seam: fold ends together and slip stitch through both edges to form a tube
- Button closure: create a short button band on one side and a loop on the other
Later, if using a button, test the fit around the cup before sewing the button down.
- Optional handle gap (if needed):
If the sleeve will be used on a handled mug, next leave a small opening by seaming only the top and bottom portions, and then skipping a short section in the middle.
Making time for cup sleeve: 45–75 minutes
2. Strawberry Mini Bag (Main Body)
This mini bag is worked like a small amigurumi pouch: a round base that grows upward.
- Start a rounded base:
First, make a magic ring and crochet 6 single crochets into the ring. Next, increase evenly in the round to create a flat circle.
After that, continue until the base is about 6–8 cm (2.25–3.25 in) across, depending on how roomy you want the bag to be. - Build the bag walls:
Next, crochet one round in the back loops only to create a crisp turning edge.
After that, crochet single crochet rounds without increasing to build height. A good mini-bag height is often 8–11 cm (3–4.25 in), depending on preference. - Shape gently (optional heart-like strawberry look):
If a more strawberry silhouette is desired, next add a few decreases near the top to taper gently.
Meanwhile, keep decreasing evenly spaced so the top edge stays smooth. - Create the top edge:
After that, add one round of single crochet to firm the opening.
Finally, fasten off, leaving a tail for attaching leaves or a drawstring channel if desired. - Add seed details using embroidery:
Next, use white or yellow yarn to stitch small “V” seeds scattered around the front and sides.
After that, keep spacing playful but balanced—clustered seeds can look busy on a tiny bag.
Making time for bag body + seeds: 60–110 minutes
3. Additional Parts
Leaf Top (Bag Detail)
- Crochet small green leaves:
First, chain a short length and crochet back to form a leaf shape (a mix of slip stitches, single crochet, and double crochet works well). Next, make 4–6 leaves for a full strawberry top. - Attach neatly:
After that, arrange leaves in a star-like circle at the bag opening. Then, stitch them down securely so they don’t flip up too easily.
Meanwhile, keep stitches hidden under the leaf base for a clean look.
Making time for leaf top: 20–35 minutes
Handle / Strap
- Choose a strap style:
First, decide whether the bag will be a keychain, wristlet, or crossbody:- Keychain loop: chain 18–25 cm (7–10 in) and slip stitch back for strength
- Wrist strap: chain 25–35 cm (10–14 in) and single crochet back
- Crossbody strap: chain 90–120 cm (35–47 in) and single crochet back
- Reinforce for durability:
Next, add a second pass of slip stitches along the strap if extra firmness is needed.
After that, attach to the bag sides with multiple stitches, because the traps take the most pulling.
Making time for strap: 15–35 minutes
4. Accessories & Details
- Decorative edging for the sleeve:
First, add a border round of single crochet along the top and bottom edges. Next, try a tiny picot edge for a cute finish, but keep it subtle so the sleeve stays functional. - Enhance bag details:
After that, add a small embroidered smile, a tiny flower, or a lighter-colored “highlight” stitch to make the strawberry look extra sweet.
Meanwhile, keep additions to a minimum so the bag doesn’t feel bulky.
Making time for accessories/details: 15–30 minutes
Assembly & Final Look
- Attach the leaf top and strap securely:
First, sew leaves onto the bag opening. Next, attach the strap ends to opposite sides using tight whip stitches.
After that, tug lightly to test strength and add a few extra stitches if anything shifts. - Shape the bag evenly:
Next, smooth the base with your hands so it sits flat. After that, lightly steam-block acrylic only if needed (avoid overheating), or finger-shape cotton for a natural finish. - Adjust sleeve fit if needed:
Finally, test the sleeve on a cup. If it slides, seam slightly tighter or add a button closure. If it feels too snug, switch to a slightly larger hook or add one extra repeat row.
Special Features
- Cute strawberry-inspired design: cheerful, recognizable, and giftable
- Functional cup sleeve: helps with heat protection and grip
- Lightweight, portable mini bag: small but useful for essentials
- Handmade aesthetic with textured stitches: cozy look that stands out
Sizing Tips
- Adjust the sleeve foundation chain for different cup sizes:
First, wrap the chain around the cup before starting rows. Next, make sure it stretches slightly but doesn’t gap. - Use a thicker yarn for a larger size:
After that, a thicker yarn automatically makes a bulkier sleeve and a bigger bag. - Use a smaller hook for tighter results:
Next, smaller hooks make the mini bag sturdier and prevent gaps, which is especially helpful for holding small items. - Simple scaling for the mini bag:
Finally, increase the base circle width and add a few extra wall rounds to make a larger pouch.
Finishing Tips
- First, keep edges smooth by chaining evenly and turning at the same point each row.
- Next, weave in ends by traveling through multiple stitches and changing direction once for security.
- After that, maintain even tension, especially on the sleeve, so it hugs the cup nicely.
- Finally, hide strap knots inside the bag edge or under leaves for a polished finish.
Common Mistakes to Avoid
- Incorrect sleeve sizing:
First, avoid guessing the chain length. Next, measure the cup and subtract a small amount for snugness. - Uneven stitch tension:
After that, pause occasionally and check whether rows look consistent. Meanwhile, switching hook size slightly can fix tight hands. - Skipping stitch counts:
Next, count at the end of every bag round, especially while increasing the base. A stitch marker helps prevent accidental shrinking or widening. - Loose attachment of bag parts:
Finally, sew leaves and straps with multiple passes. Bag accessories get tugged often, so strong stitching matters.
Variations & Customization Ideas
- Different fruit designs:
First, swap strawberry colors for a watermelon theme (pink + green stripes) or a lemon theme (yellow body + green leaf top). Next, add tiny embroidered seeds to match. - Change colors for aesthetic themes:
After that, try neutrals for a minimalist set, pastels for a soft,t cute look, or bold colors for a playful style. - Add beads or embroidery:
Later, add a few beads to the sleeve edge or stitch little hearts onto the bag for extra personality. - Make matching sets:
Finally, create a second sleeve and bag in a different fruit color so the set feels like a full mini collection.
Tutor Suggestions for ( Crochet Cup Sleeve and Bag)
First, focus on the cup sleeve’s fit, because a snug sleeve looks neat and stays in place. Next, use stitch markers and count often for the mini bag base, because clean increases create a smooth strawberry shape. After that, take time placing the leaf top, since careful arrangement makes the bag look professionally finished. Finally, keep creativity open. Small changes in edging, strap style, and seed placement can make the set feel truly unique.
Conclusion
This Crochet Cup Sleeve and Bag Pattern set combines everyday usefulness with a cheerful amigurumi twist. First, the cup sleeve adds comfort and style to daily drinks, and next, the strawberry mini bag brings a cute handmade detail that’s easy to carry anywhere. Finally, with simple stitches and flexible sizing, this beginner-friendly project becomes a fun gift, a sweet accessory, and a cozy crochet win.