Exceptional Crochet Laboon from One Piece Fun Amigurumi Pattern
Crocheting Laboon from One Piece is the coziest way to mix anime love with a relaxing yarn project. If you’ve been looking for an easy amigurumi whale pattern, a beginner-friendly crochet tutorial, or a cute One Piece crochet character, this little Laboon is a perfect make.
If you’ve ever wanted to crochet a character from your favorite anime, Laboon is such a fun place to start. Laboon, the cheerful whale from One Piece, has a simple shape that translates beautifully into amigurumi mostly rounds of single crochet, a few increases and decreases, and a bit of stitching at the end.
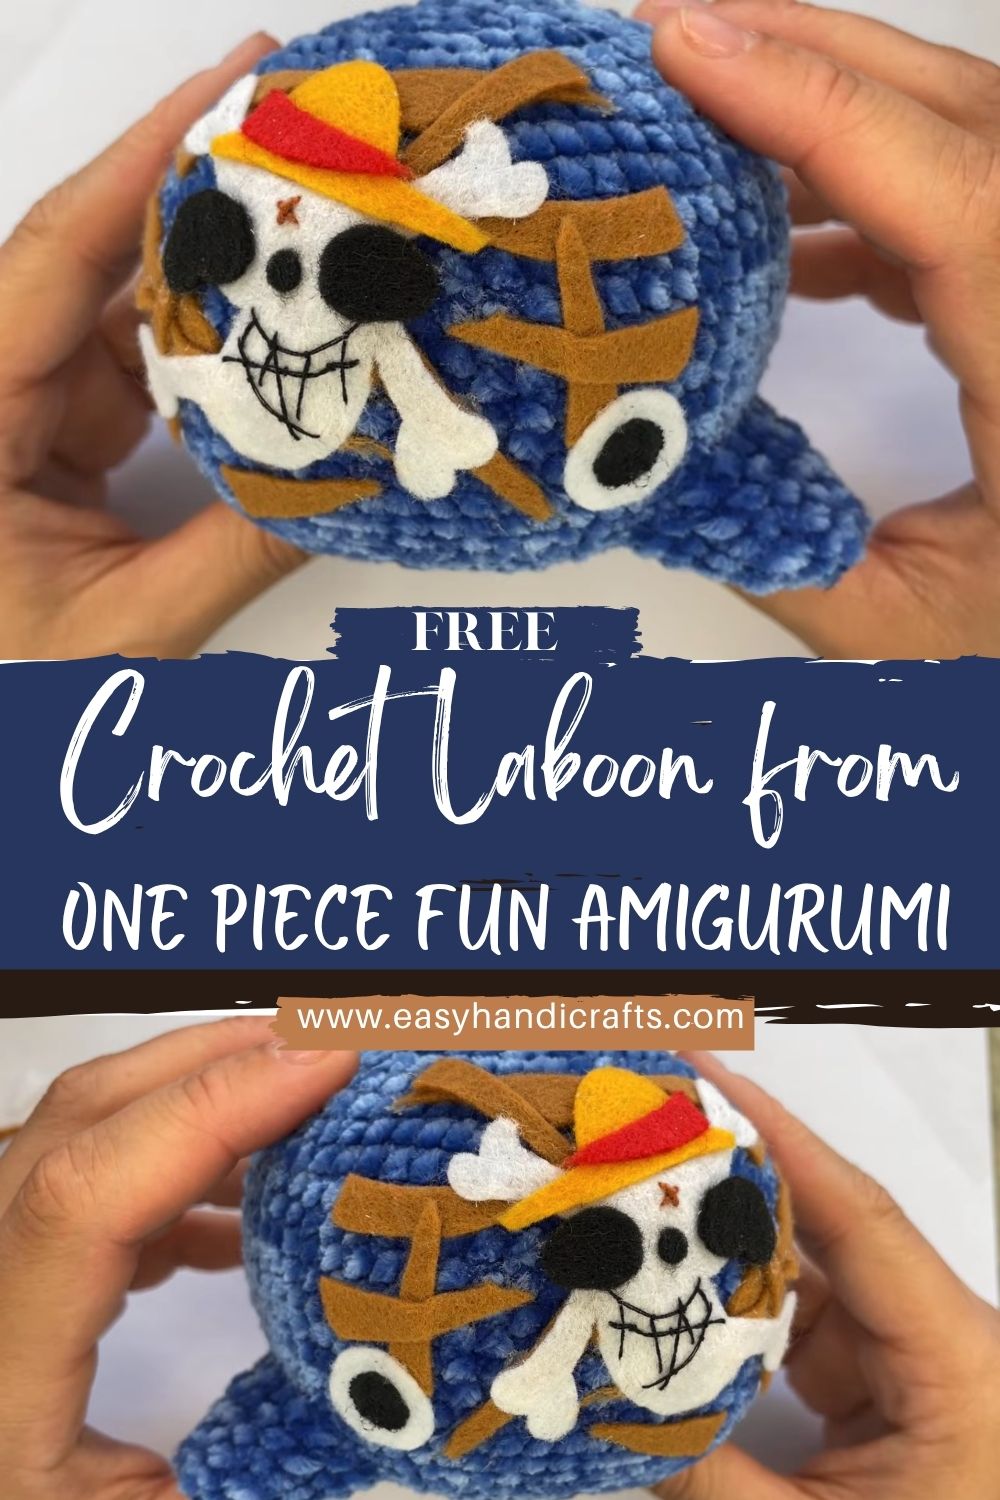
In this beginner-friendly tutorial, we’ll go step by step so you can crochet your own Laboon amigurumi without feeling overwhelmed. First you’ll make the round body, then you’ll add the tail and fins, and finally you’ll bring him to life with eyes and a sweet embroidered smile. Along the way, I’ll share small tips that make your stitches neater and your shaping smoother especially helpful if you’re still getting comfortable with amigurumi.
Materials Needed
- Yarn Type & Weight: Medium-weight yarn (worsted weight)
- Main color: blue (or your preferred Laboon shade)
- Accent color: white/cream for the belly (optional)
- Small amount of black/gray for details (optional)
- Hook Size: 3.5mm or 4mm crochet hook
- Safety Eyes: 12mm black safety eyes
- Stuffing: Polyester fiberfill
- Notions: Stitch markers, yarn needle, scissors
- Optional: Keychain ring (if you want a mini bag charm version)
Skill Level
Difficulty: Beginner / Easy
You’ll mainly use: magic ring, single crochet, increases, decreases, simple assembly, and basic embroidery.
Making Time
Approximate time: 3–4 hours, depending on your crochet speed (and how often you stop to admire how cute he’s getting).
Before You Start: Quick Stitch Guide
- MR = magic ring
- sc = single crochet
- inc = increase (2 sc in one stitch)
- dec = decrease (invisible decrease recommended)
- Work in continuous rounds (spiral), and use a stitch marker to track the first stitch of each round.
Part A: Body (The Big Round Whale Shape)
Start the Base
First, make a magic ring and crochet in single crochet (sc) to begin a flat circle.
- Round 1: MR, 6 sc (6)
- Round 2: inc around (12)
- Round 3: (sc, inc) around (18)
- Round 4: (2 sc, inc) around (24)
- Round 5: (3 sc, inc) around (30)
- Round 6: (4 sc, inc) around (36)
Next, you’ll keep growing the circle until it feels wide enough for a chubby whale body.
- Round 7: (5 sc, inc) around (42)
- Round 8: (6 sc, inc) around (48)
Tip: If your circle starts to ripple, your increases may be too many too quickly. Meanwhile, if it bowls in, loosen tension slightly.
Form the Shape
Now the body needs length. Crochet even rounds (no increases) to build that classic whale shape.
- Rounds 9–16: sc around (48)
At this stage, pause and check the proportions. If you want a longer Laboon, add 1–3 extra rounds here.
Begin Closing + Add Stuffing
Later, you’ll decrease to close the opening. Start stuffing before the hole gets too small.
- Round 17: (6 sc, dec) around (42)
- Round 18: (5 sc, dec) around (36)
- Round 19: (4 sc, dec) around (30)
- Add stuffing firmly, shaping as you go
- Round 20: (3 sc, dec) around (24)
- Round 21: (2 sc, dec) around (18)
- Round 22: (sc, dec) around (12)
- Round 23: dec around (6)
Finally, fasten off, close the opening with a needle, and weave in the end.
Safety Eyes Placement
Place 12mm safety eyes between roughly Rounds 11–13, about 7–9 stitches apart (adjust to your preferred expression). If you want a cuter “baby” look, set them slightly wider. If you want a happier cartoon look, set them a little closer.
Part B: Tail (Simple, Cute, and Sturdy)
Crochet the tail separately and sew it on the back.
- Round 1: MR, 6 sc (6)
- Round 2: inc around (12)
- Round 3: (sc, inc) around (18)
- Rounds 4–5: sc around (18)
- Round 6: (sc, dec) around (12)
- Round 7: sc around (12)
Fasten off, leave a long tail for sewing.
Shape tip: Gently pinch the tail piece so it looks a bit fin-like before stitching it down. Then sew it onto the back of the body, centered.
Part C: Fins (Make Two)
Fins are quick and forgiving. Make 2 and attach them symmetrically.
- Round 1: MR, 6 sc (6)
- Round 2: (sc, inc) around (9)
- Round 3: sc around (9)
- Round 4: (sc, dec) around (6)
Fasten off, leave a long tail for sewing. Lightly flatten each fin, then stitch one on each side of the body around the midsection.
Part D: Face Details + Assembly
Add a Happy Smile
Using black embroidery thread or thin black yarn:
- First, make a small curved smile under the eyes.
- Next, add tiny “cheek” stitches if you want extra sweetness.
Go slowly here—small stitches look cleaner than long ones. If you don’t love the smile, gently pull it out and redo it. Embroidery is super adjustable, and it’s worth taking your time.
Final Assembly Check
Meanwhile, check balance before you tie everything off:
- Do the fins match height and angle?
- Is the tail centered?
- Is the face looking forward (not tilted)?
When you’re happy, knot securely on the inside and weave in every end.
Special Features & Customization Ideas
Texture Ideas
- Smooth yarn gives Laboon a clean, cartoon finish.
- Slightly textured yarn can make him look more plush and huggable.
Accessories (One Piece Twist)
- Add a tiny pirate hat, a mini bandana, or even a little anchor charm stitched to his side.
- If you’re making a keychain version, sew a small loop on top and attach a keyring.
Sizing Tips
- Bigger Laboon: use thicker yarn + a larger hook (and add a few body rounds).
- Smaller Laboon: use thinner yarn + a smaller hook (keep tight tension so stuffing doesn’t show).
Finishing Tips (For a Neat, Polished Look)
- Keep tension even: This prevents gaps and gives a smooth surface.
- Stuff gradually: Add small amounts, then shape with your fingers. Overstuffing can stretch stitches, so aim for “firm but not bursting.”
- Secure your parts well: Tail and fins get tugged the most, so stitch them down with multiple passes.
Common Mistakes to Avoid
- Incorrect stitch count
Count at the end of each round. If you miss one increase early on, the body shape can turn lumpy later. - Very tight tension
Tight stitches can make it hard to insert your hook and can warp the shape. Try relaxing your grip a little, especially when decreasing. - Waiting too long to stuff
If the opening gets too small, stuffing becomes a struggle. Add stuffing earlier, then top it off as you close.
Variations & Fun Ideas
- Color changes: Make a pastel Laboon, a deep navy Laboon, or even a “galaxy whale” version with speckled yarn.
- Expressions: Add sleepy eyes (embroidered), excited eyebrows, or tiny blush marks for different moods.
- Theme builds: Turn Laboon into a holiday whale with a scarf, or a summer whale with a little beach hat
Tutor Suggestions (Beginner-Friendly Tips)
Take your time and enjoy each step. First focus on keeping your rounds neat, then worry about perfect symmetry during assembly. A stitch marker helps so much, and breaks are totally part of the process—especially if your hands get tired.
Conclusion
Now you’ve finished your very own crochet Laboon from One Piece a friendly little whale that’s cute, beginner-friendly, and surprisingly quick to make. Whether you keep him for yourself, turn him into a keychain buddy, or gift him to a One Piece fan, he’s sure to bring a smile the moment someone spots him. Happy crocheting!If you share your finished Laboon online, tell me what colors you used and whether you added any fun One Piece accessories I’d love to hear how you customized yours.